PIR - Project InBox and Routing
Contents
Overview
Project InBox and Routing (PIR) is the Scenario electronic version of the 'post office mailbox' - basically where every incoming Communication for your Company are received and placed for subsequent processing or routing to specific internal Users.
Every Company on the project will have its own Project InBox.
PIR is Company focused and generally, it is the Company Document Controllers who are responsible for monitoring and performing initial action.
Note - often Communications (Correspondence, RFIs, Drawing Transmittals) are sent to the Company as well as the Company Staff as Cc. Even though multiple paths used for delivery, only one copy or 'row' appears on the InBox page.
When is a Document delivered to the Project InBox?
Communications are only delivered to the Recipient Project InBox when the Communication Document is Published by the Sender (i.e. Originator / Sender changes Document Status to say, 'Issued' - which is defined in the Instant Install configuration as Published). Prior to that point, the Communication Document is private and only visible to the Originating Company.
Once a Document is received in the Project InBox, it is then normally ‘routed’ to the appropriate staff for action or for information. You are able to configure your Routing Lists to facilitate this process. Once a Document has been Routed, then it is considered ‘Actioned’ to enable easier grouping between new documents arriving and already under processing documents. Actioned does not mean closed out, but does mean actions should be underway.
Note – important benefit. The Project InBox is the complete history at any point of all incoming communications to your company. Example - you are able easily to inquire on different types of documents by selecting Register and also an originating party.
Screen Explanation
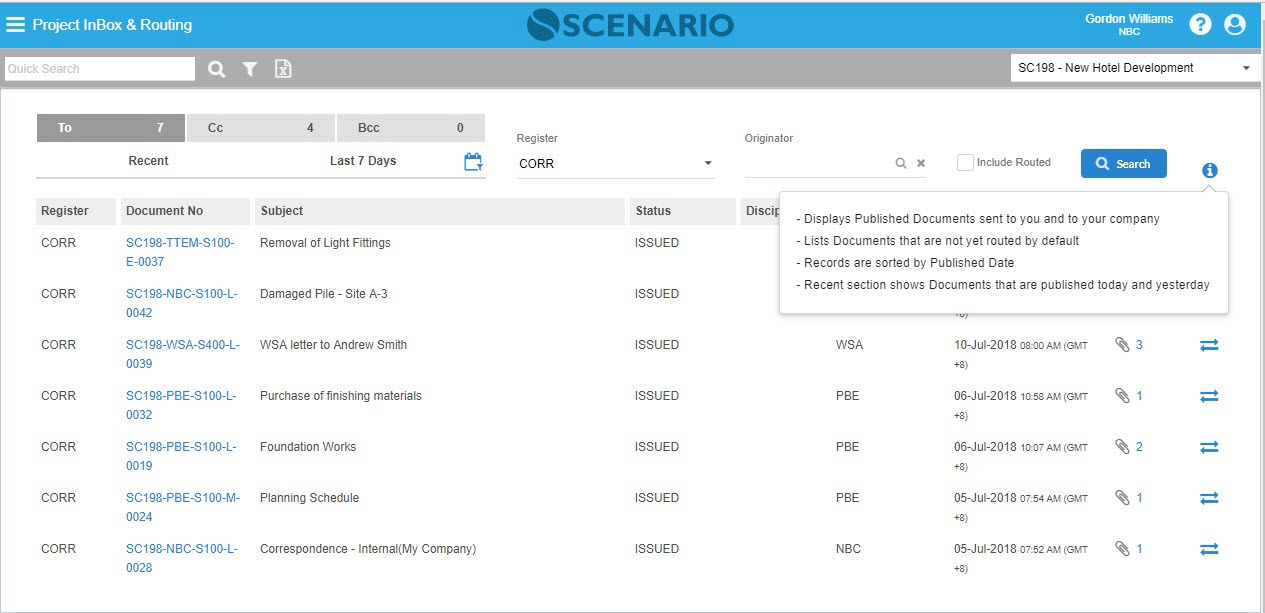
PIR screen Information
PIR screen displays Published Documents sent to the logged-in User or to the logged-in User's Company.
- Published Documents including those flagged as Closed
By default, PIR displays the list of Documents that not yet routed.
Listed Documents are sorted by Published Date-newest on top and oldest at the bottom.
'Recent' section shows Documents that are Published Today ad Yesterday.
The default display is showing on top the latest Published Document directed at the Company in To. Likewise, by default In Box lists 'Recent' (Today & Yesterday) rows that are not yet actioned.
Documents that are already 'Actioned', i.e. Routed, are not displayed unless 'Include Actioned' checkbox is set to True.
.png?inst-v=d925b16b-549c-4ccf-ae5e-650f86076864)
Field/Icon | Description |
|---|---|
Quick Search Field | Top of the Page Quick Search field |
| Filter icon | Top of the Page Filter icon; this includes Registers, Status and Contact Lookup (To/Cc) and Include Actioned checkbox |
| Export icon | Use to export the displayed Documents into excel file. |
| Project Filter | Use to filter the display of Documents by Project. By default, the displayed Project is the logged-in User's 'Last Project' used. |
| To/Cc/Bcc Tab Count | Tabs that will show how many documents are into the category of To/Cc/Bcc depending on the filters used |
| Recent Tab Filter | Recent = Today + Yesterday. This is the default display. |
| Last 7 Days Tab Filter | A quick option to filter other than Recent that will list out rows in the last 7 days |
| Date Filter icon | Include options such as Today, Yesterday, Last 7 Days, Last 14 Days, Last 30 Days and Date Range |
| Register Field | Use to filter the search by Register. |
| Originator Field | Use to filter the search by Originator. |
| Include Routed check-box | When ticked, this will retrieve all rows for the selected date range and will also show those already Routed. This is by default not ticked. |
| Search | When clicked, the search process is carried out. |
| Info icon | When hovered, displays information regarding the InBox page. |
| Columns: | |
| Register | Displays what Register the Document belongs to. |
| Document No | A hyperlink that when clicked displays option to open the document in New Browser Tab or Existing Browser Tab |
| Subject | Pertaining to the Document Subject. |
| Status | Published Status of the Document. |
| Discipline | The Discipline of the Document (if any). |
| Originator | The Originator of the Document - every Document has an Originator. |
| Published Date | Date when the Document was set to Published. Note – that this is a key audit record as only at that point were the receiving parties able to see, action and start to respond. Where a Document has a separate manual Issued Date entered by the Originator, you should check for any differences to the Published Date. |
| Attachment(s) | Attachment icon and link that shows the count of the uploaded files. Attachment hyperlink can be downloaded. |
| Routing icon | This icon signifies that the Document is still to be Actioned. To Action the Document, at least one Routing has to be done. |
| Check icon | Indicates that the Document was Actioned already. Actioned = Document has been Routed already. |
Pop-up and Header Filter options:
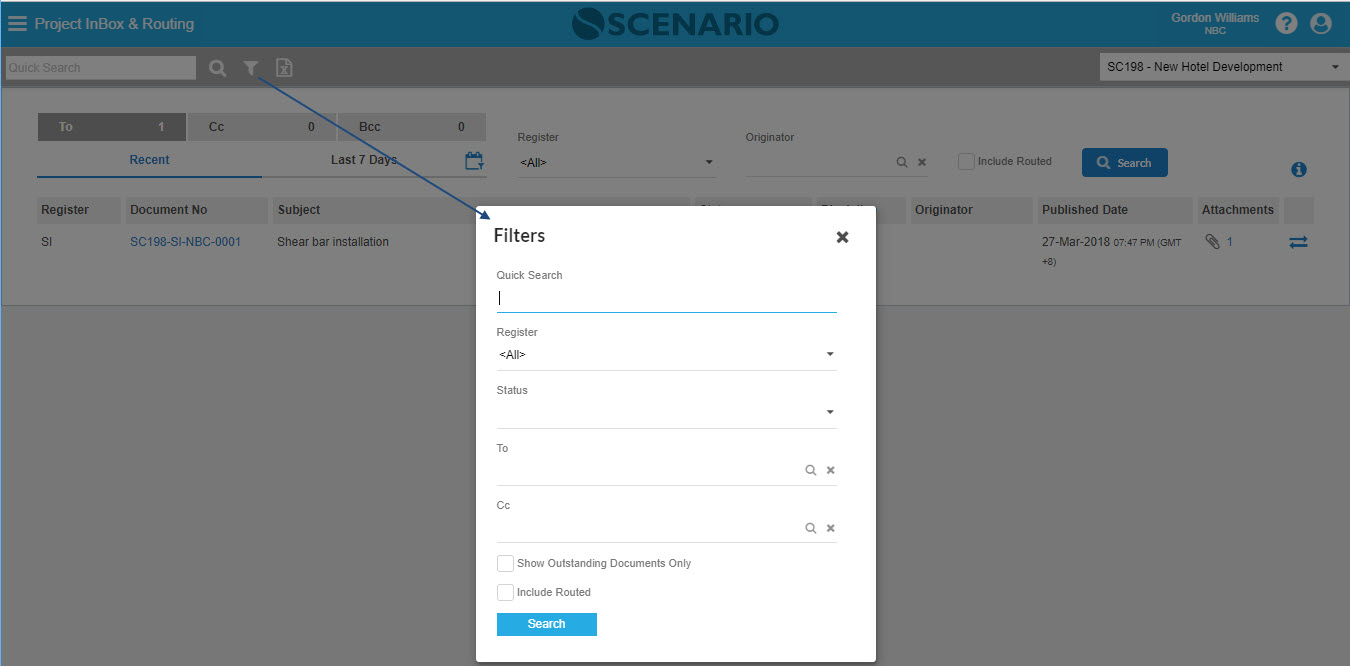
Filter Fields/Icons | Description |
|---|---|
Filter options in the Action bar/header and in pop-up screen: | |
| Quick Search | A free text field that can be used to search for documents/files. |
Register | Register selection to filter the rows. |
| Status | Display of Statuses is based from the selected Register. |
| To | Recipient set as To - could be Company or Company + Individuals. |
| Cc | Recipient set as carbon copy - could be Company or Company + Individuals or Individuals. |
| Show Outstanding Documents | The default display is not ticked. When ticked, this will display rows that are set to be Outstanding. Outstanding is defined on each Register Statuses to flag Documents that still requires action, review or approval prior to closing out. |
| Include Routed | The default display is not ticked. When ticked, this will retrieve all rows for the selected date range and will also show those already Routed. |
Date Filter options:
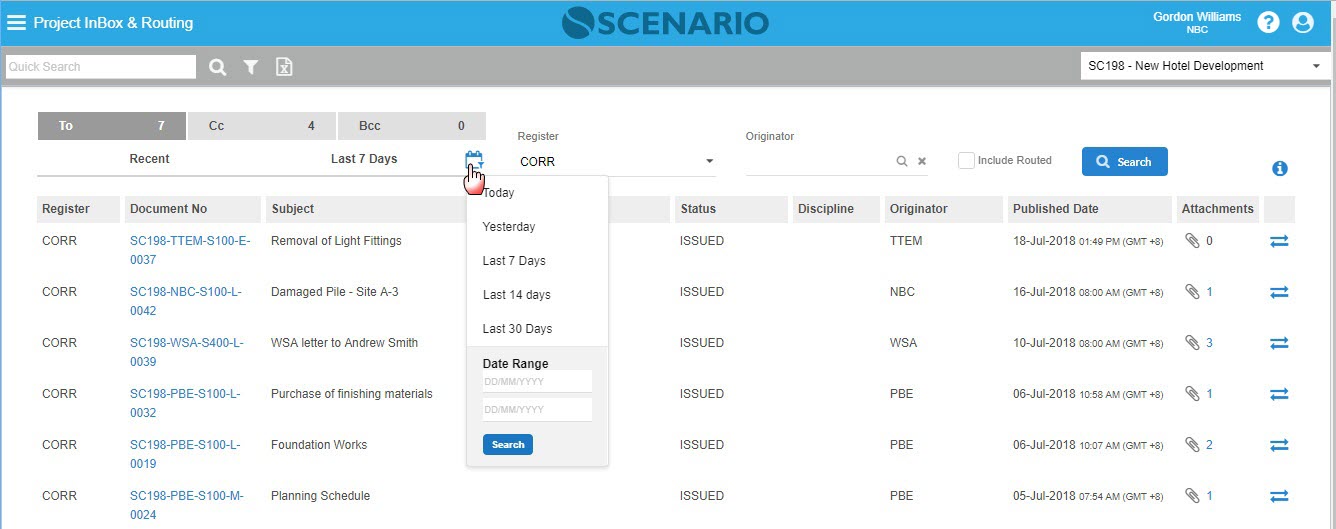
Filter | Description |
|---|---|
| Date Filter options: | |
| Today | Will list Published documents not yet Actioned for Today |
| Yesterday | Will list Published documents not yet Actioned for Yesterday |
| Last 7 Days | Will list Published documents not yet Actioned for the last 7 days |
| Last 14 Days | Will list Published documents not yet Actioned for the last 14 days |
| Last 30 Days | Will list Published documents not yet Actioned for the last 30 days |
| Date Range | Date selector for Date From and To |
Recipients
Recipients are directly linked to the logged in AuthUser Parent Contact who can be:
1 - Company Name – and AuthUsers with that Parent Company Contact.
2 - Individual with the Company Parent Contact but is not an AuthUser.
3 - Individual with the Company Parent Contact and an AuthUser.
Security
1 - AuthUser with access to Project In Box can see Documents rows on display when the security is applicable to the User's Company and opening Document restrictions as normal.
2 - If the AuthUser does not have access to Confidential, Financial or Private, then cannot open the Document. The Document Controller can see these classes of documents and have the ability to Route the Document but cannot open it.
Routing Security applied to PIR (Project InBox & Routing) - i.e. Documents will not be shown as routed when the security is not applicable to the User's Company:
1 - A green tick will appear if the document is routed to a Public routing list
2 - A green tick will appear if the document is routed to Project Team Routing List and the logged-in User is a member of the Project Team
3 - A green tick will only appear if the document is routed to My Company and the logged-in User belongs to the company the document was routed to. The routed document associated with the User's Company will then be opened when the green route tick is selected.
How Do I?
How Do I Action the Published Document in Scenario Enterprise In Box?
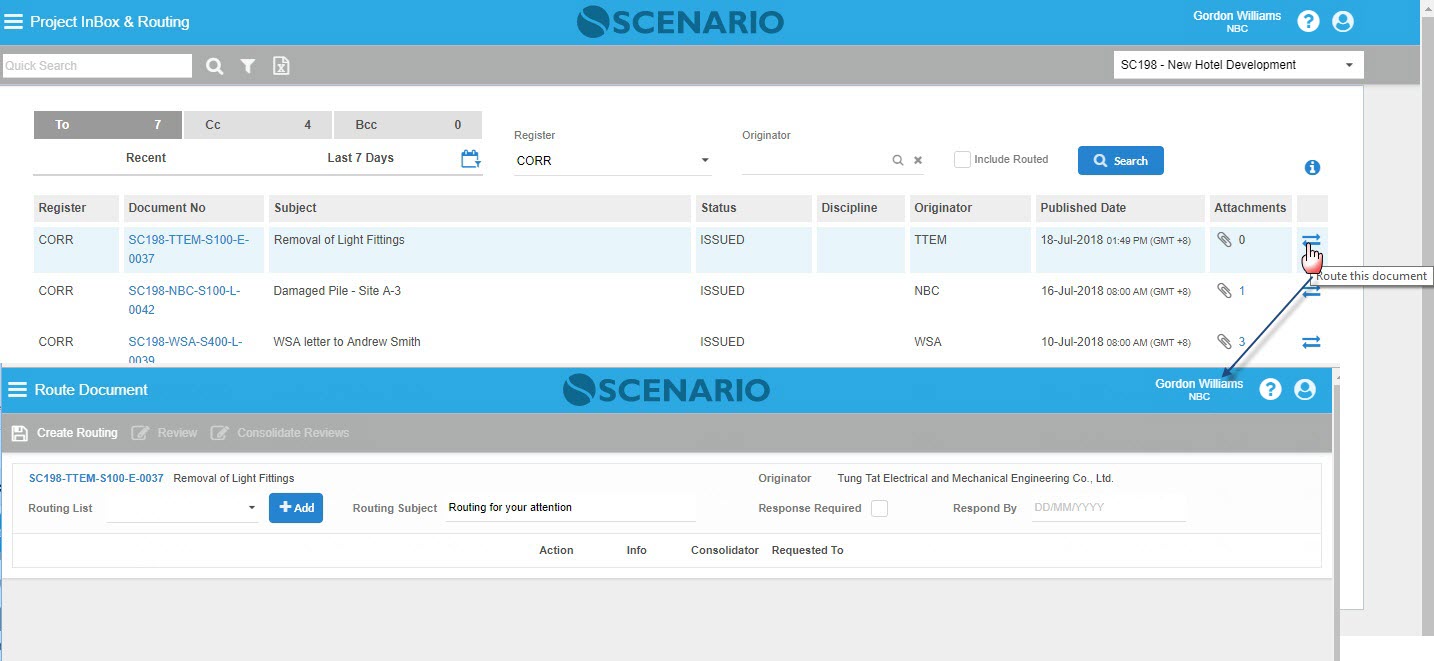
1. Click the Routing Icon |
|---|
|
Clicking the Route Document icon will open the Route Document Page directly into a new Browser tab to initiate the route and it will automatically display the details such as the Document No., Subject, Originator, and Attachments. |
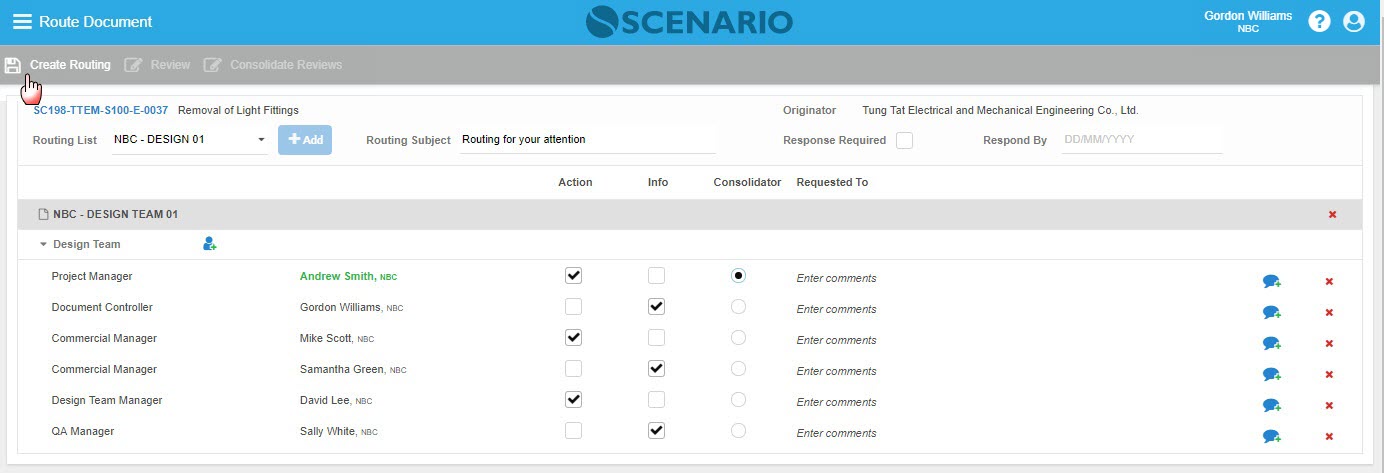
| 2. Select the Routing List and the Recipients who are for Action or for Info only |
|
Once desired Recipients are selected, comments can also be added to specific User. Click Create Routing to proceed with the Routing process. For further and elaborate steps in Routing please go to this link Routing / Distribution. |
How Do I Download an Attachment?
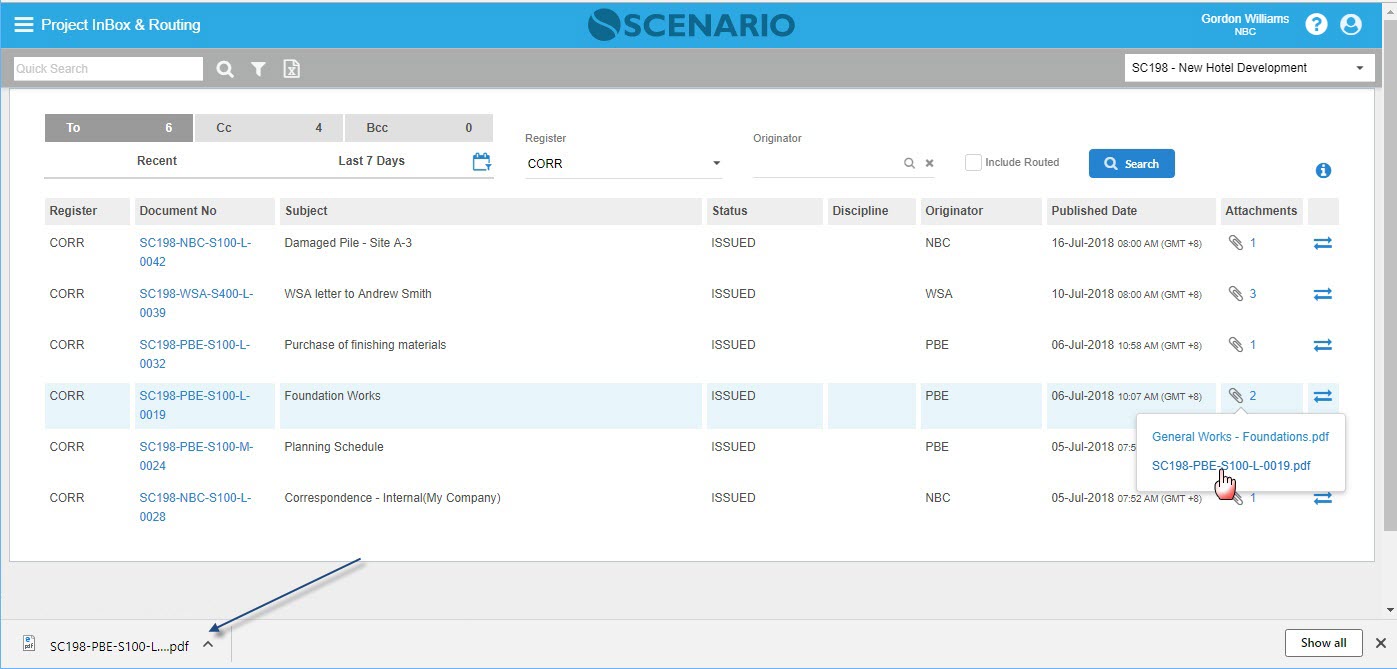
1. Select a File to be downloaded |
|---|
|
Attachment can be downloaded by clicking the attachment icon and selecting the filename (hyperlink). |
Examples of Use
Sample Filtered rows with already Actioned document
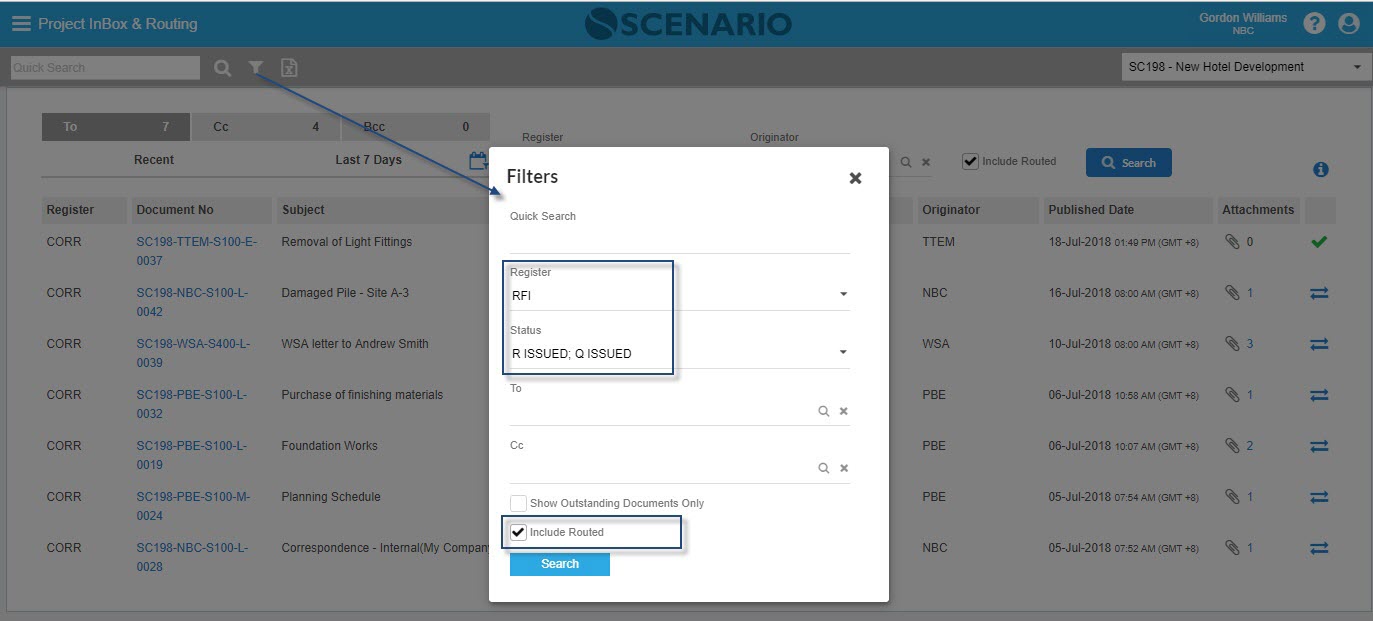
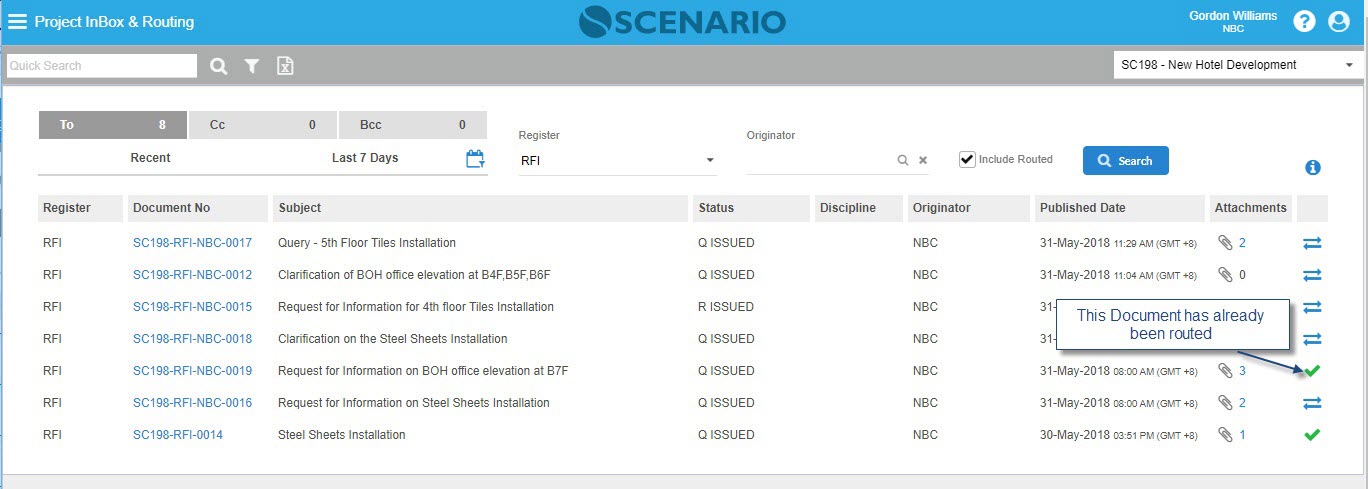
Once routed, the document record in the Project Inbox will be marked as routed (green tick/check).

