Routing / Distribution
Contents
Overview
Routing is also known as 'Distributing one Document'. It is, therefore, the distribution of a Document amongst the Project Team, i.e. 'Internal to Project' Users and not to External Parties, and directed to Users and not to a Company. Most often, an AuthUser consolidates feedback and take some Action to respond.
Routing functionality is visible in several screens:Users
- TS- Today's Status screen
- MI - My InBox screen
- PIR - Project InBox & Routing
- Document Form Routing tab
Screen Explanation
Routings Table View in Document Form
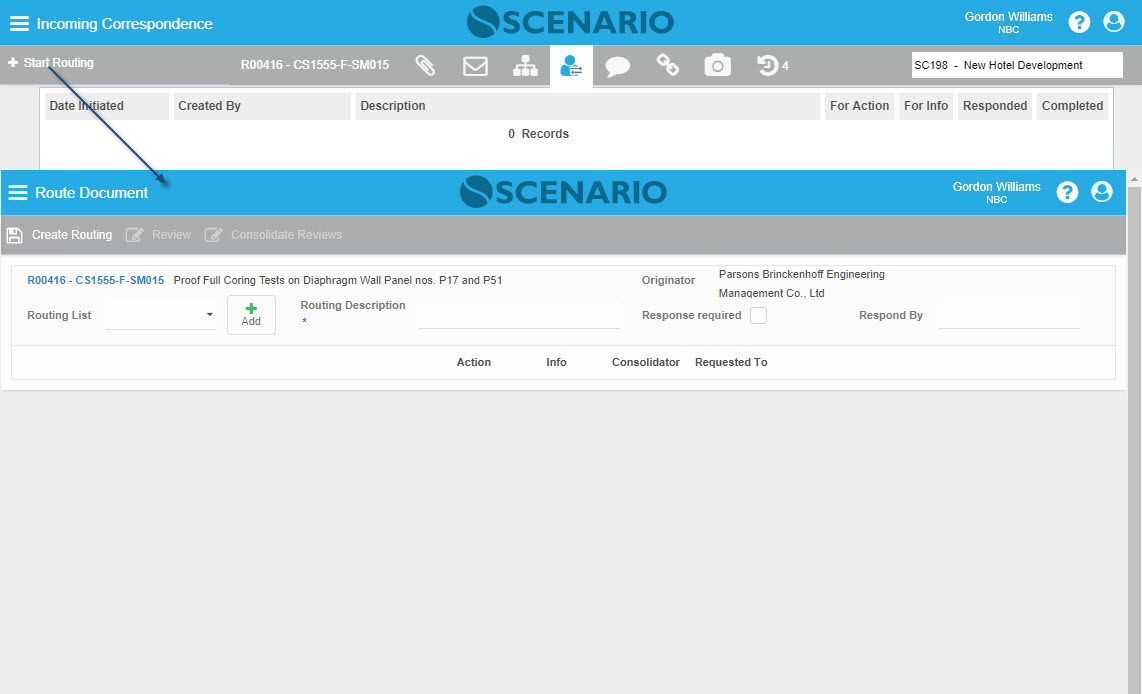
A tab for 'Routing' can be found under Scenario Enterprise form. Where there are more than one Routing initiated, the Table view shows the current 'Routings' raised for the selected Document. However, where there is only one Routing (normally), the single Routing will be displayed instantly.

Field/Column | Description |
|---|---|
Date Initiated | Date wherein the Routing of Document has been initiated. |
Routing Description | Subject of Routing |
| For Action | Count of the AuthUsers set to take Action |
| For Info | Count of the AuthUsers that are For Info only |
| Responded | Count of the AuthUsers who responded already |
| Complete | Identifies if the Routing is finished already or still in progress. |
Routing is categorised by either For Review or Not for Review depending on the source Transmittal Document if Action/Purpose is Active = True or False.
Below is a sample Routing for Review (e.g. Drawings for Review)
In this example, the selected Action/Purpose in Transmittal is with AttributeConstant equals to 2 (review)
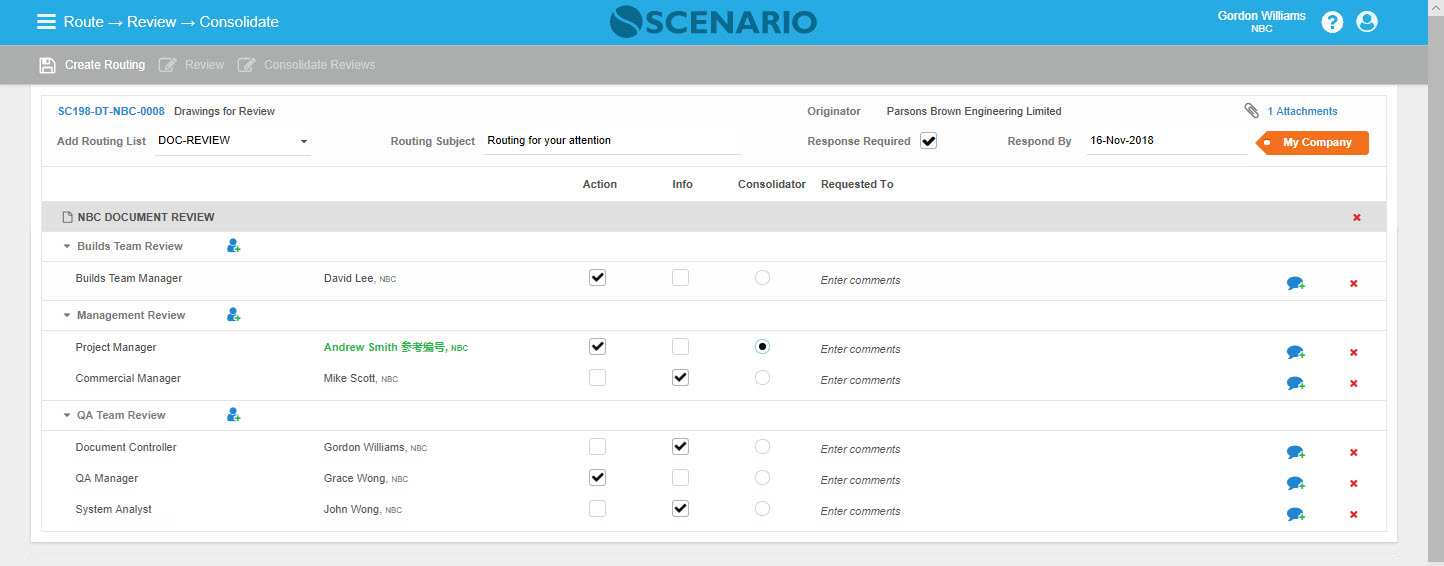
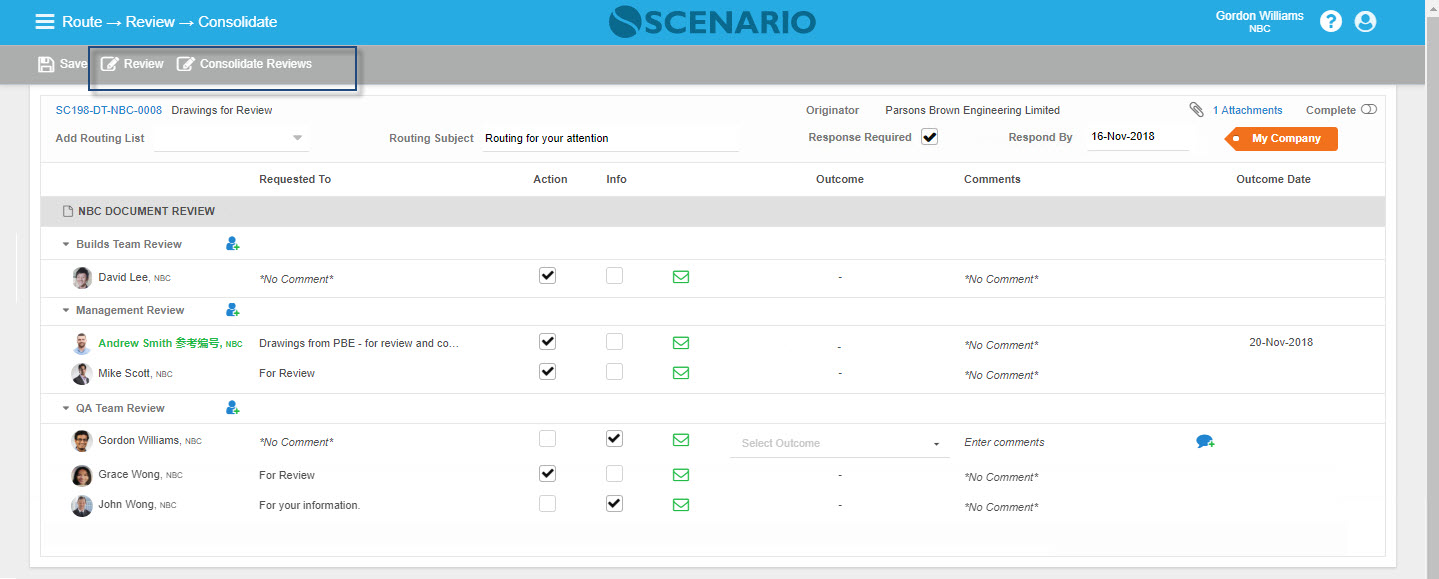
After creating a Routing, Review and Consolidate Reviews buttons in the Action bar get enabled.
Note - A label for the applied 'Restricted To' will be displayed on the Create Routing or Action Route screens depending on the what Routing List Security has been set for the selected Routing List.
Below is a sample for a Non-Review Routing (e.g. Correspondence, Technical Documents, Instructions, etc.)
In this example, the selected Action/Purpose in Transmittal is with AttributeConstant with values not equal to 2 (Active); but could be 0 (Draft), 1 (Info), 3 (Comments), or 4 (IFC)
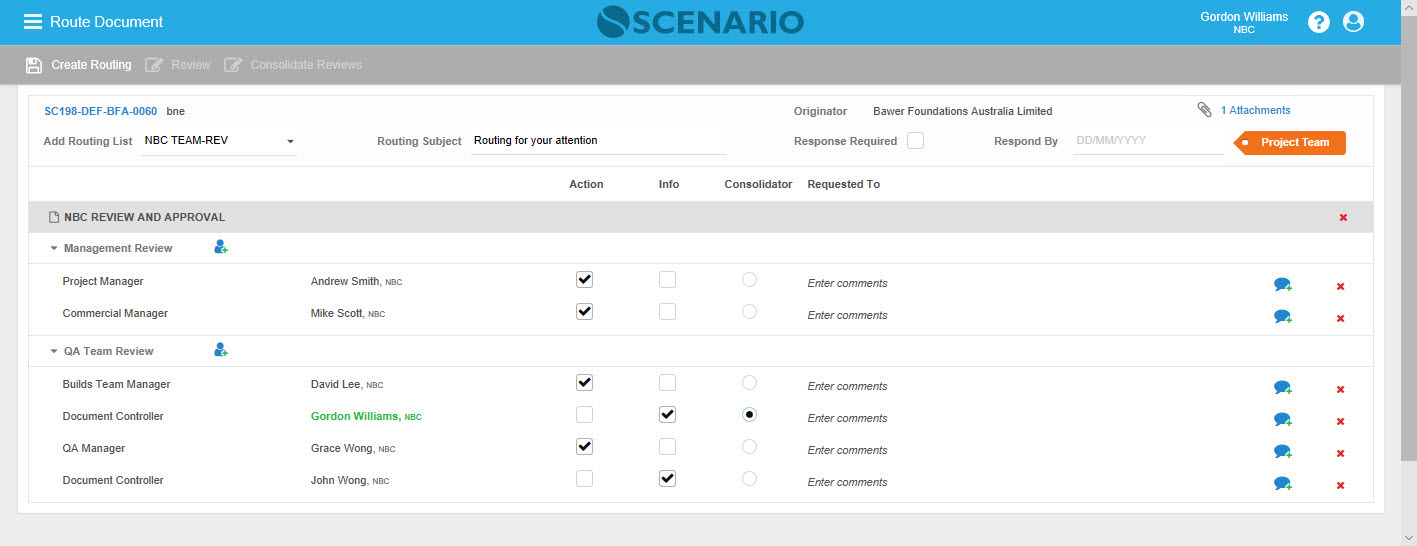
After creating a Non-Review Routing, Review and Consolidate Reviews buttons in the Action bar disappear.
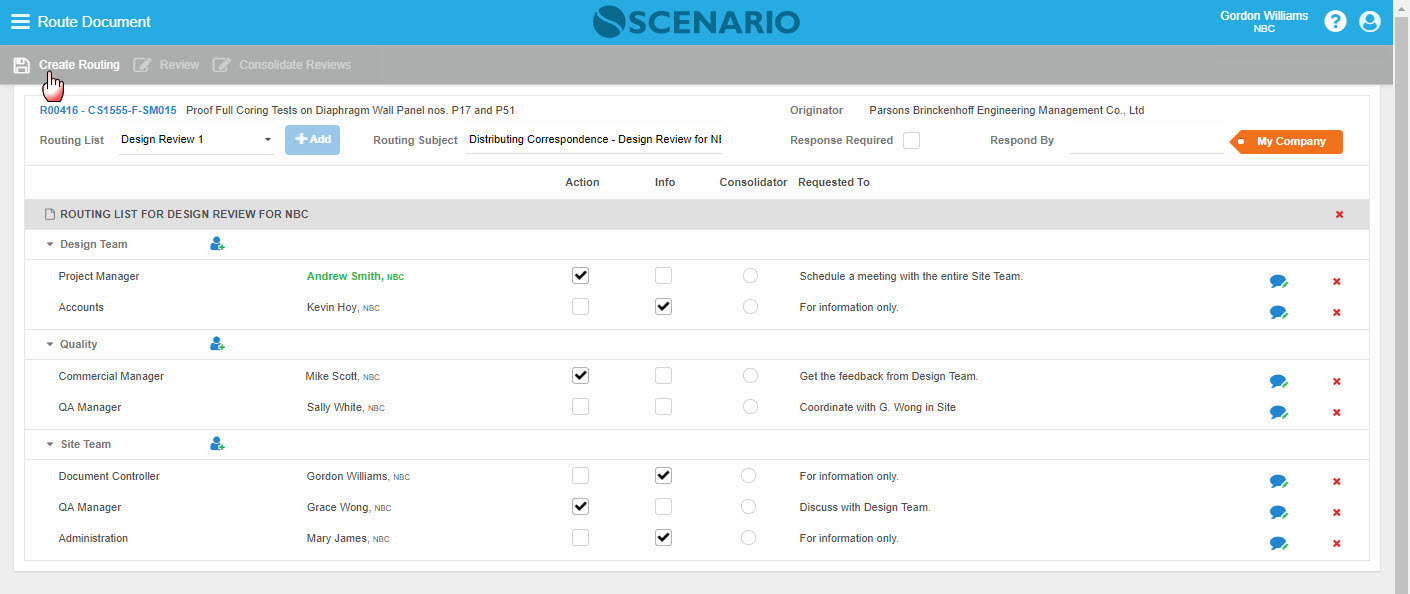
Fields/Columns/Icons | Description |
|---|---|
Document No. | The selected Document that is to be routed |
Document Subject | The subject of the Document; it automatically defaults on the screen. |
| Originator | The Originator of the Document |
| Attachments | Files attached to the Document. Can be downloaded by clicking the filename. |
| Routing List selection | List of Groups or Teams with its Member who will take Actions or For Info |
| Routing Subject | A free text field that can be entered with the Subject of the Routing. Not a mandatory field - When no subject is entered a default is displayed ' Routing for your attention'. |
| Response Required | A flag that indicates if a response is required or not |
| Respond By Date | The date that the response is due |
| Groups/Teams | List of Group or Team Names For Action Members (To) - Routed To in Today’s Status For Info Members (Cc) - Routed Cc in Today’s Status |
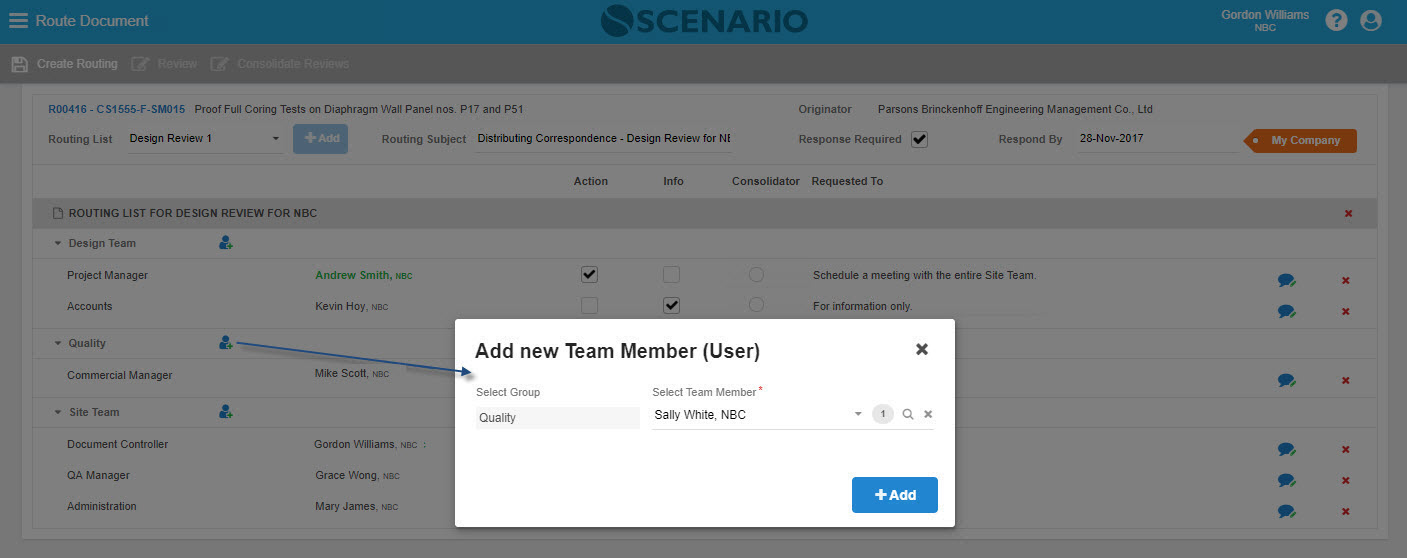
| Add New Team Member (User) Icon | By clicking this icon, it allows the User to add 'New Member(s)' in a Group or Team which will be displayed and would possibly take Action or For Info. Multiple Members/Users can be added. |
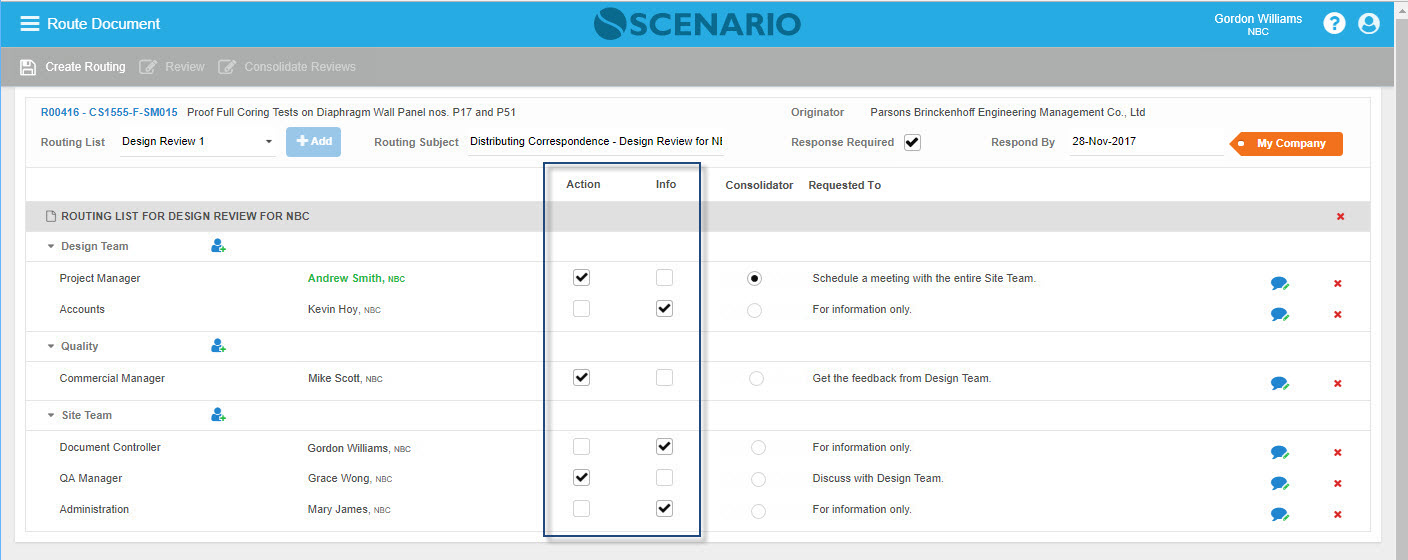
| Actions flag | Tick for Individual AuthUsers who will take Actions |
| Info flag | Tick for Individual AuthUsers who will be For Info |
| Requested To column | A direction notes/comments that can be added for specific AuthUsers |
| Add/Edit Comments icon | A pop-up dialog wherein the User can add or edit the comments. When the entered Comments is long, only a portion of the Comments will be displayed and an ellipsis will be shown. |
| Delete Icon | Used to remove Routing List or Contacts in the Routing List |
Create Routing - For Review
Note that the source Transmittal Document of this Route is with Action/Purpose = to an ActtributeConstant that is 2 (Review).
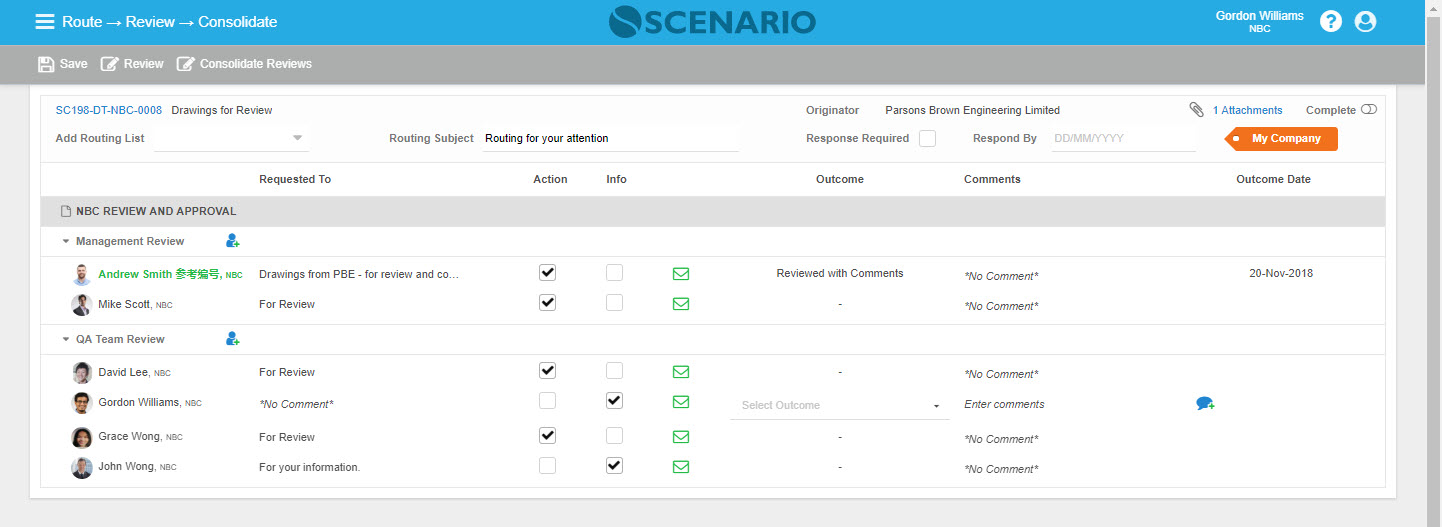
When Start Route button is clicked, the User will be redirected to Route → Review → Consolidate Review page.
The buttons/icons are presented with tool-tips to give the User the information on what the function does.
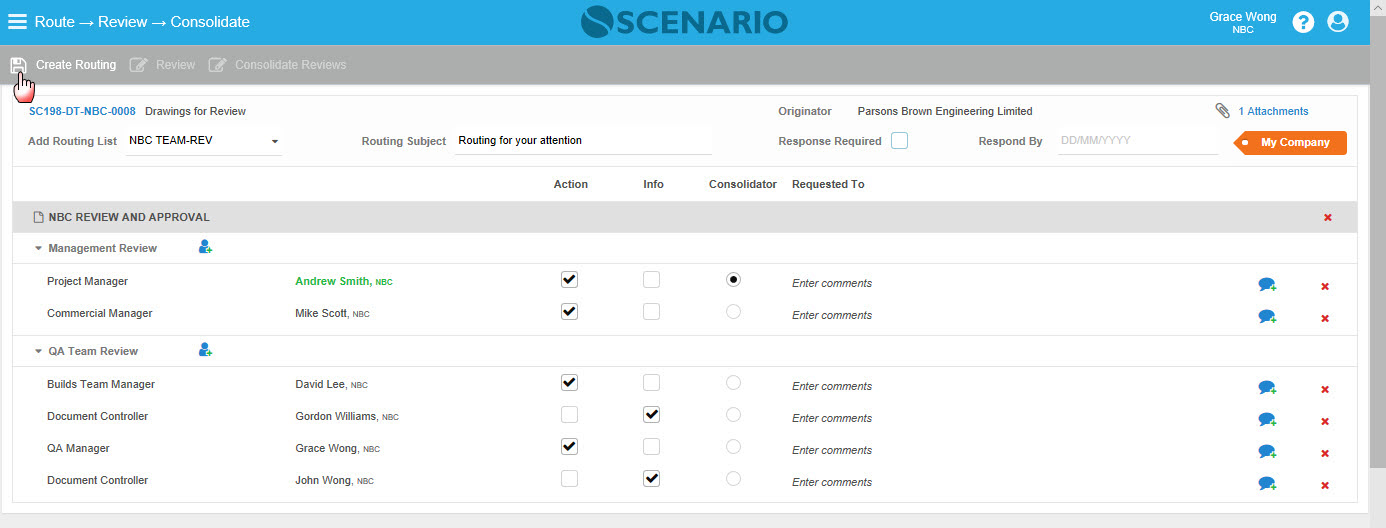
Route → Review → Consolidate
This screen is presented to Action Routing, Review Drawings and Consolidate Reviews. This series of buttons are available when the source Document is 'For Review'.
Create Routing - 'No Review' is required
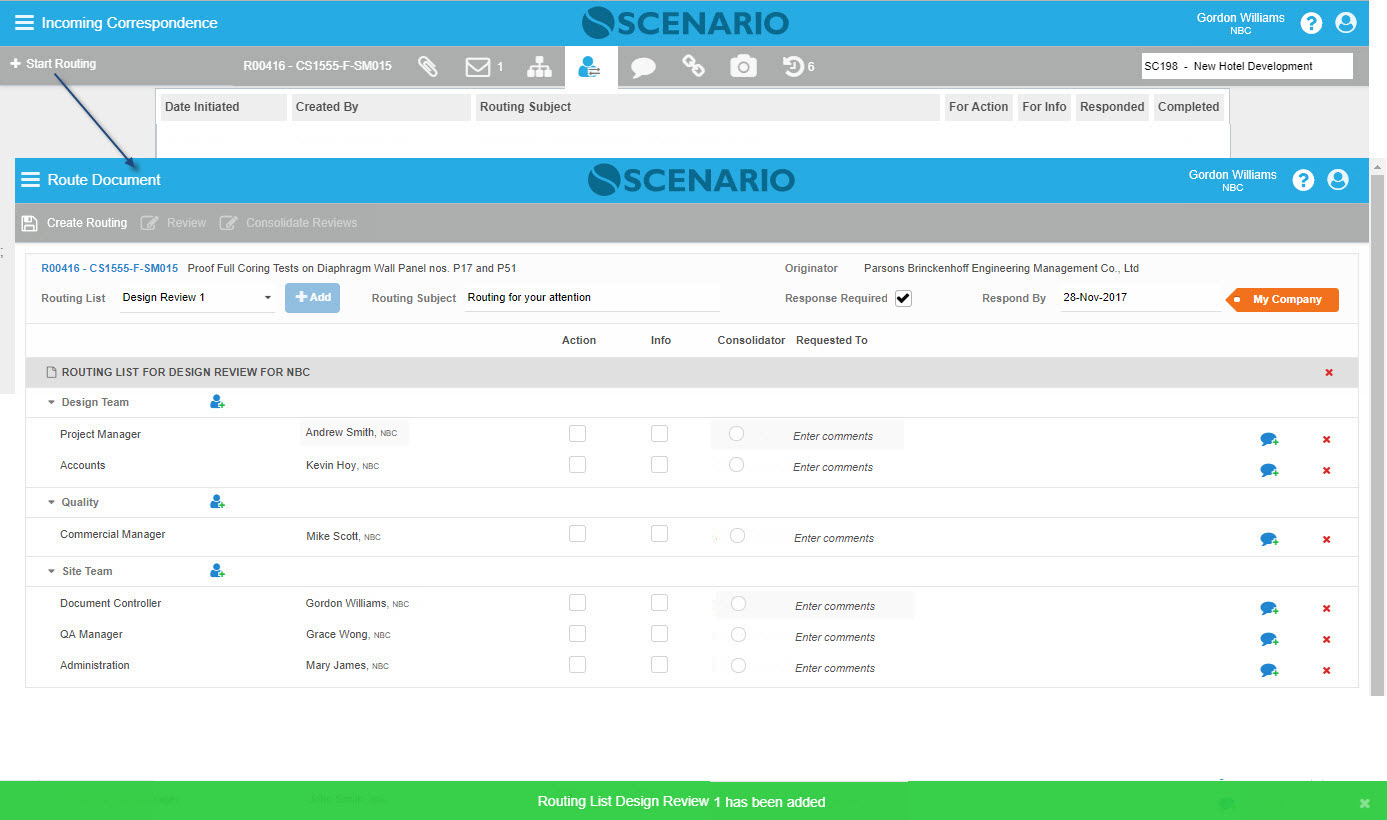
When Start Route button is clicked, the User will be redirected to Start Route Document page.
Action Routed Document Page for 'No Review'
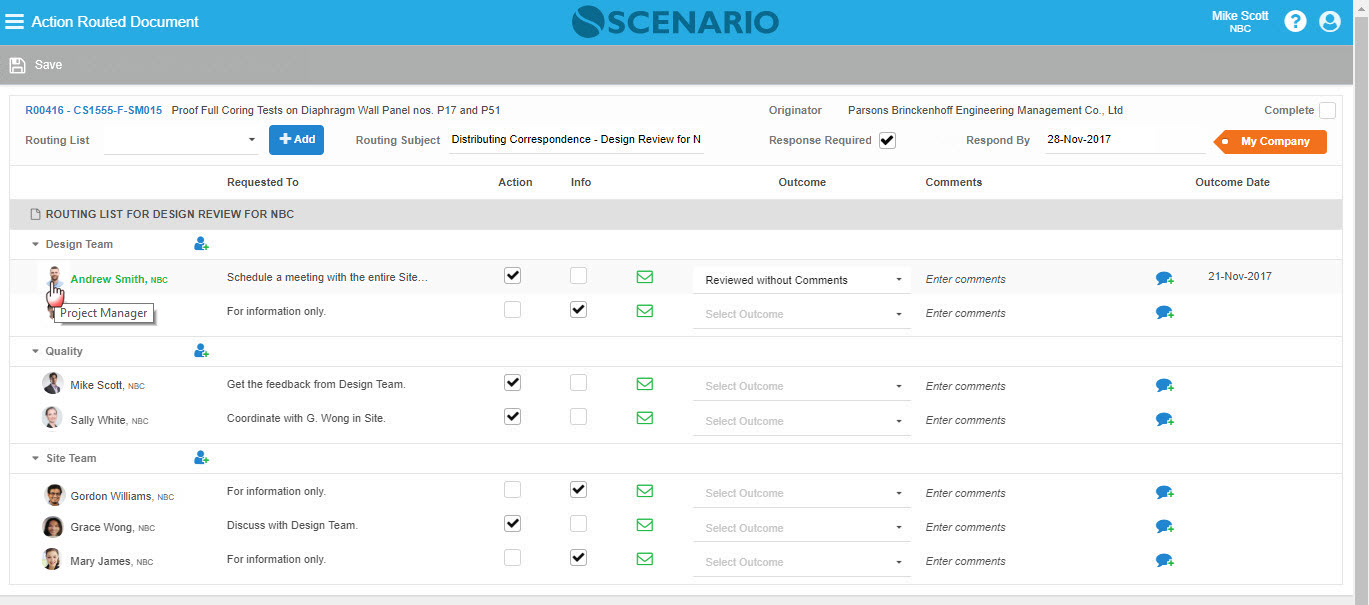
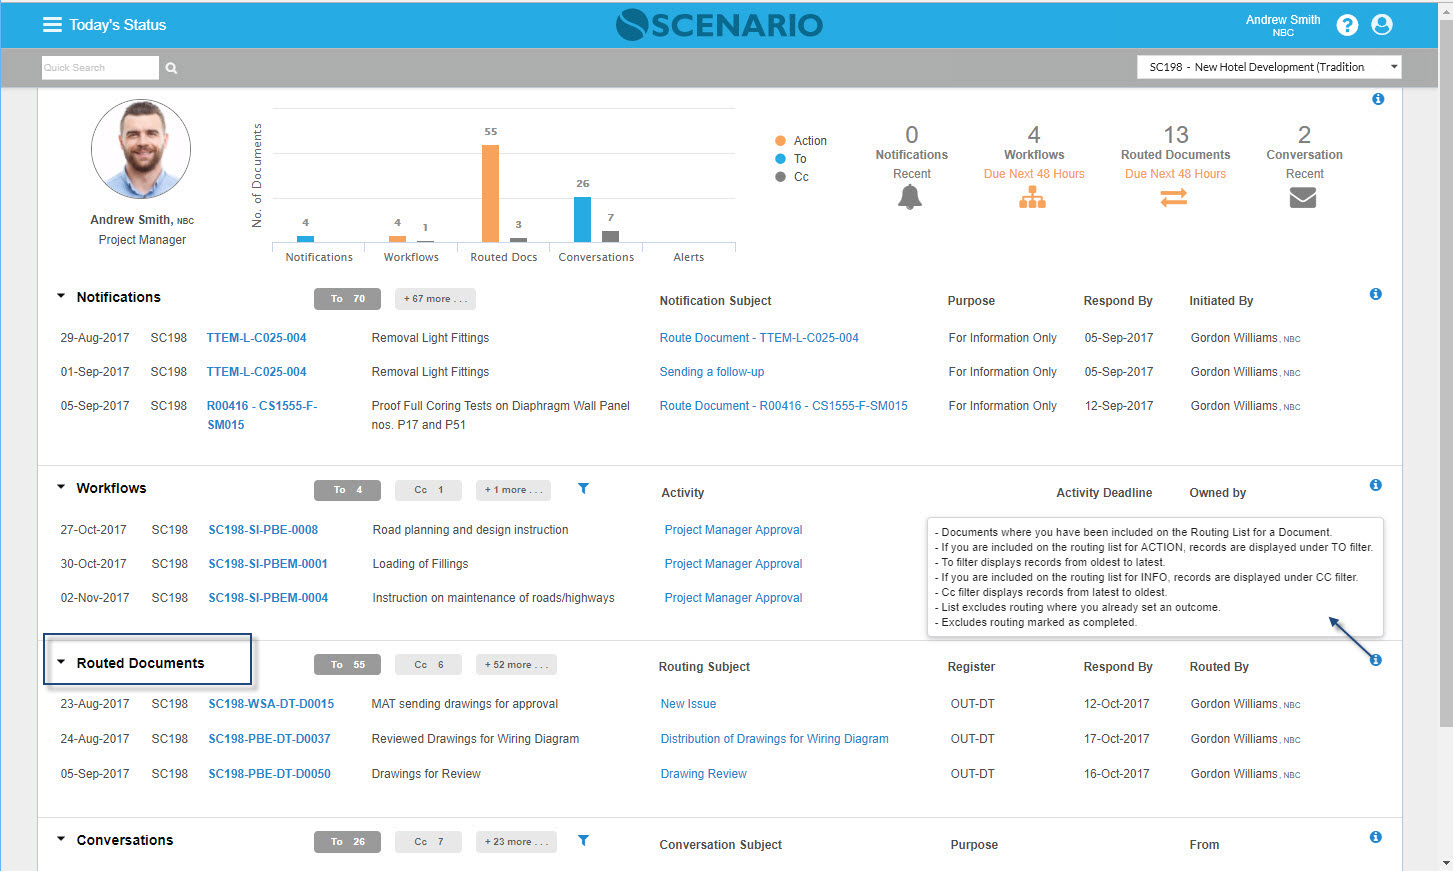
To Action Routed Document, go either to Project InBox & Routing screen, Today's Status - Routed Documents section, or in My Inbox - Routed Documents Tab.
When viewed in the Document Form Routing Tab, 'rows' are presented once there are more than one Routing that has been initiated. This row must be clicked for the Action Routing Sheet to be displayed. However, normally only one Routing is to be initiated for a Document.
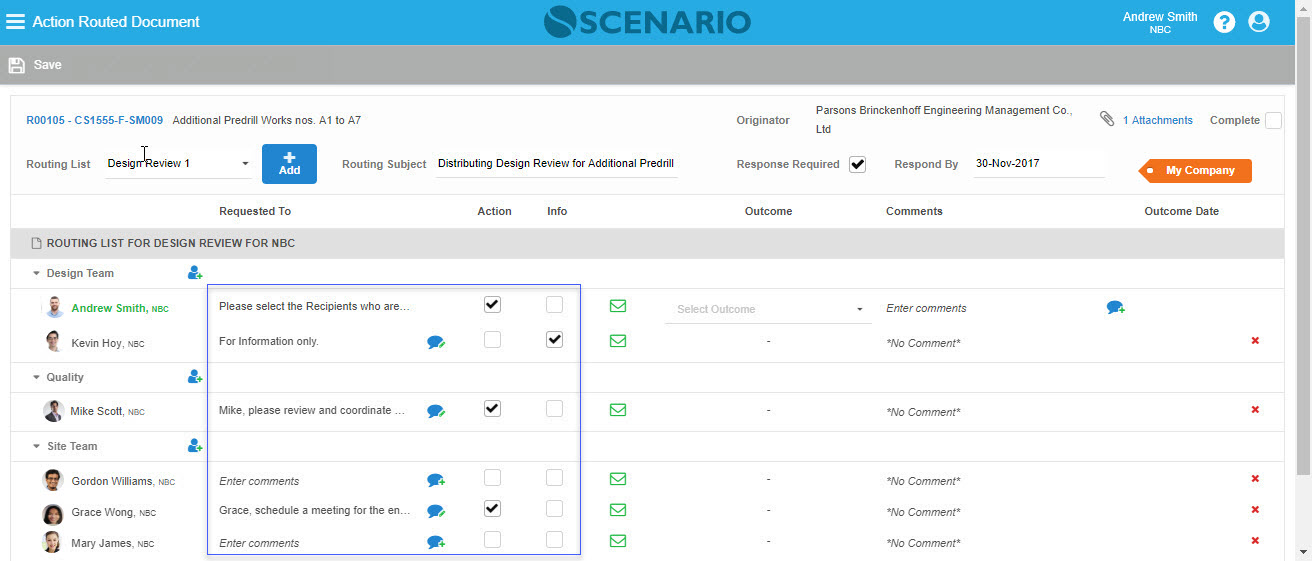
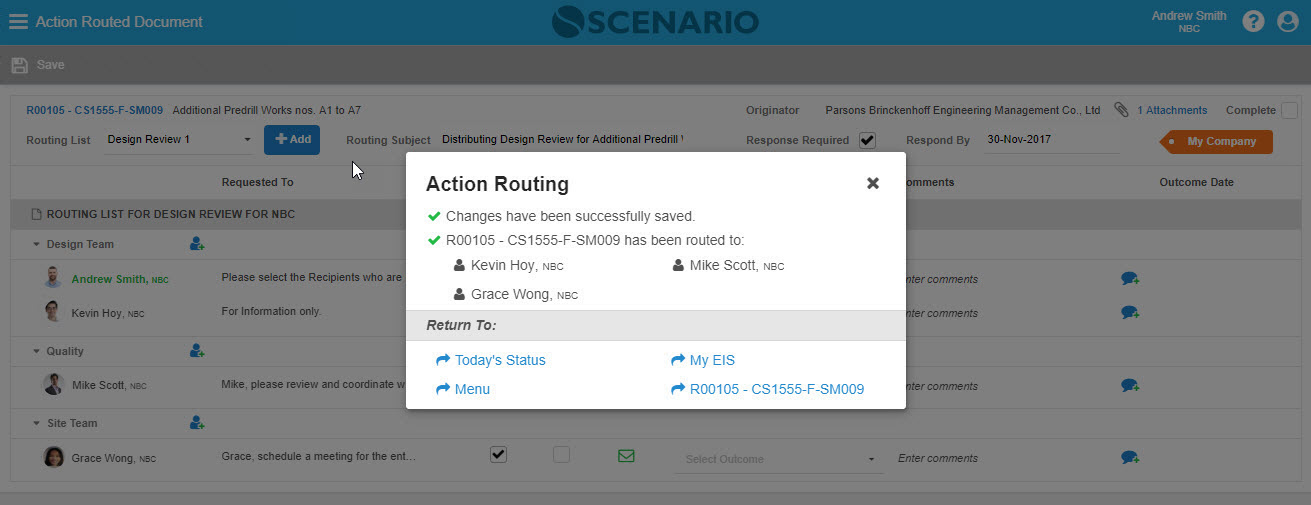
Action Routing can be edited as progressed. A new Routing can be appended - once a New Routing List has been added, and the User clicks 'Done', a pop-up message will appear stating that the changes were saved, Routed Document was sent to the Recipient(s) and the option for the User where they wish to go next.
In Action Routed Document sheet, a User can check the Roles of the listed Members by hovering on the icon beside the Member/User's name.
Routing List Security
- Routing Security applied to the Document Form Routing Tab - i.e. Users can only see Routes they have permission to see:
1 - Routing Records set as Public can be seen by all Users
2 - Routing records set as Project Team to be seen only by Users who are members of the Project Team.
3 - Routing records set as My Company to be seen only by Users who are members of the same Company the route is set to.
4- Routing Records set as Nominated Public can be seen by Users who are under the same Company of the selected Recipient(s) of the Routing List.
- Routing Security applied to PIR (Project InBox & Routing) - i.e. Documents will not be shown as routed when the security is not applicable to the User's Company:
1 - A green tick will appear if the document is routed to a Public routing list
2 - A green tick will appear if the document is routed to Project Team Routing List and the logged-in User is a member of the Project Team
3 - A green tick will only appear if the document is routed to My Company and the logged-in User belongs to the company the document was routed to. The routed document associated with the User's Company will then be opened when the green route tick is selected.
- Routing List Configuration 'Restricted To':
1 - My Company
2 - Project Team
3 - Public
4- Nominated Public
Users from System Owner Company can configure Routing list set to My Company, Project Team or Public
Users from Non-System Owner Company can configure Routing List set to My Company only
What can the Routing Creator/Initiator and the Consolidator do:
1 - Routing Creator and Consolidator can edit Requested To Comment after Routed
2 - Routing Creator and Consolidator can remove Users who are already Routed and have not reviewed anything yet (no Outcome in Action Routed screen nor in Review tab)
4 - Routing Creator and Consolidator can change the assignment of the Consolidator (in case of the wrong Consolidator selected and also for the purpose of delegation).
How Do I?
How Do I Initiate Routing?
Case1 - User Initiating Route Document knows the Routing List and who to Route to as well as the Persons who must be involved.
Note - In this sample case, the source Document is not 'For Review'
1. Initiate Routing only from a Document Form |
|---|
|
Select a Document to be routed - normally an Incoming Correspondence will be created and distributed as 'Routing'. Transmittal with linked Drawings is also commonly routed. Click ‘Start Routing’ button to start routing, it will redirect to Start Route Document Page. Alternatively, use the PIR- Project Inbox & Routing screen to select and Route the Document. The Start Routing page includes: Document No., Subject, Originator, Attachments, Routing List selection, Description, Response Required & Respond by Date field |
| 2. Select a Routing List |
|
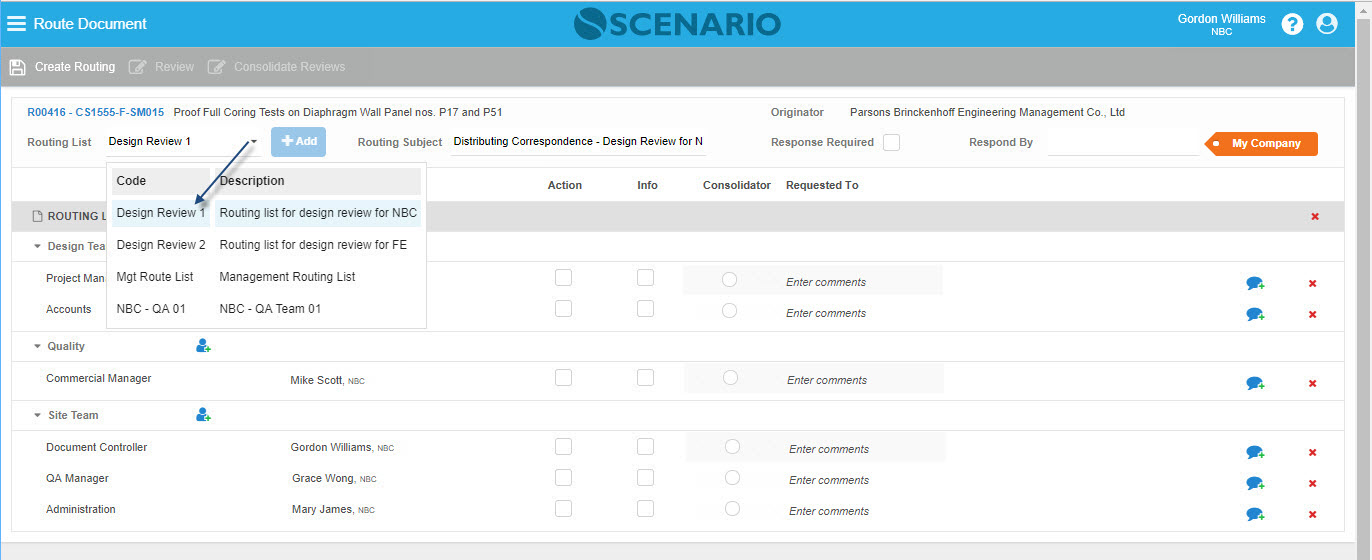
Select the Routing List from the drop-down and click the 'Add' button to populate the selected routing list. Also, enter the Routing Description. Note: When no Routing Subject is entered, Routing Subject will be defaulted with 'Routing for your attention'. |
| 3. Select AuthUsers who are For Action or For Info |
|
Individual AuthUsers or Team Members can be selected for taking Action or just 'For Info’. For specific AuthUsers, direction Comments/Notes can be added. Multiple Routing List is allowed to be routed - see below How Do I Route Multiple Routing List? |
|
| More Users can also be added (multiple selections is allowed) as Team Members or be removed from the List - see below How Do I Add New Member(s) or Remove Member in the Routing List? |
| 4. Create Routing |
|
Click the Create Routing button to carry on with the Routing process. A nag message will be presented stating 'Document has been successfully routed to each routing recipients.' After the Document is routed, a Conversation will be sent automatically to the Recipients involved (see below). Note - Conversations created from Routing process will inherit the 'Restricted To' value of the Routing List. |
|
|
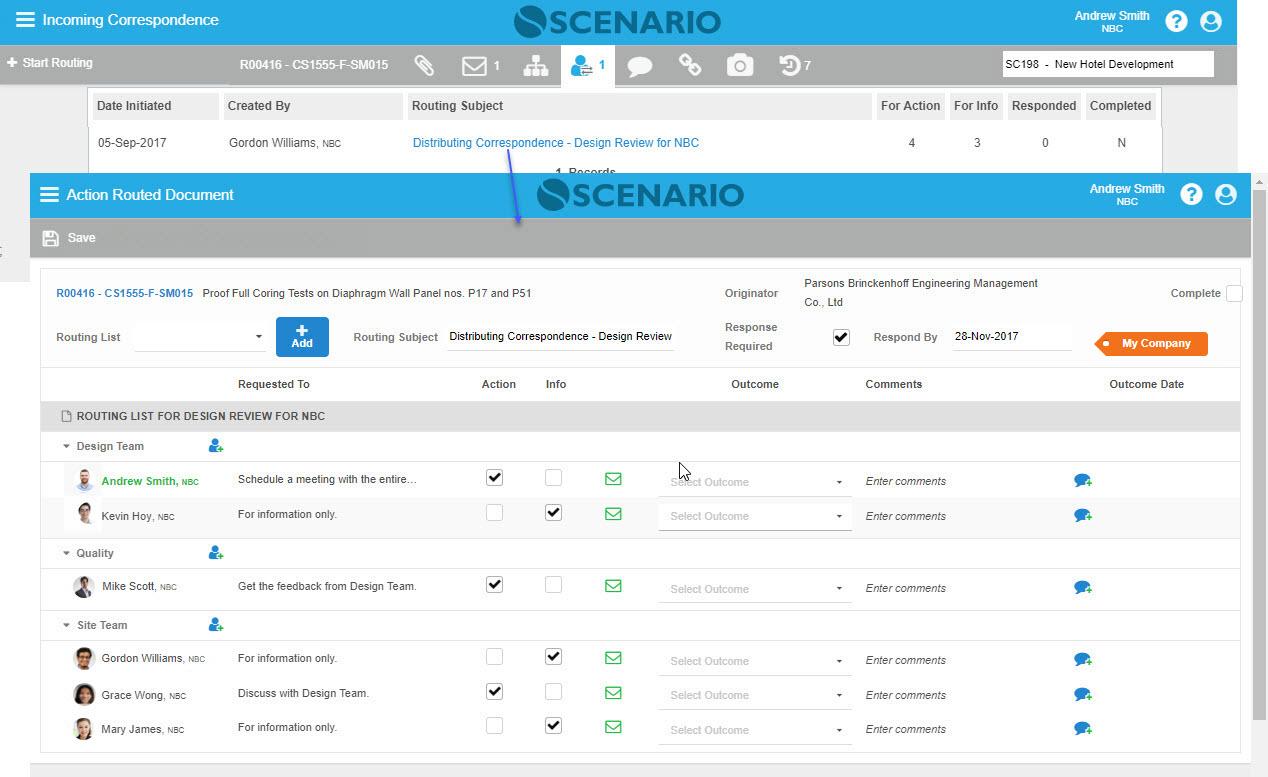
The initiated Routing List can be accessed for Action in the Routing tab (table view) of the Document. Another option is to open in Project InBox & Routing screen, TS Page Routed Document section or in My Inbox - Routed Documents tab (see below). |
| 5. Routing Cover sheet in Today's Status and in My Inbox Page |
Andrews Smith, NBC (one of the Routing recipient) logs in.
|
| Receiving User can open the Routing cover sheet on Today’s Status or in My Inbox page. The recipients will be aware due to a Conversation coming from the Routing Register. |
Case2 - User Initiating Route Document knows the Routing List but not who to Route to and the Recipients who should be selected as For Action or For Info.
1. Forward the Routing List to Responsible Initiator/Consolidator |
|---|
|
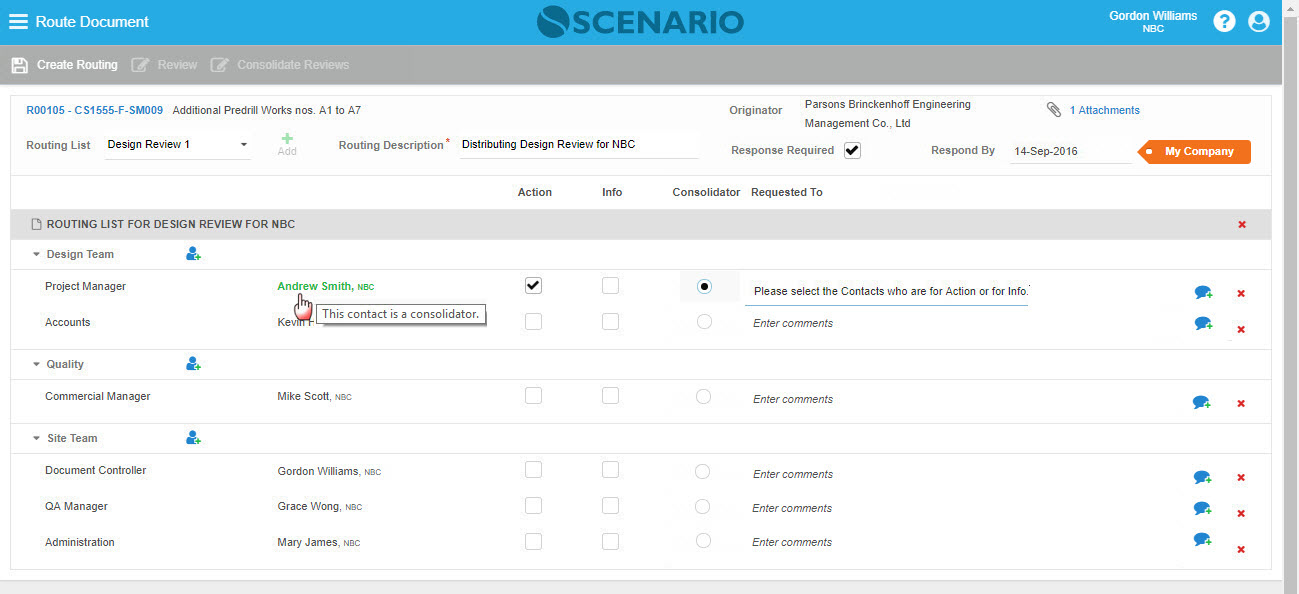
In this case wherein the User knows the Routing List but not who should be selected for Action and Info, the User will forward first the Routing List to Responsible Initiator (a Consolidator e.g. Manager) for review of Documents and assessment who will be for Action or for Info. The Consolidators are those Members with green font and when hovered, will display 'This contact is a consolidator.' It will end up in the Routing section of Today’s Status addressed to the selected Consolidator. This process is just the same as Case1. Points to remember: 1 - Those members that were not selected as Recipients prior to sending the Route Document will not be saved in the Routing List. 2 - The Member(s) flagged as Consolidator is configured in a separate Configuration page. |
| 2. The Consolidator selects the persons involved |
|
As the Consolidator (Manager) receives the Routing List, he/she will then open the Routing Register. Other Team Members of the Routing List who were not selected as Recipients will not be shown. The Consolidator need to add back the original Members by reselecting the Routing List on the field and clicking the Add button and determines who would be For Action or For Info. |
|
To proceed with the Routing, the User/Consolidator will do the following: • Will select who are For Action or For Info, add Comment/Notes per AuthUser and adjusts Respond By Date or maybe the Subject as well. • When ready, will click Send. A Conversation will be generated from the Routing Register to every selected AuthUser based on either For Action or For Info. • If necessary, User can also select another Routing List and append to the bottom before sending. |
|
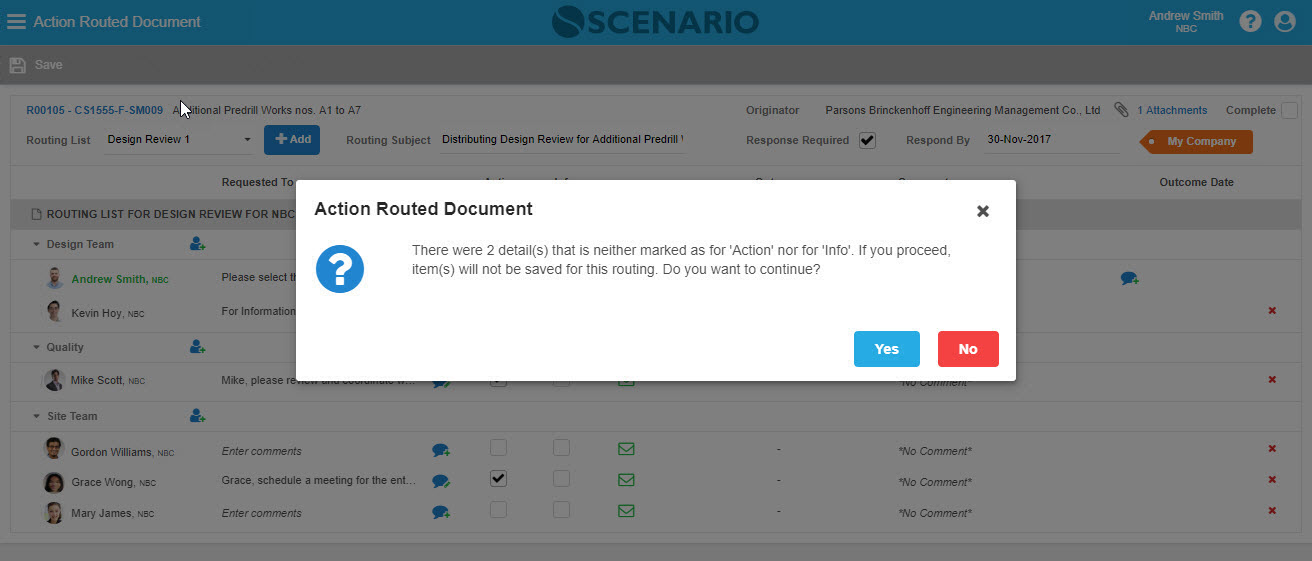
| Upon saving/clicking the Done button, a pop-up dialog will appear 'There were (number) Members that is neither marked as for 'Action' nor for 'Info'. If you proceed, item(s) will not be saved for this routing. Do you want to continue?' Once the User selects Yes, Routing will continue to be sent; if No, the pop-up dialog will be closed and will return to Action Routed Document Page. |
|
Action Routing pop-up dialog will also appear as the User saved the changes and sent the Routing to the newly selected Recipients. Page option was to return is also presented. Click the Document Number to be redirected to the Document Details screen or click Menu to be redirected to the Main Menu. |
Case3 - User who created the Document is unsure which Routing List is to be distributed and to whom must seek advice from someone else (i.e. the Manager).
1. Use Manager's Routing List |
|---|
|
When the User who created the Document is unsure which Routing List is to be Routed and to whom, the process is to Route first the Correspondence to the Management, i.e., select Management Routing List. User must select the Manager from the Management List and click Send. Start Routing and notify Management AuthUser – this will appear on Today’s Status/MI screens. Only the selected Manager will be displayed in the Routing list after sending. |
| 2. The Manager will select and append the correct Routing List |
|
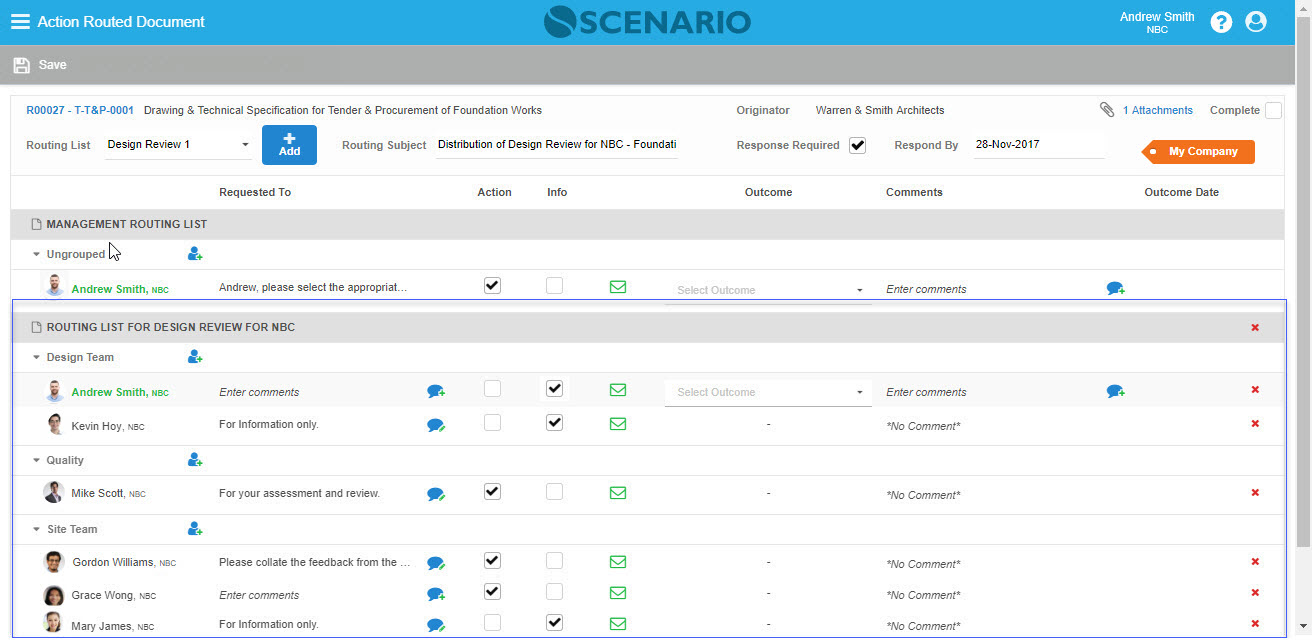
The Manager will open the Routed Document and will select the correct Routing List to be distributed and the corresponding Team Members who are for Action or for Info. The User is allowed to modify the Routing Subject and or the Respond By Date. Comments can also be added as well as more Members can be selected as part of the Team; once ready, the User can then click Done. A pop-up dialog will appear after clicking Done. |
How Do I Add New Member(s) or Remove Member(s) in the Routing List?
1. Add New Member(s) or User(s) in the List |
|---|
|
User can add ‘New Member(s)’ by clicking the blue User icon on the right side of the Group name. The Members/Users can be selected either by entering a code or name that matches the name from the list or by selecting in Select Team Member pop-up screen. Note that listed Users must have access to the Register to be selected. |
| 2. Delete a Member in the Routing List |
|
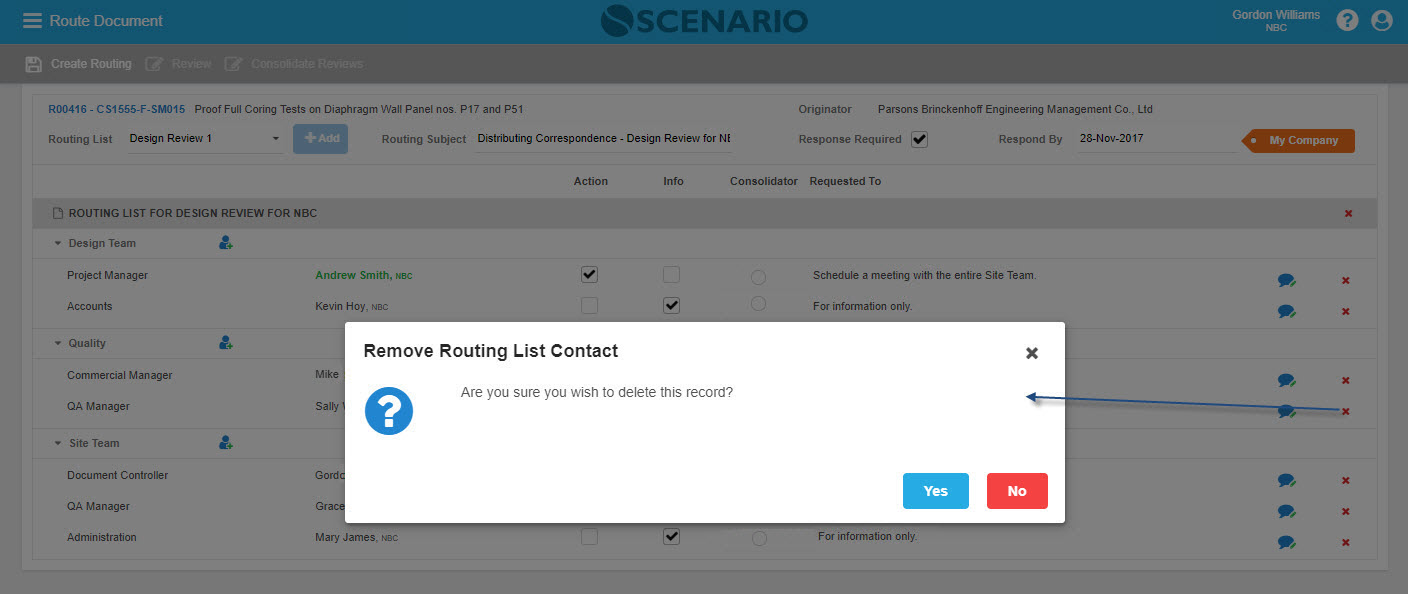
| In case the User chooses to edit or remove a Member from a Group, click the delete icon on the right-most side of the User's row. A confirmation message to delete the Member will be displayed; click Yes to proceed else click No. |
How Do I Route Multiple Routing List?
How Do I Delete an added Routing List?
1. Append Multiple Routing List |
|---|
|
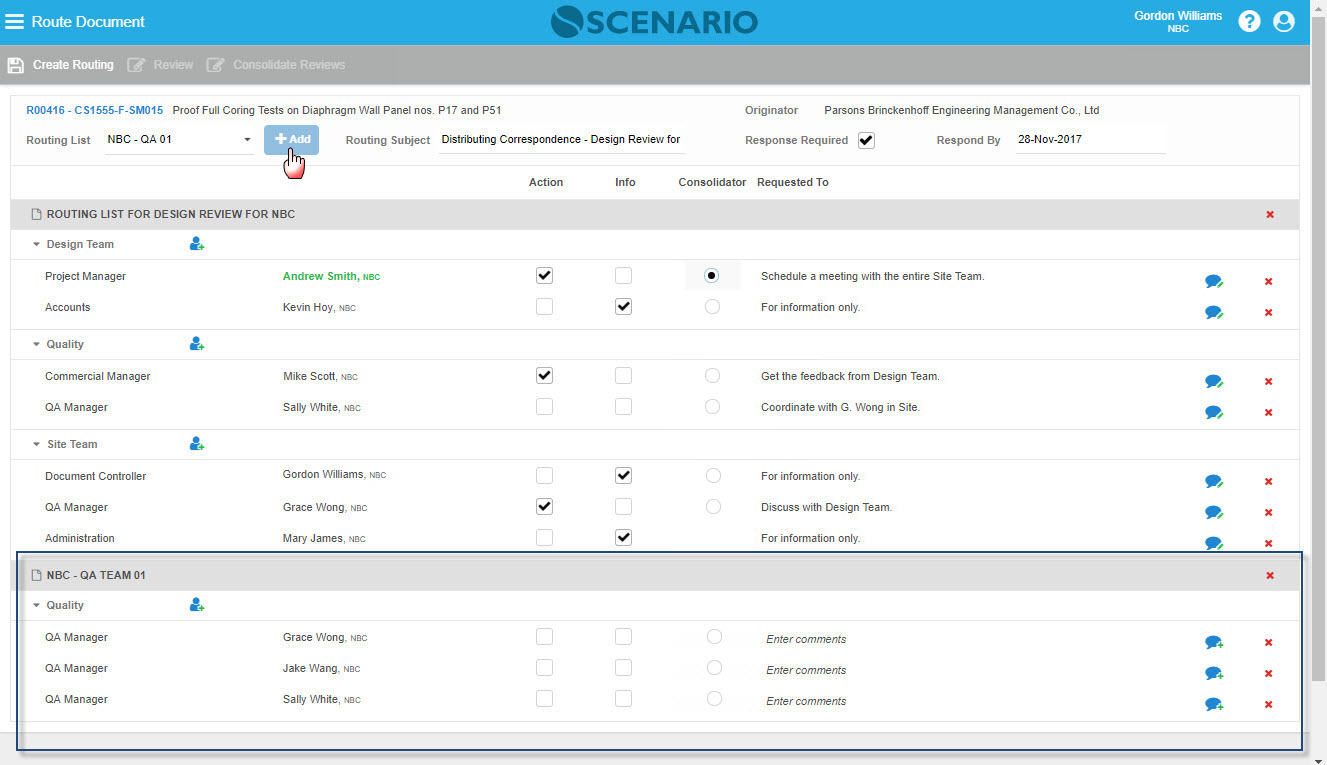
Multiple Routing List is allowed to be routed, User can append multiple Routing List by selecting another list and clicking 'Add' button. The selected Routing List will be displayed at the bottom after the first routing list. Note - the 'Restricted To' label will be updated depending on the appended Routing List. |
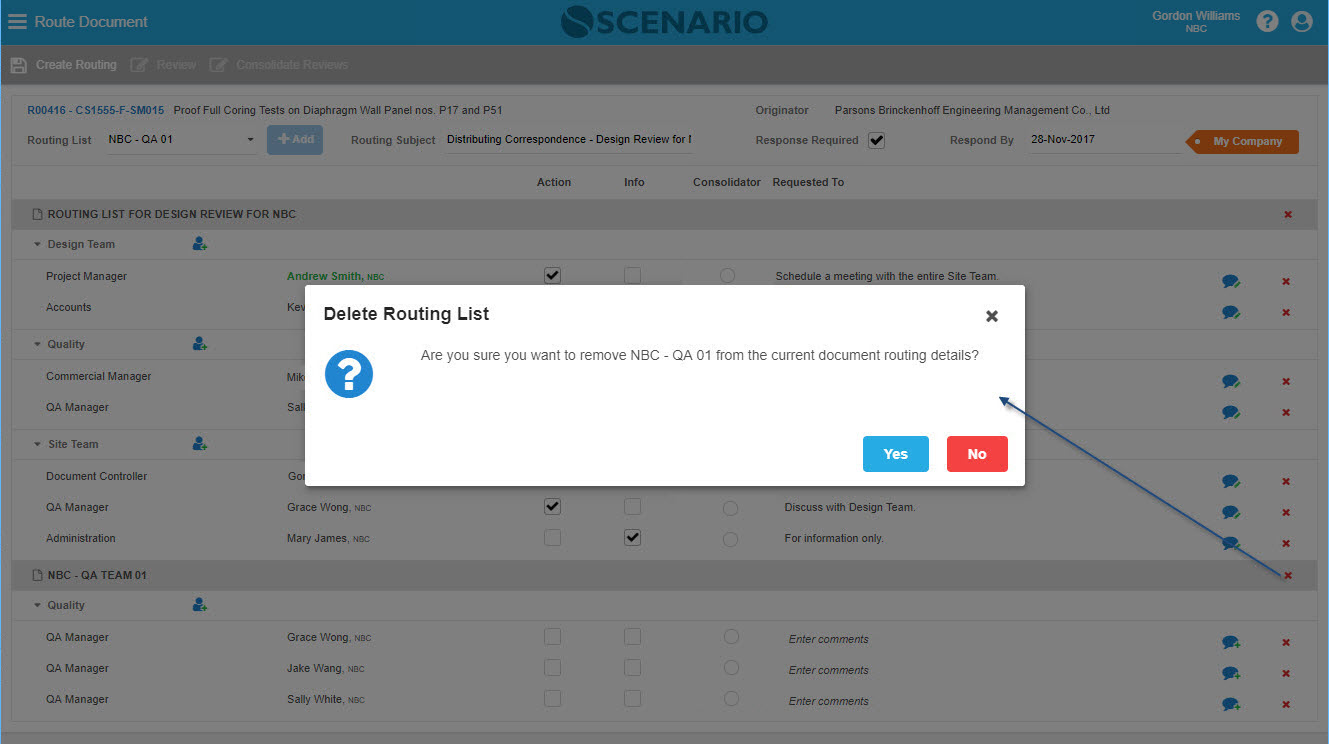
| 2. Delete a Routing List |
|
| For some instances that a Routing List is not needed or incorrectly added, User can click the delete icon button on the Routing List header - confirmation message to remove will be displayed. Click Yes to proceed else click No. |
How Do I Process Action Routing against a Document?
Note - Alternatively, PIR - Project InBox & Routing screen can be used to Route and Action Routing.
1. Action Routing against a Document |
|---|
|
Click a ‘row’ under the Table view (or click the Routing Subject in TS or My Inbox page). Once clicked, the Action Routing Sheet will be displayed. This Action Routed Document can be edited as progressed - User can add additional Team Members/Users to be involved in the Routing List and/or append new routing list. Once the Action Routed Sheet is edited or a New Routing list has been added, User can click ‘Done’ and a Convo will be sent to the contact/s that belongs to the selected routing list. Note: New routing list added can still be removed, unless the user clicks ‘Done’ |
| 2. Select Outcome |
|
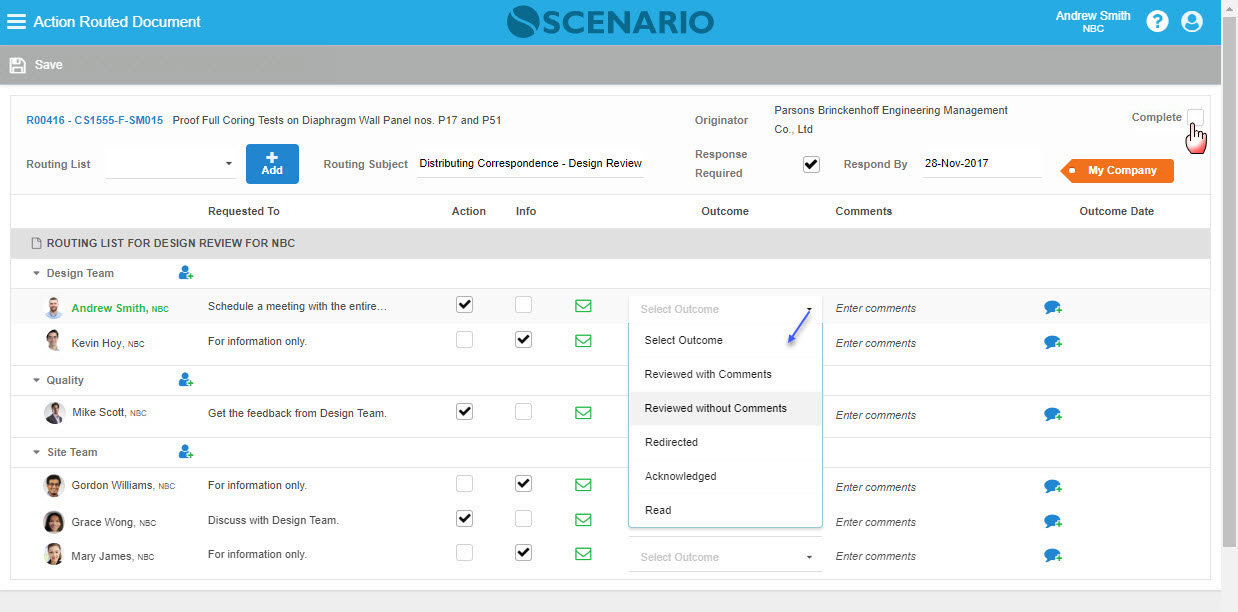
User can select the Outcome from the drop-down list, and Comments can also be entered by clicking the blue Add/Edit Comments icon. Once an Outcome is selected, Outcome Date will be displayed. |
|
| A Routing List can be set to Complete by the Consolidator only by ticking the Complete check-box at the upper right-most part of the Action Routed Document screen. Once the Routed Document has been set to Complete, Action Routed Document will be disabled. Document form - Routing table view will be displayed with 'Y' under the Completed column. |
How Do I Configure the Routing List?
Please refer to Routing List Configuration.
Examples of Use
<insert examples of use here>

