Routing List Configuration
Contents
Overview
Through the Routing List Configuration page, Users are able to carry out the configuration of new and existing Routing lists.
Screen Explanation
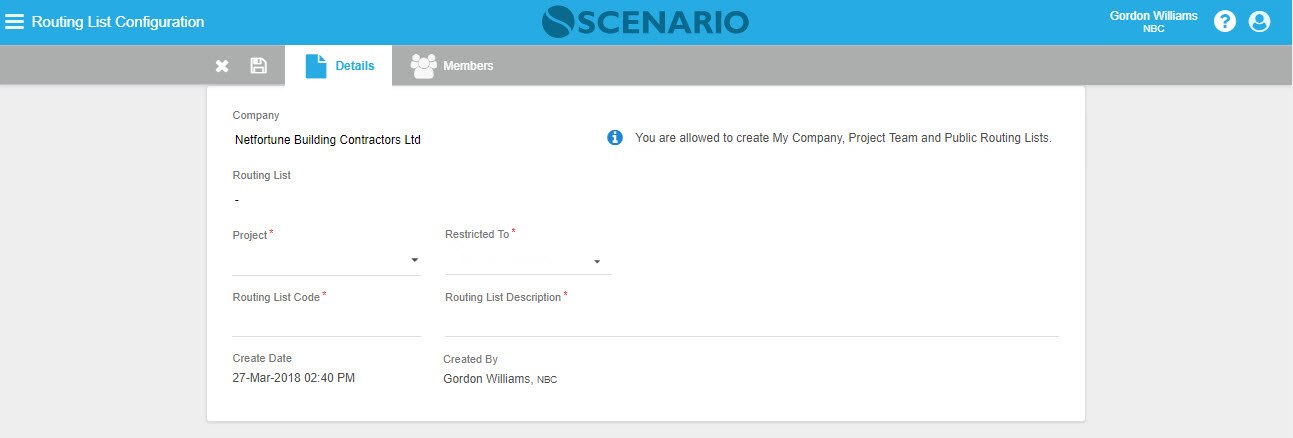
Fields/Icon | Description |
|---|---|
Company | Displays the Company of the creator of the Routing List. |
| Info icon/message | The info message depends on who is the logged-in User:
|
| Routing List | Dropdown selection for existing Routing List to logged-in User as well as the field where a new Routing List can be entered. |
| Project | The dropdown field for Project option accessible to the logged-in User. This a mandatory field. |
| Restricted To | Selection for Routing List Restricted To:
|
| Routing List Code | Can be entered at most 15 characters as Routing List Code. This a mandatory field. |
| Routing List Description | The free text field that can be entered up to 60 characters for Routing List Description. This a mandatory field. |
| Create Date | The configuration date of the Routing List. |
| Created By | The User who created the Routing List Configuration. |
AuthUsers | Description |
|---|---|
System Owner | Responsible for the overall operation and maintenance of the system. |
| Internal | AuthUsers who are flagged as 'Internal to Project'. |
| External | AuthUsers who are neither System Owners nor Internal. |
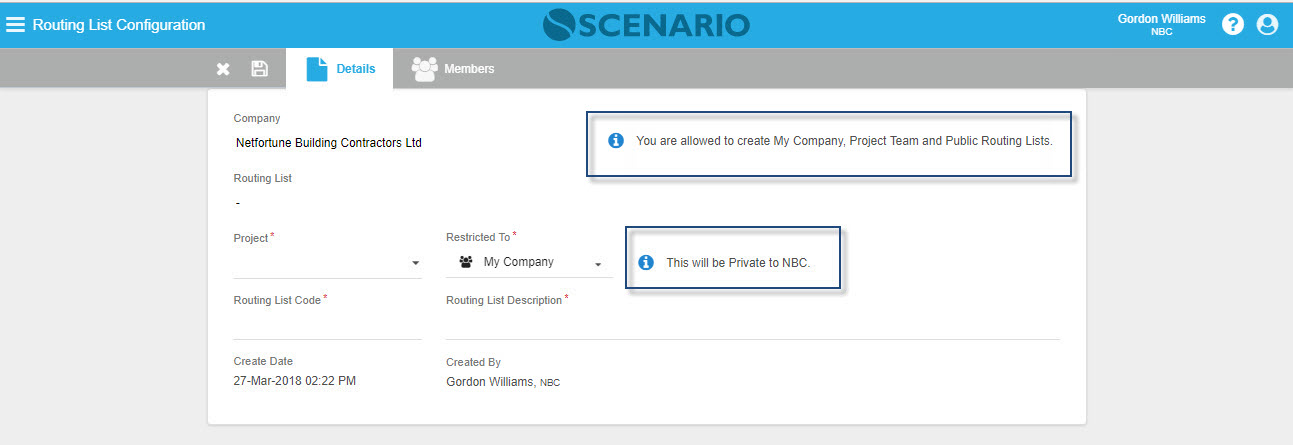
Info icons with the message are displayed depending on the selected Type.
Routing List Configuration 'Restricted To':
1 - My Company
2 - Project Team
3 - Public
4 - Nominated Public
Users from System Owner Company can configure Routing list set to My Company, Project Team or Public
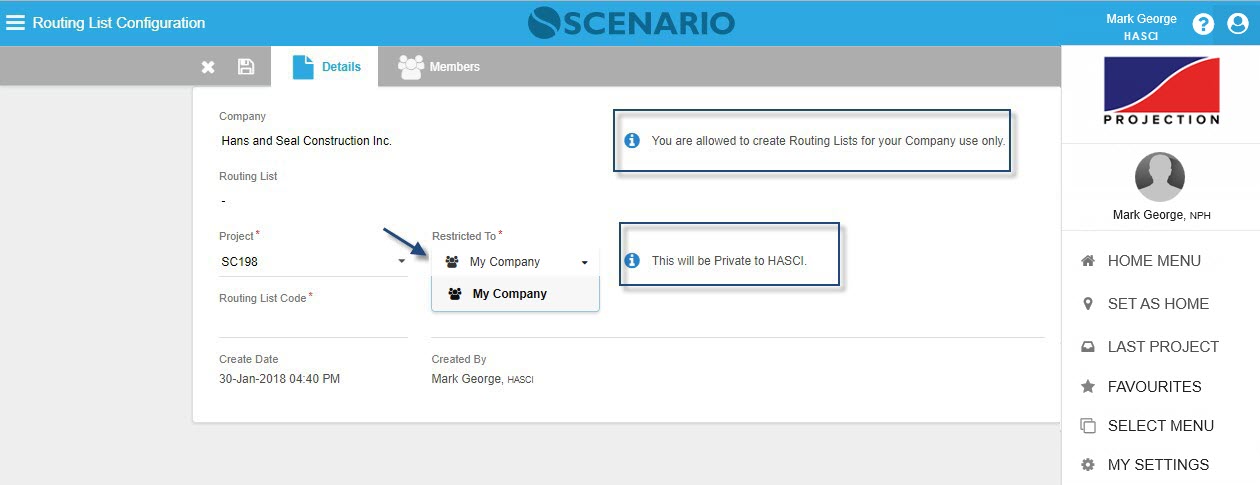
Users from Non-System Owner Company can configure Routing List set to My Company only
How Do I?
How Do I Configure Routing List as the System Owner?
1. Create a New Routing List. |
|---|
| System Owner User logs in (e.g. NBC Document Controller - Gordon Williams, NBC) |
|
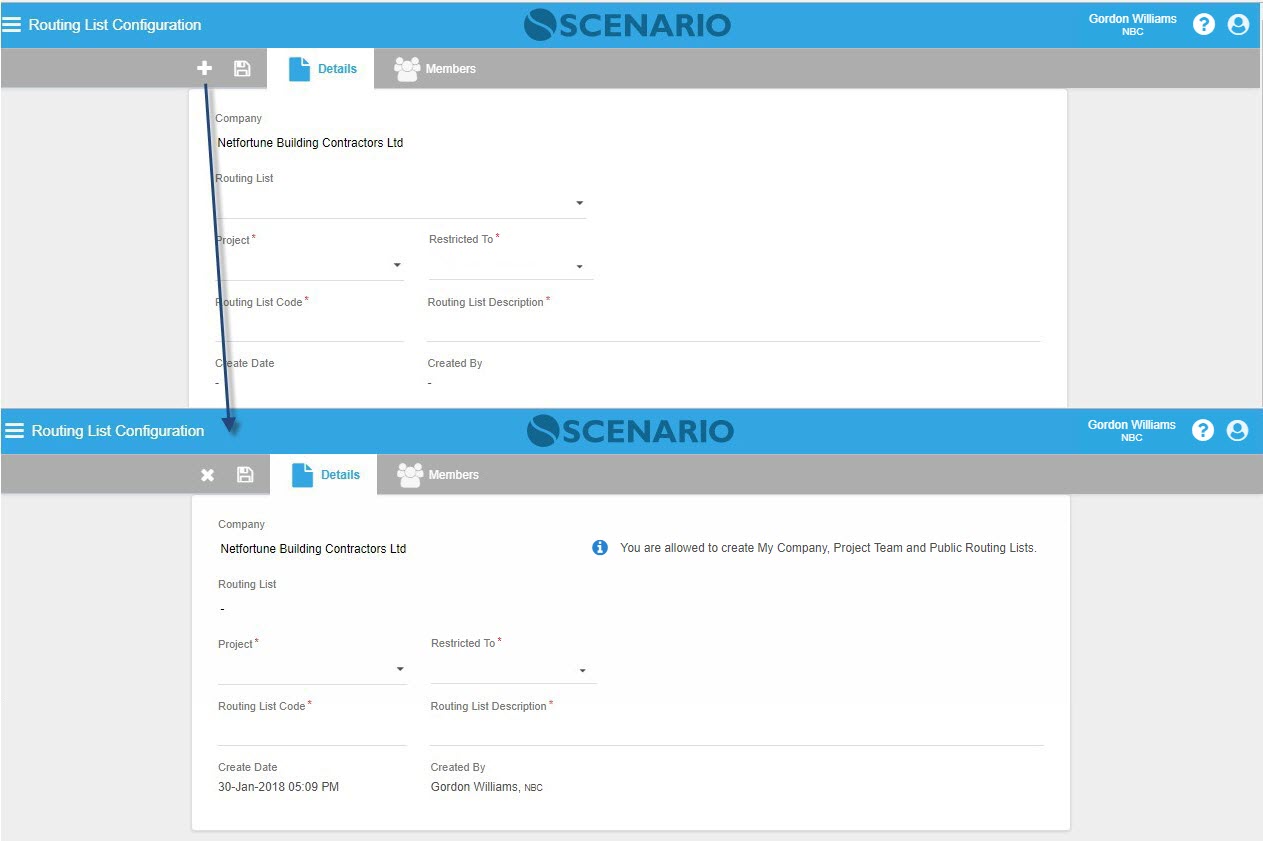
On the Details tab of Routing List Configuration screen, click the New icon ( + ) to create a new Routing List. Note that the Company will default with the login User's Company Name. Info message will automatically display if what type of routing list the User can create. For System Owners, you can create either My Company, Project Team or Public Routing List. |
|
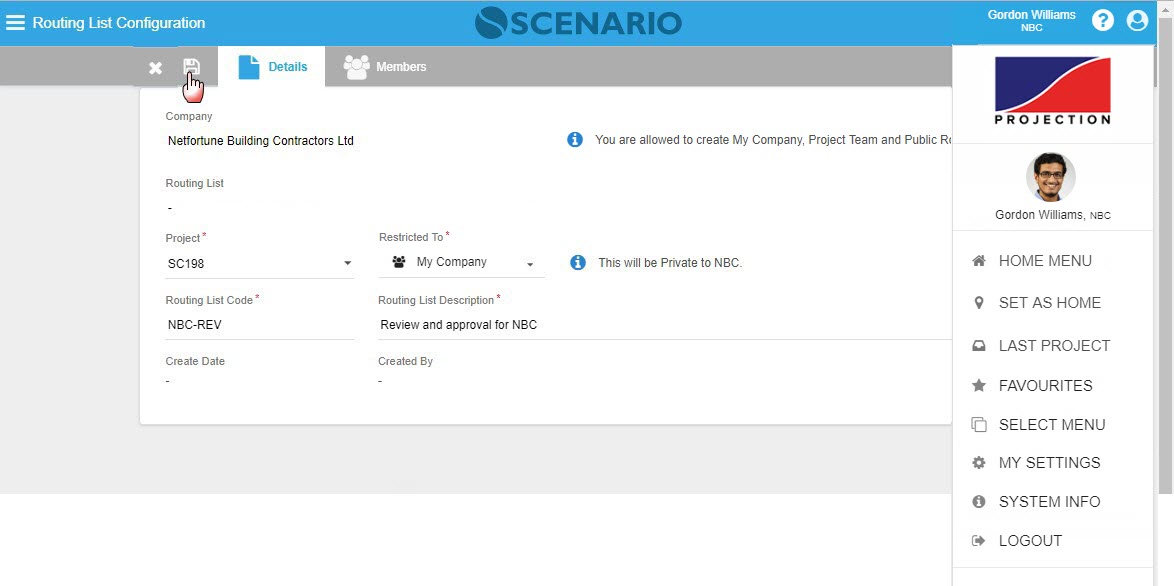
Fill-up the mandatory fields like Project, Routing List Code and Routing List Description. Then select the Type/Restricted To from the drop-down list (e.g. Company). Once 'My Company' is selected, Only NBC AuthUsers can access and view this Routing List in the Route it has been set to. When the selected Type is 'Project Team', NBC AuthUsers plus AuthUsers flag as 'Internal to Project' can access and view the Routing List it has been set to; i.e. AuthUsers who are members of Project Team. When set to 'Public', all AuthUsers (creating Company, External, and Internal) can view and access the Routing List it has been set to. And when the Routing list is set as Nominated Public, Users who are under the same Company of the selected Recipient(s) on the Routing List can access and view the Routing List it has been set to. |
|
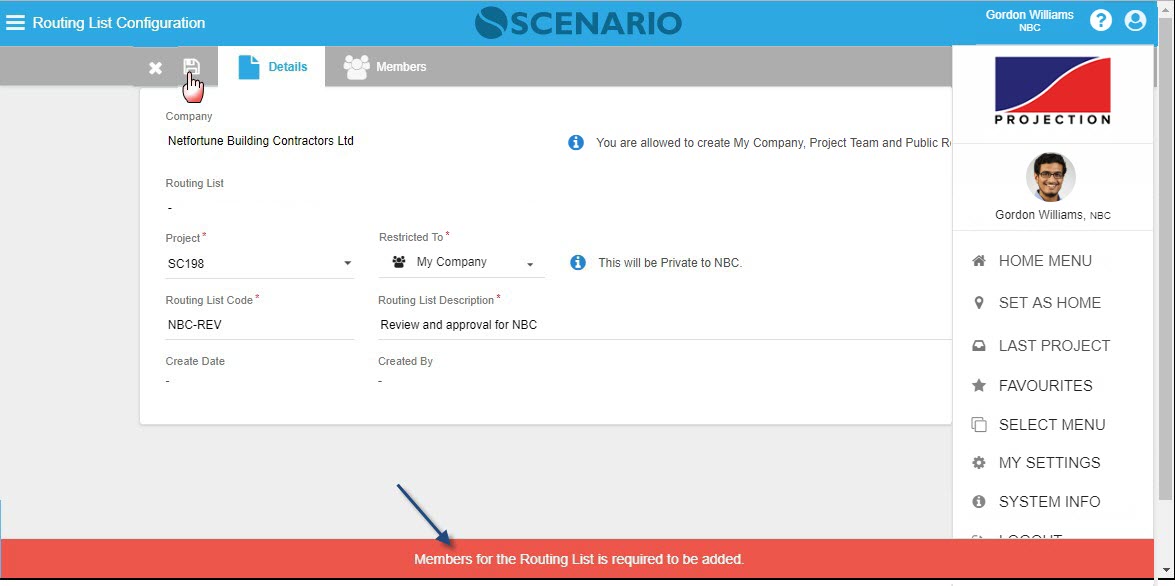
| After completing the details, you have to proceed to the Members tab to add first the Members for the Routing List to be saved. |
2. Add Members |
|---|
|
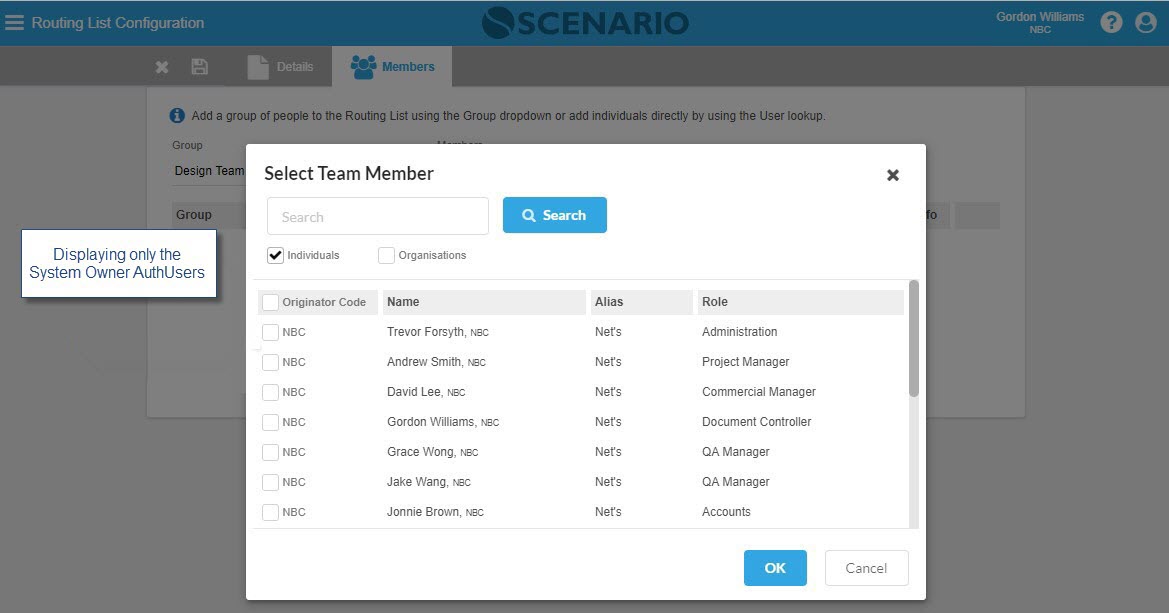
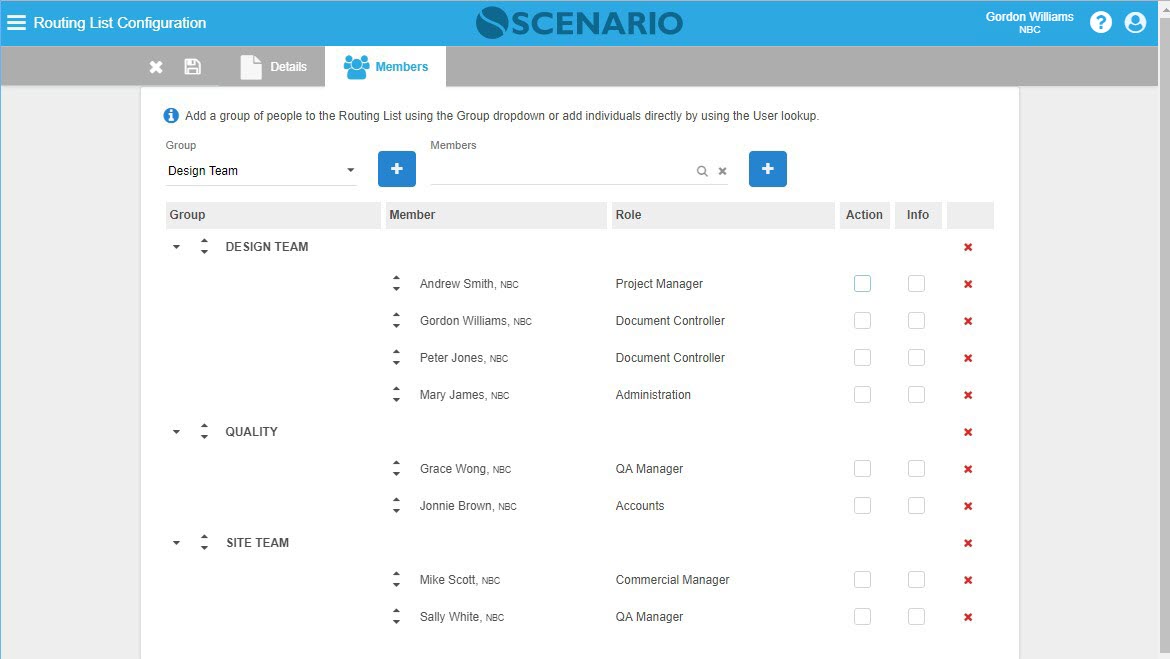
After entering data in the Details tab, proceed to the Members tab. Select first the Group and add the Team Members using the User lookup. Note: Groups are separately configured in S6 under SYSM. |
|
Showing above an example of selected Members per Group. To add more Members, just select again the Group and then click the lookup to add Members. If the User opted to delete a Group or a Member, click the x button at the end of the row and select Yes on the confirmation message to delete. |
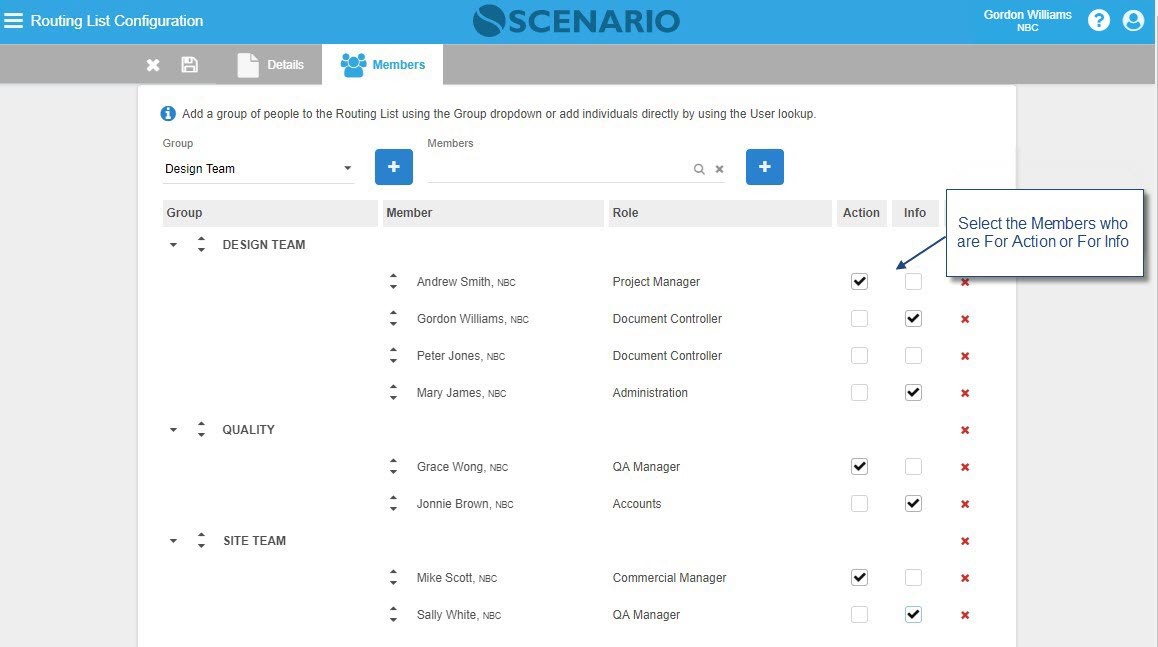
3. Select the Members who are For Action or For Info. |
|---|
|
Selected Members can already be assigned as 'For Action' or 'For Info' and will be displayed as default Recipients in Route Document Page. |
|
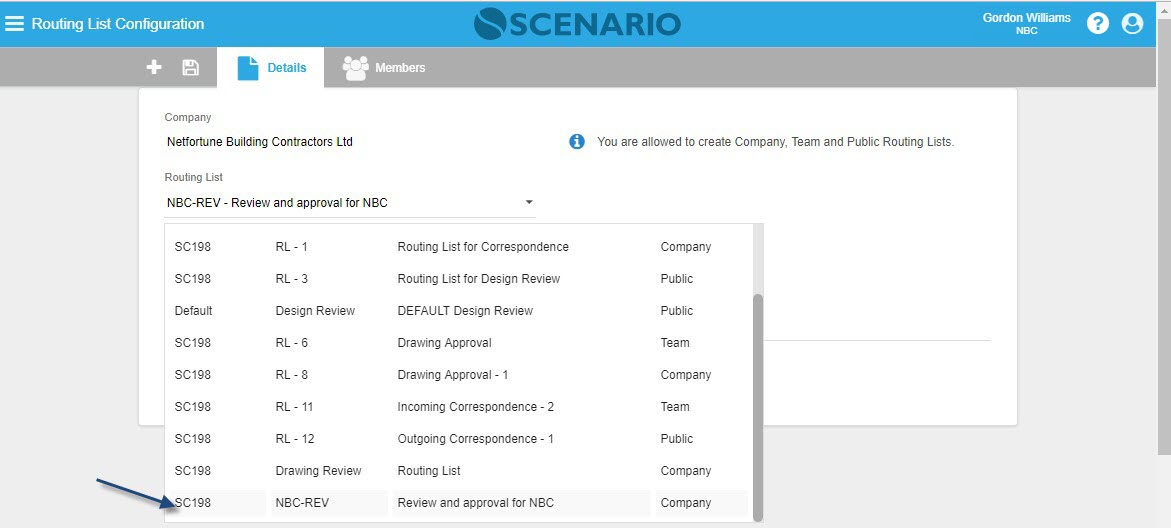
| Save the Routing List and check if it can be viewed in Routing List dropdown field. |
How Do I Configure Routing List as the Internal User?
1. Create a New Routing List. |
|---|
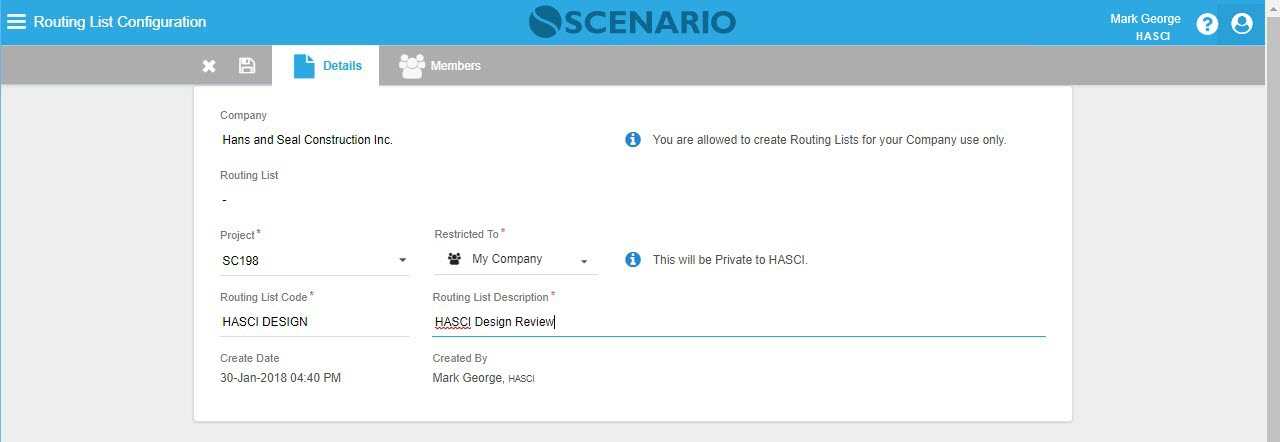
| Internal AuthUser logs in (e,g, Mark George, HASCI) |
|
On the Details tab of Routing List Configuration screen, click the New icon ( + ) to create a new Routing List. Note that the Company will default with the login User's Company Name. Info message will automatically display if what type of routing list you can create. Since from the example the login User is not a System Owner, Mark George can only create a Routing List for his Company. |
|
| After completing the details, you have to proceed to the Members tab to add first the Members for the Routing List to be saved. |
2. Add Members |
|---|
|
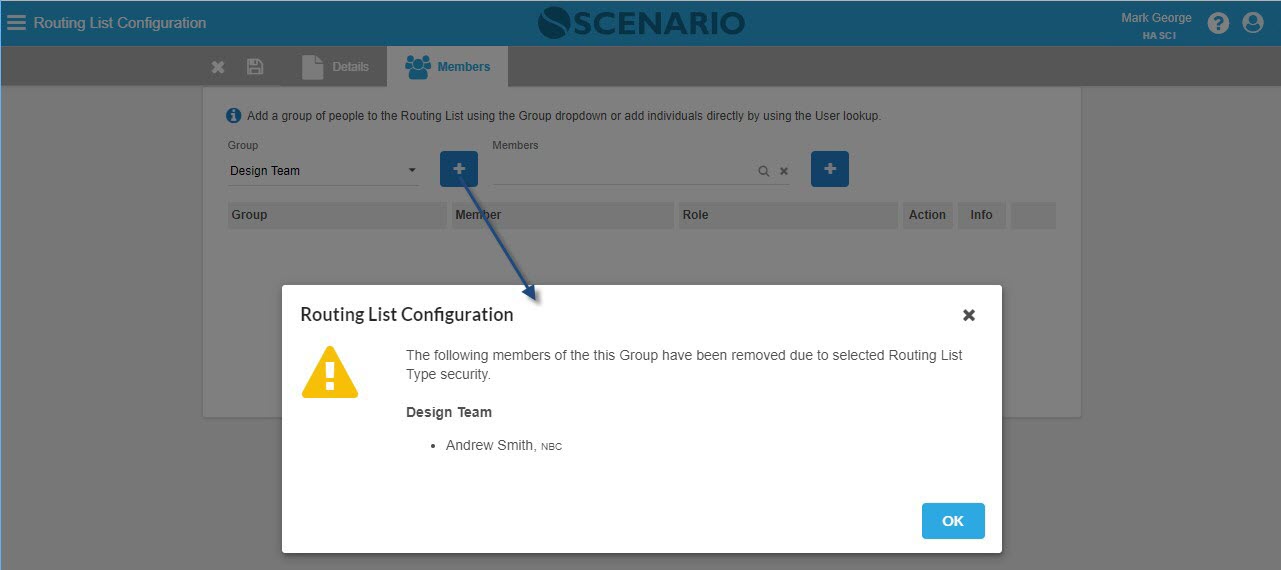
When the pre-selected Member(s) for the Group is not from the same Company, a validation will appear. |
|
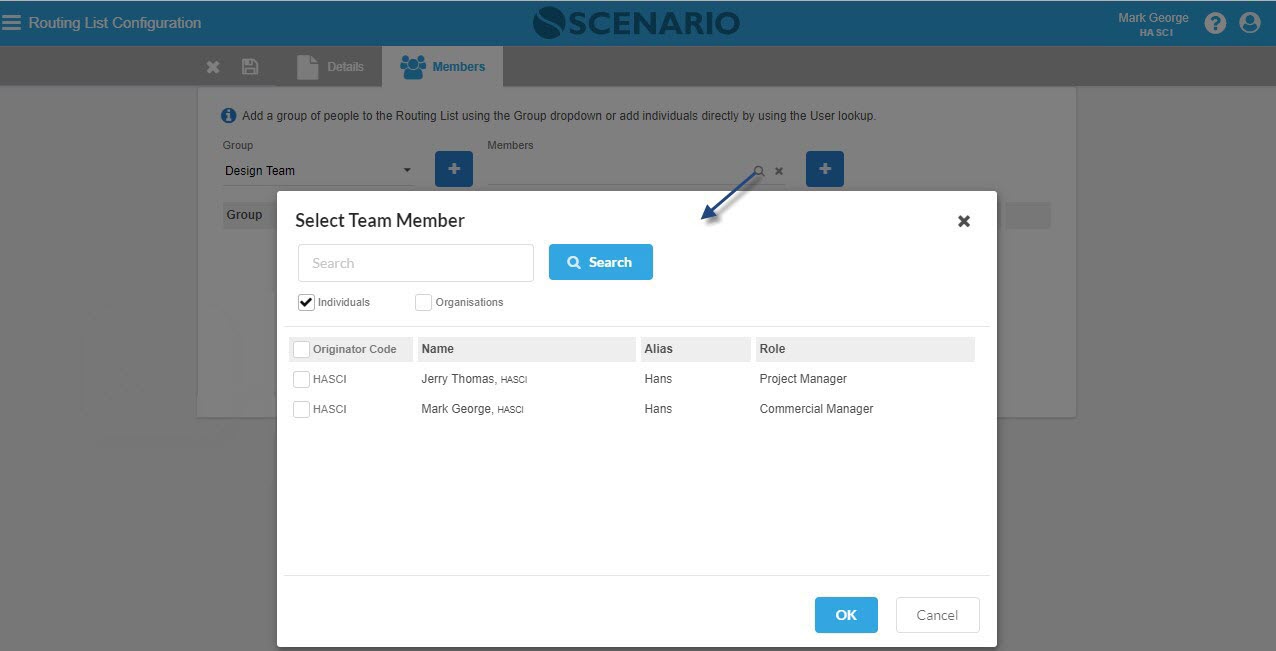
Members that can be selected are those belonging to the same Company as the login User. |
How Do I Configure Routing List as the External User?
1. Create a New Routing List. |
|---|
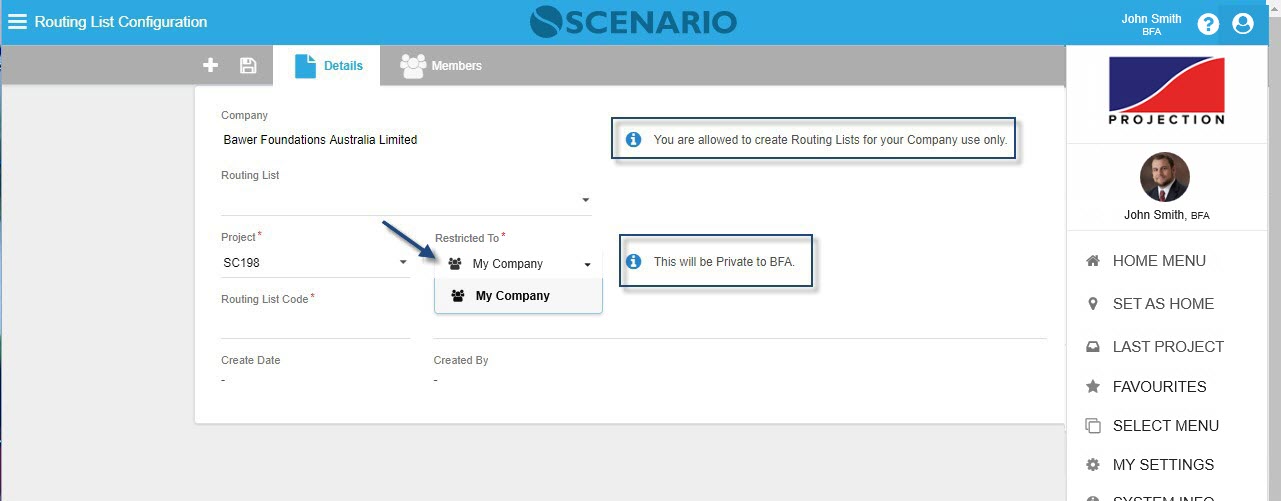
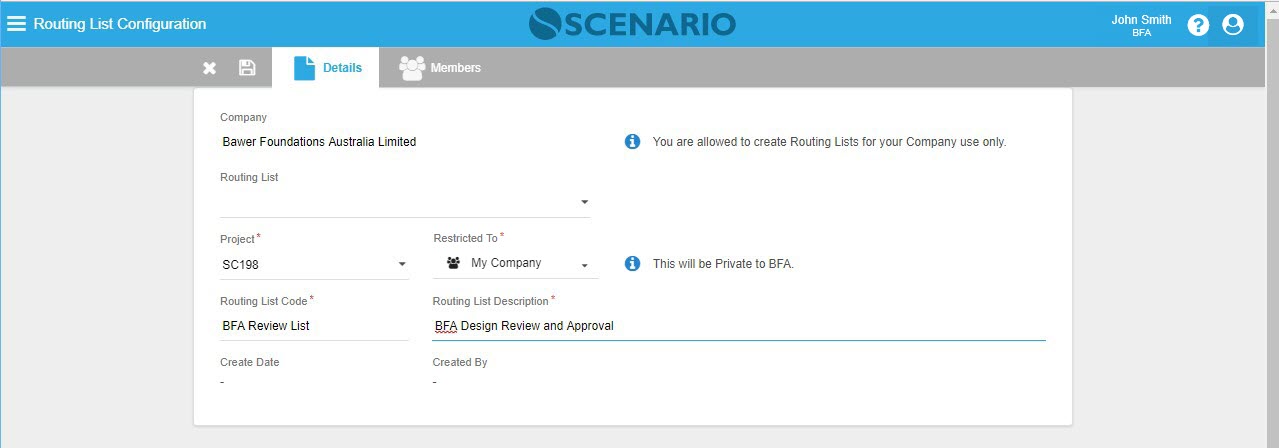
| External AuthUser logs in (e,g, John Smith, BFA) |
|
On the Details tab of Routing List Configuration screen, click the New icon ( + ) to create a new Routing List. Note that the Company will default with the login User's Company Name. Info message will automatically display if what type of routing list you can create. Since from the above example the login User is an External User, John Smith can only create a Routing List for his Company. |
|
| After completing the details, you have to proceed to the Members tab to add first the Members for the Routing List to be saved. |
2. Add Members |
|---|
|
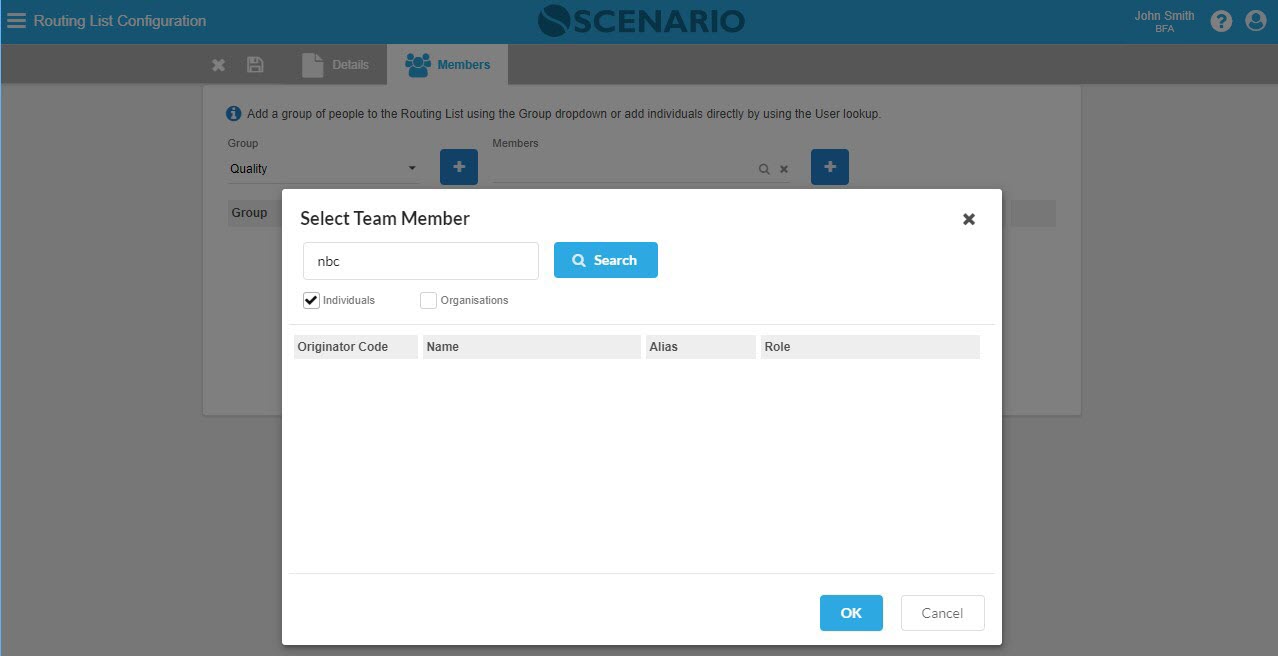
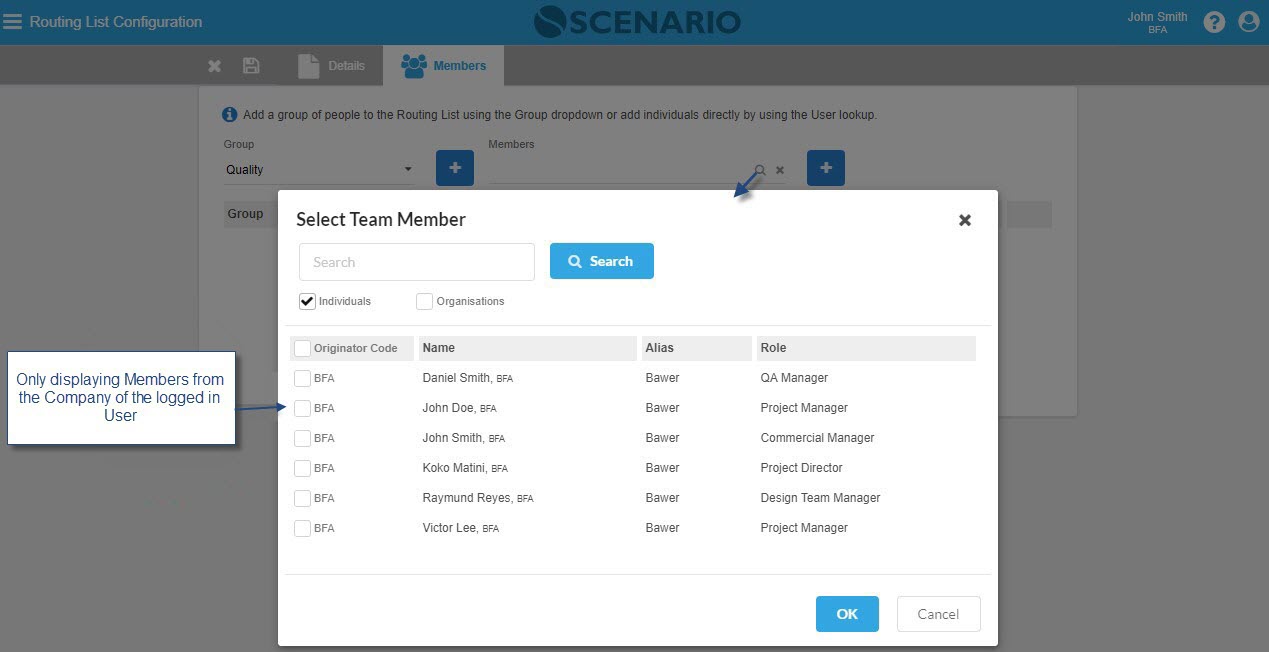
Searching for AuthUsers from other Companies will not display a search result; only Members from the same Company of the logged-in User will be displayed. |
|
Members that can be selected are those belonging to the same Company as the login User. |
Examples of Use
<insert examples of use here>

