Workflows Tab
Contents
Overview
The Workflows tab is the tab with the icon like an ORGANISATION HIERARCHY. This is called the Workflow icon and is used in various screens to allow access to workflows.
User is able to view the history of Workflows for the Document along with the specific status of each Workflow. If there are more than 1 workflow, the most recent workflow is displayed at the top of the list.
All other workflows are collapsed and displayed directly below in descending date order.
Note - important information is available by clicking the blue Info icon
Screen Explanation
Header Rows
The Workflows Tab has a header row and then further information is displayed once expanded. See the example below.

Header/Label/Icon | Description |
|---|---|
| The Workflow header row shows the following: | |
Workflow Name | It displays the name of the Workflow. |
| Workflow Status | It displays the status of the Workflow (In Progress, Completed, or Cancelled). Show also the date when workflow is completed and cancelled. |
| Workflow Owner | Shows the owner of the Workflow |
| Initiated By & Date | It displays the Initiator of the Workflow and the date of initiation. |
| Time Allowed | It displays the number of days the Workflow is expected to be finished. |
| Deadline | The Workflow deadline date. |
| Workflow Comment Info icon | When hovered, displays the comments entered by the Owner, Initiator, and the one who set the Outcome. |
| When expanded, the additional information shows each activity within the Workflow: | |
| Activity Name | The name of the Workflow Activity |
| Outcome | The Activity outcome that has been set by the Activity Owner. |
| Remarks | The added remarks by the one who sets the Outcome. |
| Owner of the Activity | The Owner of the Activity and anyone included for Info on the Activity. |
| Outcome | The Activity outcome it has been set already. |
| Who sets the Outcome | The Owner of the Activity who sets the Outcome. |
| Outcome Date | The date the outcome has been set by the owner. |
| Actioned By | The Individual who sets the Outcome of the Activity. |
| Activity Comment | Any comment entered by the Owner when setting the Outcome. This is viewed when the blue info icon beside the Activity Owner is clicked. |
| Actioned Date | It displays the date when the Activity has been Actioned. |
| Activity Deadline Date | It displays the Activity Due date. |
Initiate Workflow Page
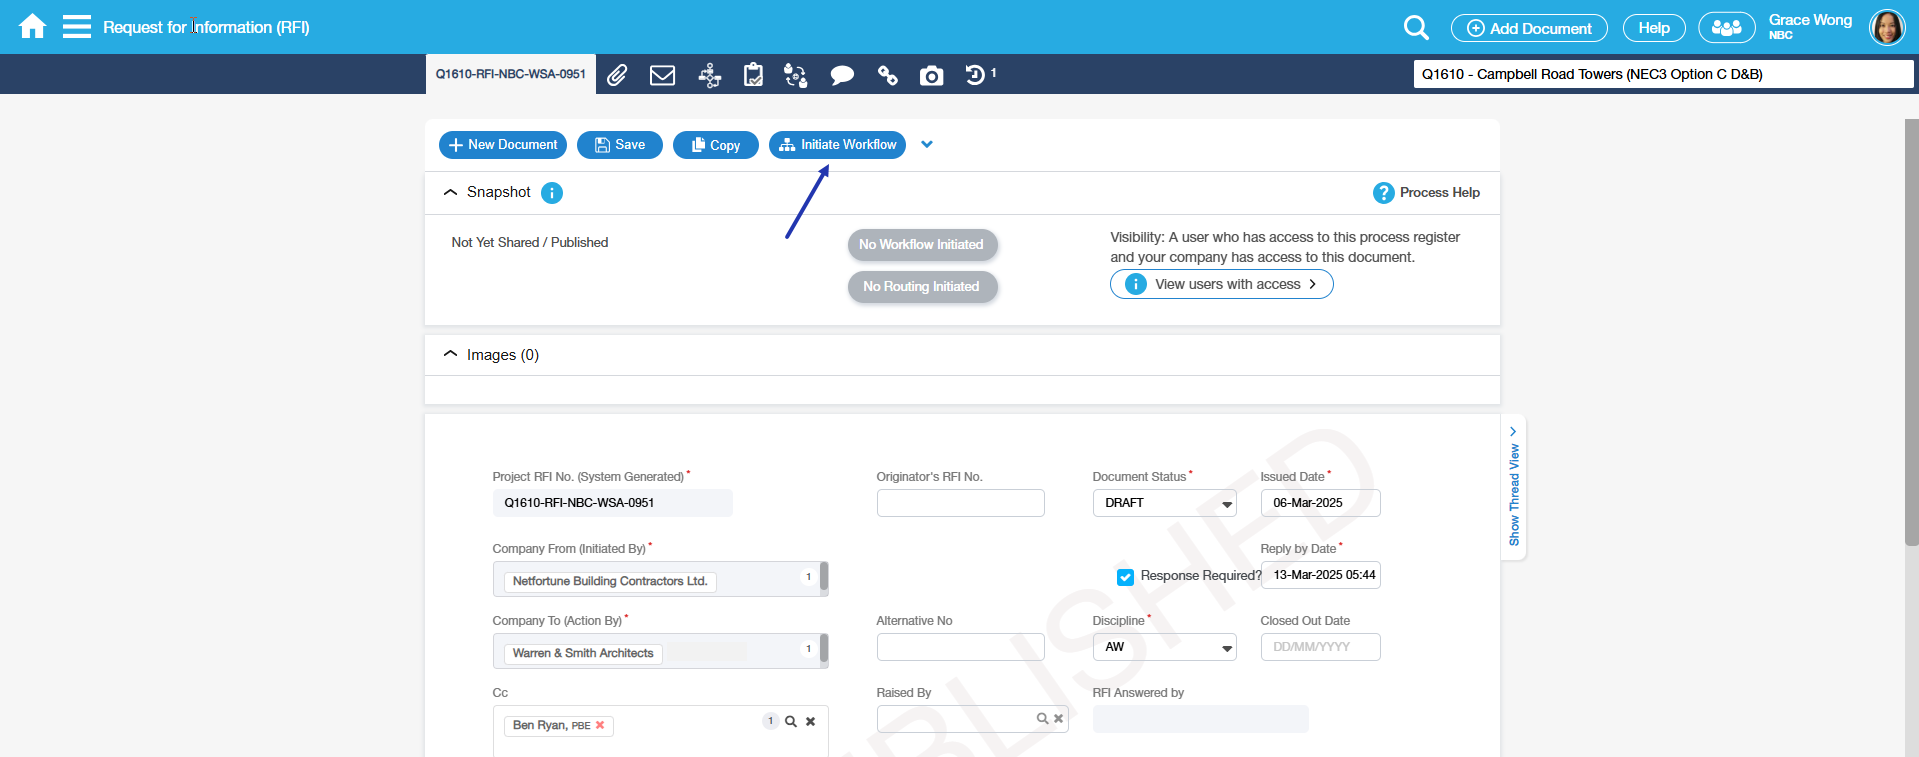
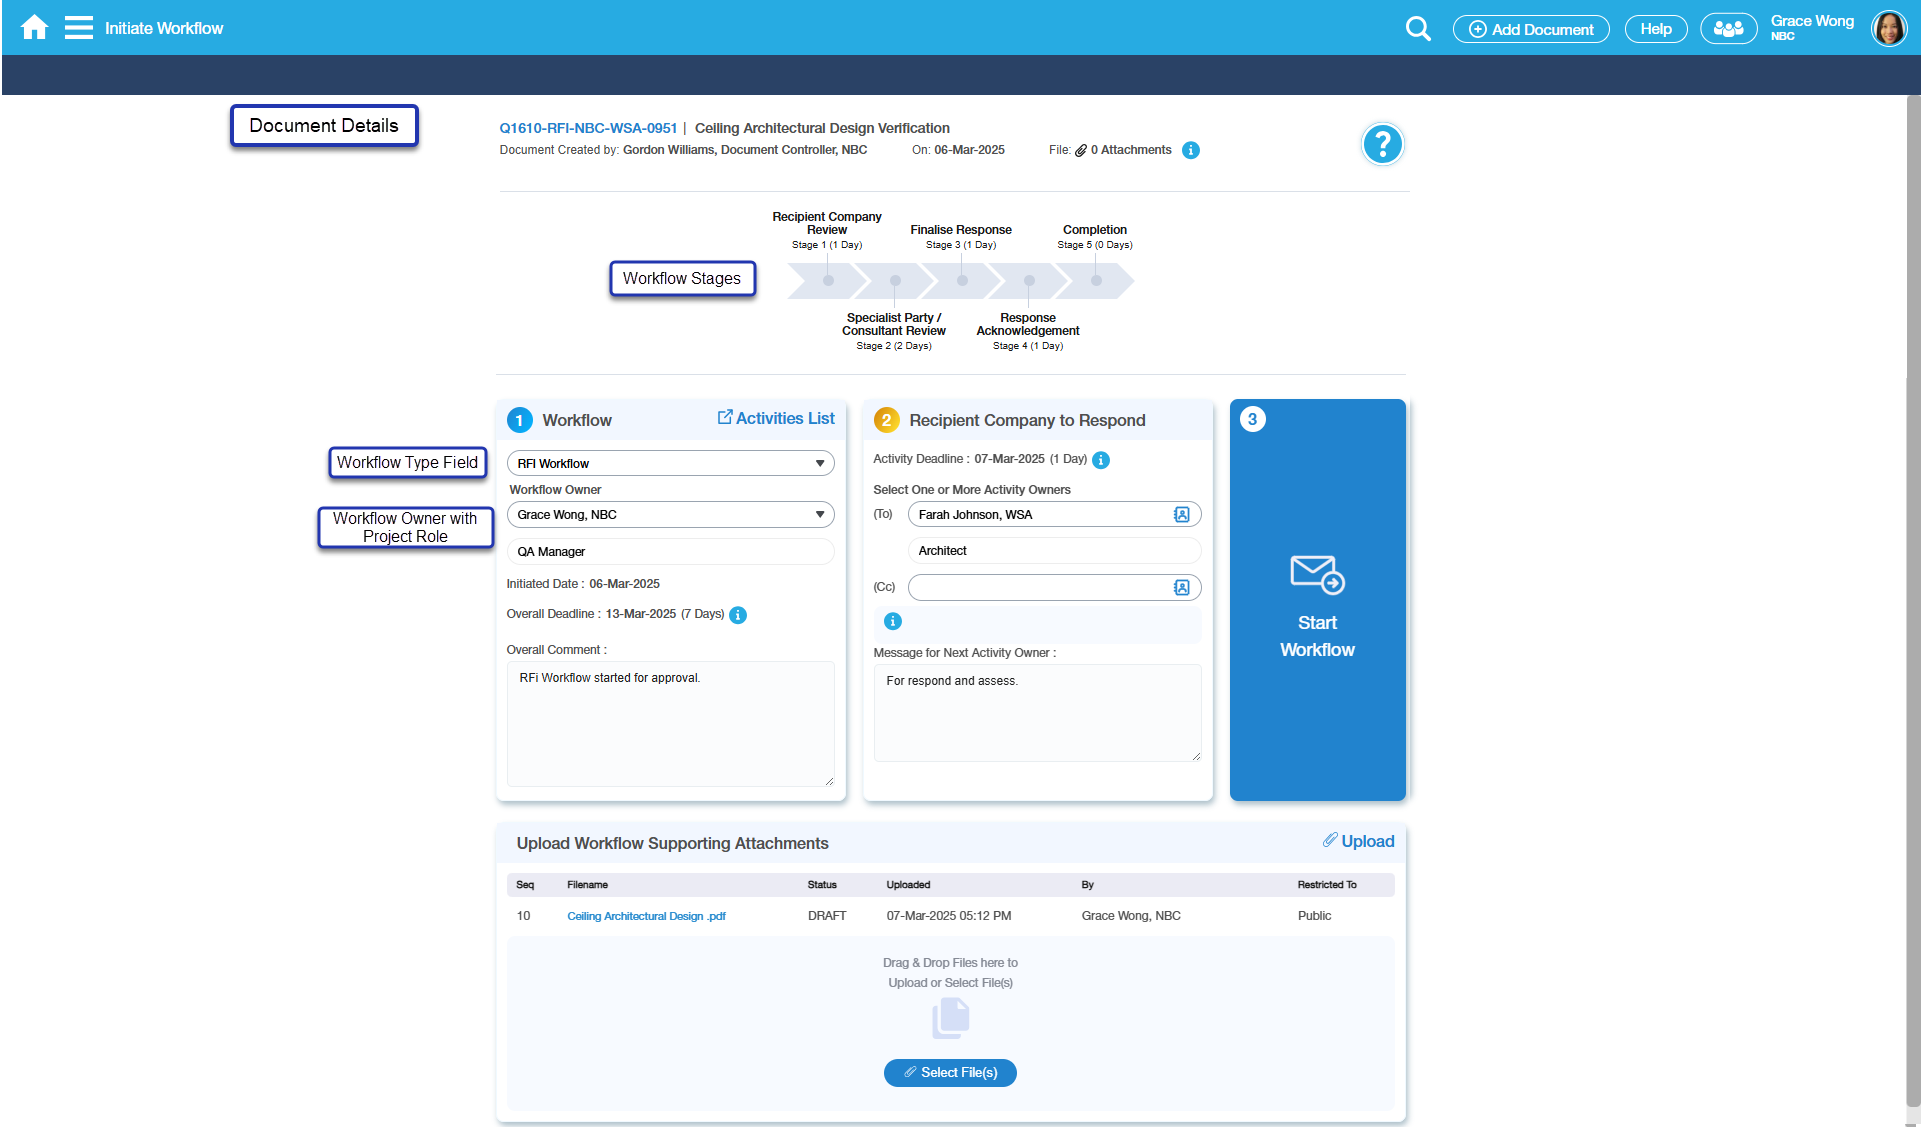
When on a Document, Initiating a Workflow can be accessed either from the Details Tab or the Workflow Tab. Upon selecting either of these two ways, the application will take the User to Initiate Workflow page.
Field/Button | Description |
|---|---|
| Document Details | Displayed at the top-most part of the IWF screen. This is read-only indicating the Document details such as the Document Number, Subject, Document Creator, Document Created Date, and the Attachments. |
| Attachment Info | Displays the information of the Attachment(s) including the Sequence and the Filename. The filename is a hyperlink that when clicked will automatically download the file. The files are sorted with the latest on top. |
| Workflow Stages | This is used to determine what is the current stage or the Activity of the Workflow that has been initiated against the Document. This will display once Workflow is selected and the selected Workflow has configured Workflow Stages. |
| First Section Workflow Details | |
| Workflow Type Field | Select Workflow that is to be initiated. Note: If there is only one Workflow type assigned to the register, it will automatically populate the field. |
| Activities List | It displays the table list and the information of the entire Workflow. |
| Workflow Owner | Default set as the Initiator but but can be edited and changed to other Users. |
Overall Comment | Free text field to enter the Overall Workflow comments. |
| Overall Workflow Deadline | This will normally default with a date based on a number of days after the Workflow is initiated depending on the contractual agreement of the project or as configured against the Workflow. |
| Second Section Workflow Details | |
| Next Activity Header | This is for reference only showing the Next Activity Description. |
| To | Defaulted with Role or individual(s) as configured in the Workflow set-up; the person assigned to this Role will be the first Activity Owner of the Workflow. |
| Cc | Other User(s) included as For Info on the Activity. Default For Info can be selected in the Workflow set-up. |
| Next Activity Comment (Message for Next Activity Owner) | Text field wherein User can add comments and notes for the next Owner reference. This will be captured and saved on the Comments tab of the document. |
| Activity Deadline | This will normally default with a date based on a number of days after the activity is assigned depending on the contractual agreement of the project or as configured against the Workflow activity. |
| Next Activity Details | By default, this column will show empty details. Once Workflow is selected, it will display the following fields for the Next Activity Owner(s) |
| Third Section Workflow Details | |
| Start Workflow button | This is clicked to proceed on initiating the Workflow. Send or Start button for the Workflow to progress. Disabled when no workflow yet is selected. |
| Uploading attachment files for Workflow | |
| Upload Workflow Supporting Attachments | Upload supplementary attachment(s) against the IWF screen. The uploaded file(s) will be reflected under the Document Form Entry Attachment tab. There are two ways to upload the file:
|
How Do I?
How Do I Initiate the Workflow against a Document?
There are several ways the User can Initiate the Workflow against a Document; note that either way, the same Initiate Workflow screen will be opened: |
|---|
1. Go to the Document > Workflow Tab |
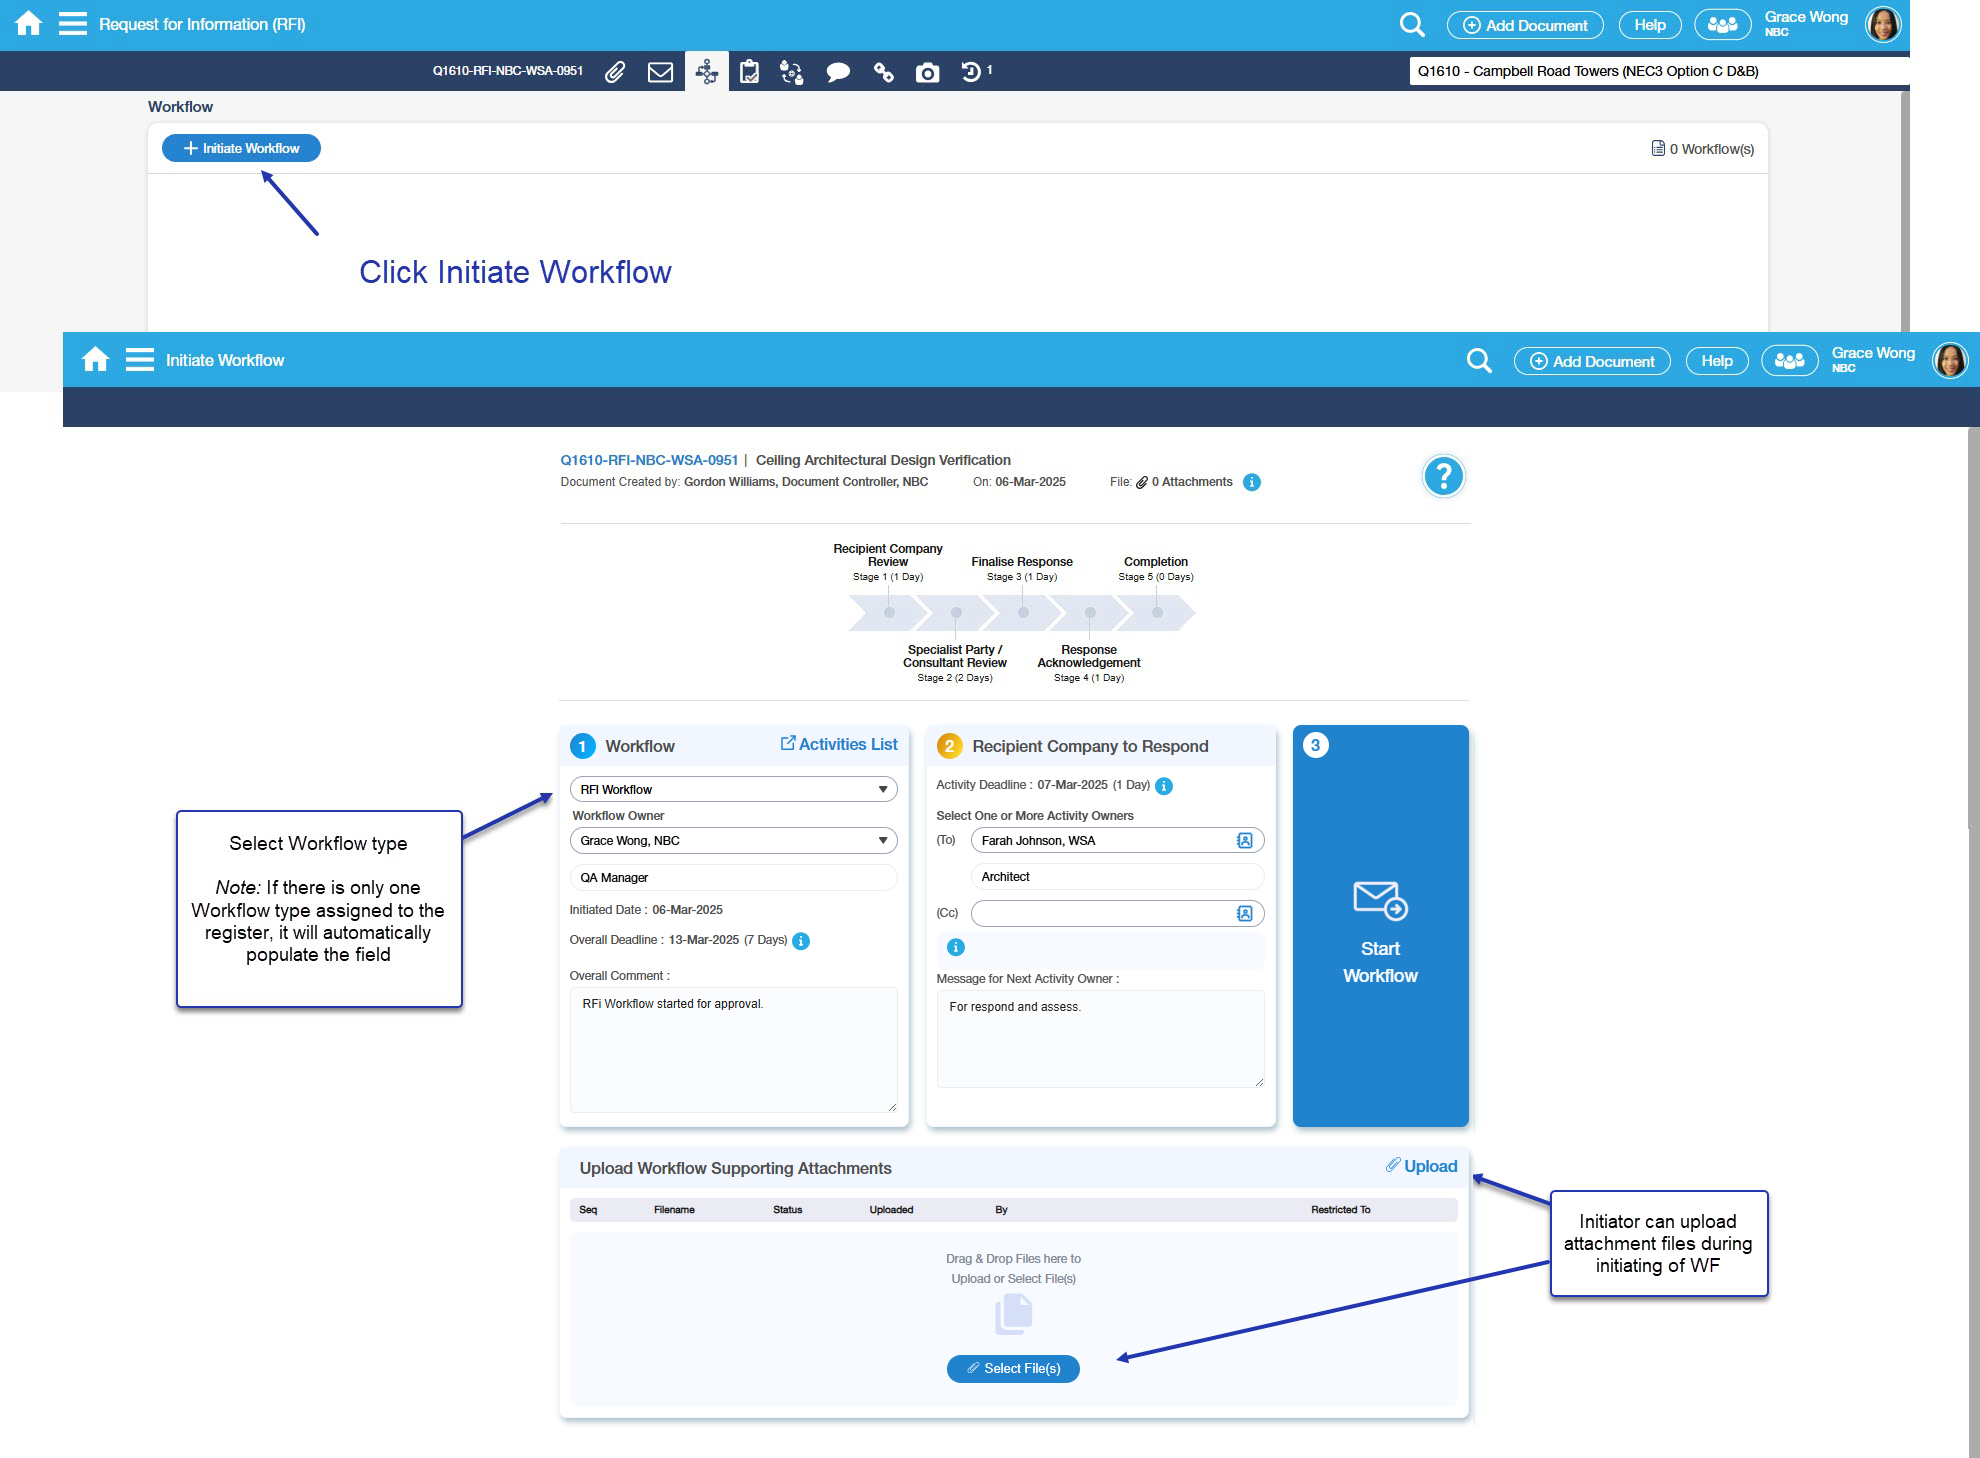
Click Initiate Workflow in the Workflow Tab to open the WF Initiate Page
|
2. Click the Initiate Button located at the Document Form Details Tab |
|
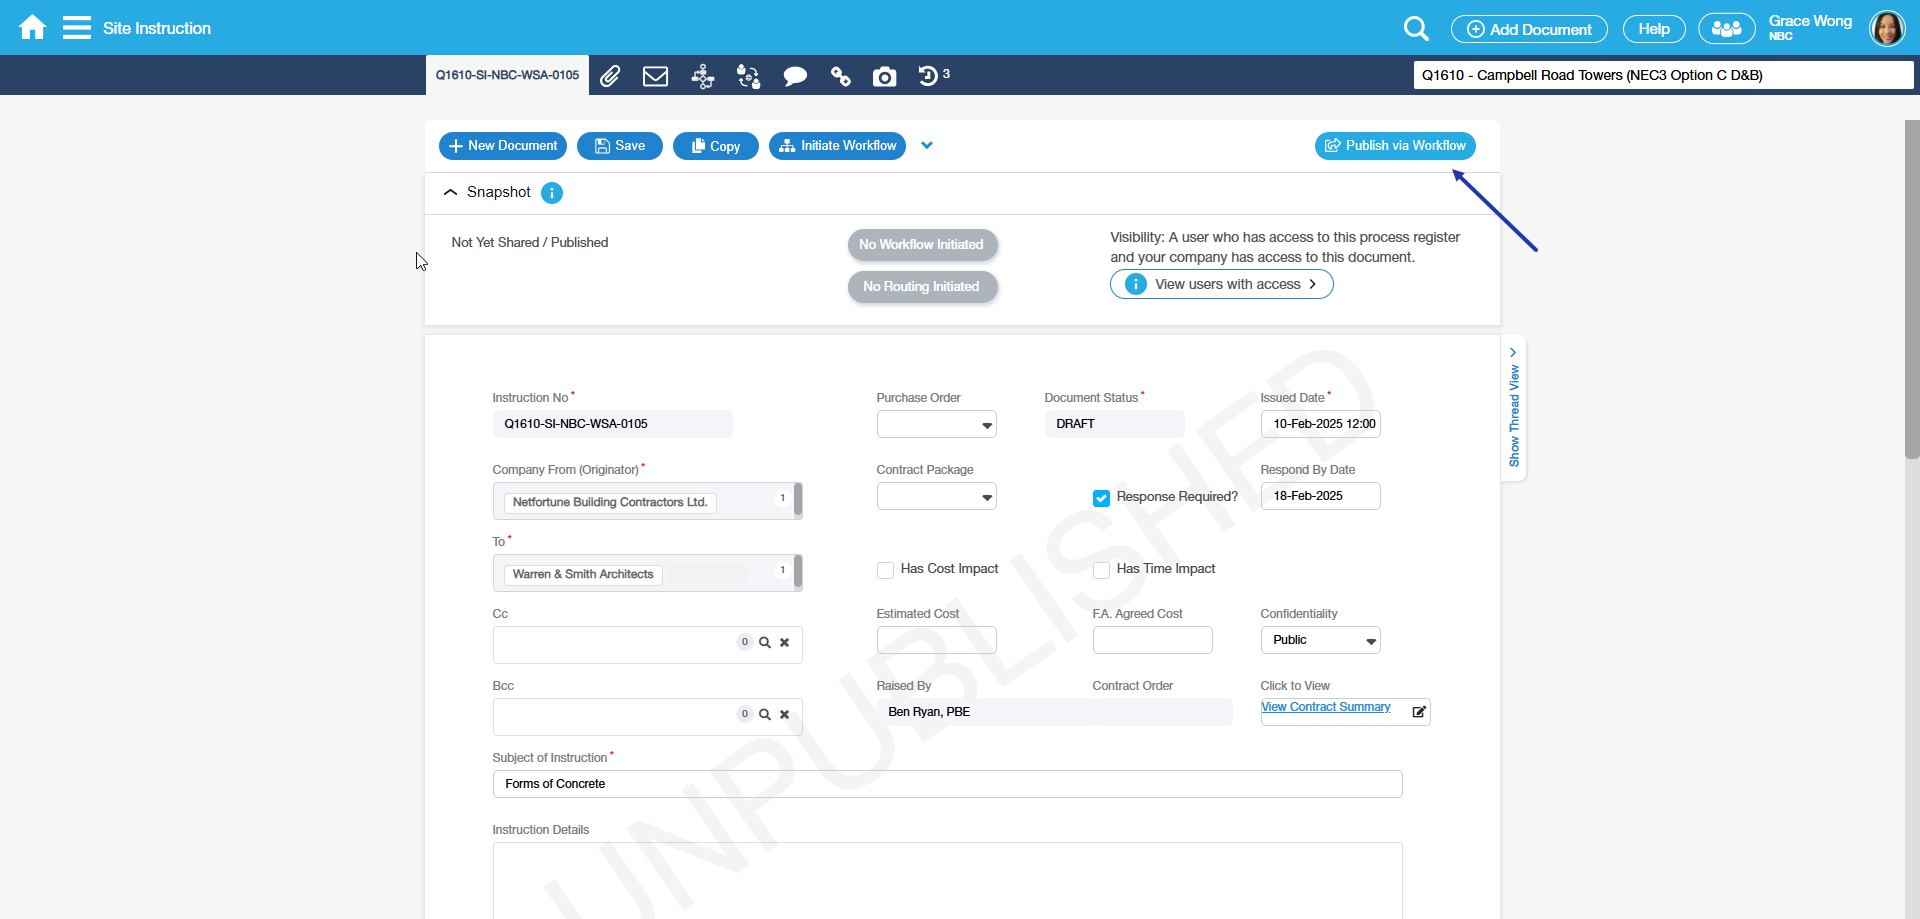
3. Publish the document via Publish via Workflow |
|
| 1. Go to Document Form > Workflow Tab and click + Initiate Workflow |
2. Select the Workflow Type - User must first select the Workflow intended to be initiated. Only Workflows you have access to and authorized to initiate are displayed in the list. Register specific and Global Workflows are separated by a grey row with the label ‘Global’. Note: If there are only one Register specific Workflow assigned to the register, it will automatically populated the Workflow Type field. |
3. Once the Workflow is already selected, the Workflow Owner field will default with the User who is initiating the Workflow; however, this field is editable and can be changed to another User. Initiated Date and Overall Deadline Date field will have a default date as configured accordingly. This field is not editable. |
| 4. Enter the Workflow Overall Comment. |
| 5. If other than the defaulted Workflow Owner on the field, select Contacts from the list. |
| 6. The Next Activity Description will also be displayed (as configured). The Activity Deadline will be displayed automatically based on the setup. |
| 7. Assign the Next Activity owner on the To field; in the above sample, To defaults with 'Role'. The To field was configured in the Workflow with default = Role. |
| 8. Enter Comment for the next Activity Owner reference on the Message for Next Activity Owner. Note: After initiating, this will be displayed in the Comments Tab. |
| 9. To add supplementary files, you may either opt to select the files from your folder or use the drag & drop feature to upload attachments. |
10. Proceed on initiating the workflow to the next Activity Owner, click Start Workflow.
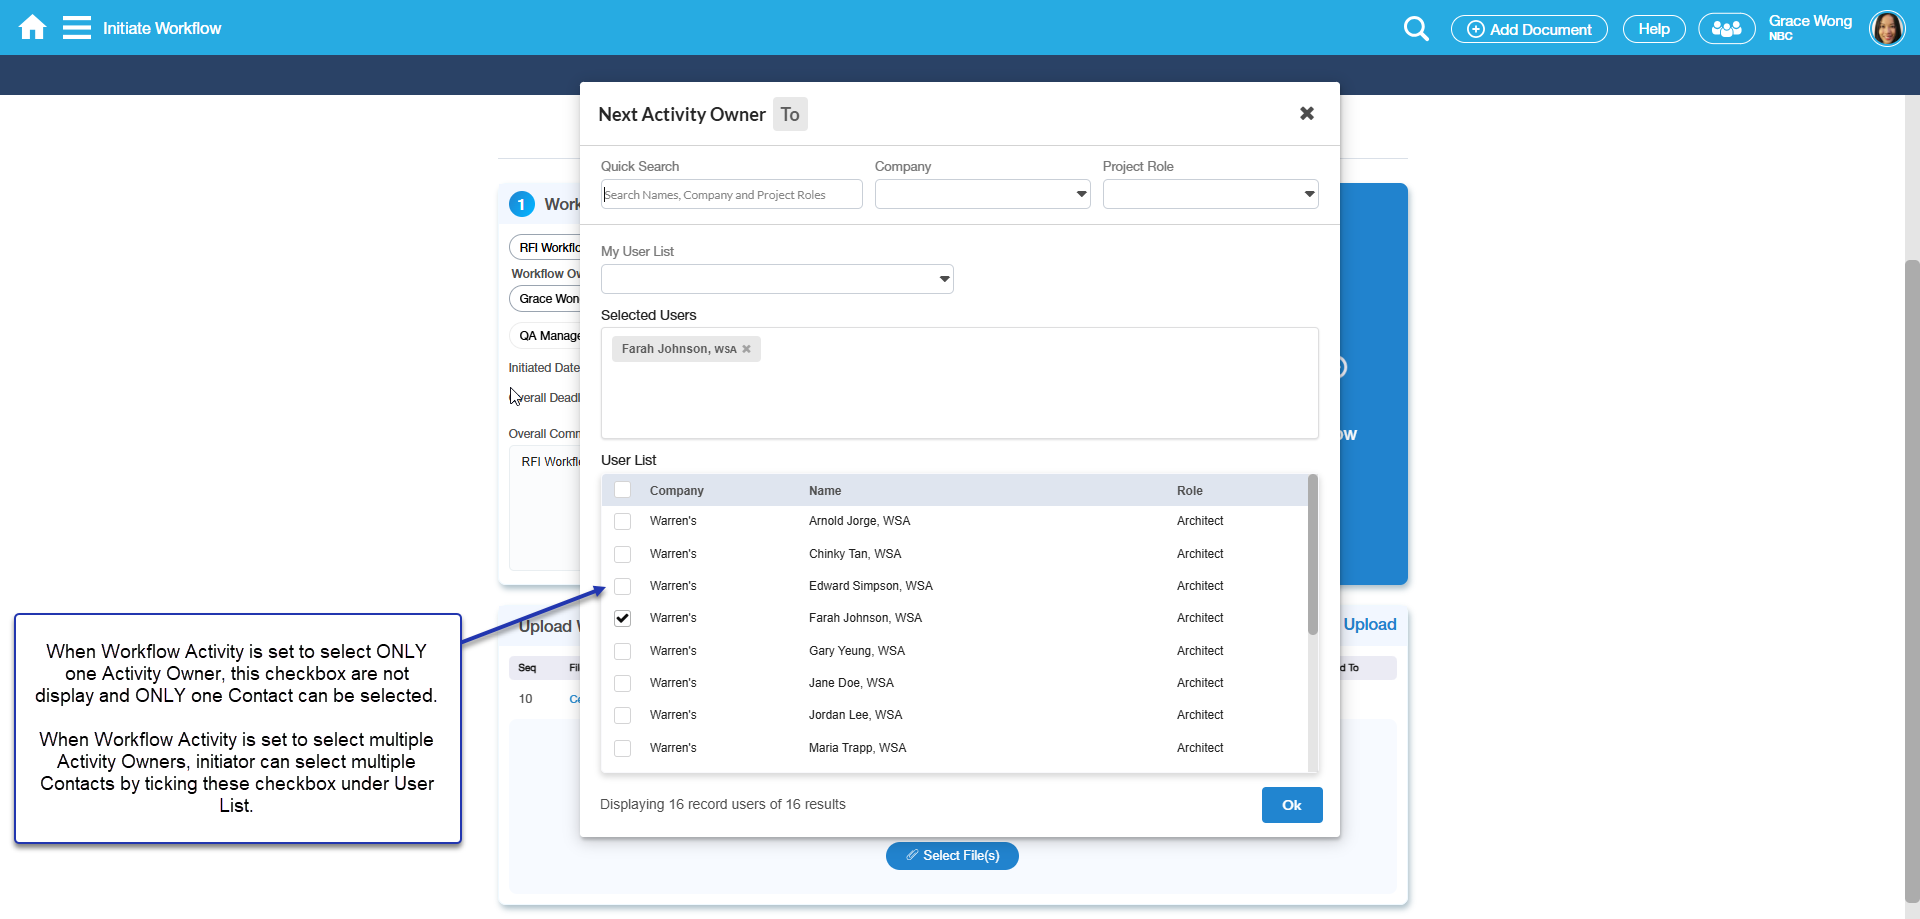
When there are several Contacts under the same Role, and the Workflow Activity is not allowed to set multiple Owners, ONLY one contacts can be selected. If Workflow activity allows to set multiple Owners, Inititiator can select multiple Contacts by clicking the checkbox under User List. Selected Contacts for Activity Owner will be display under Selected Users field. |
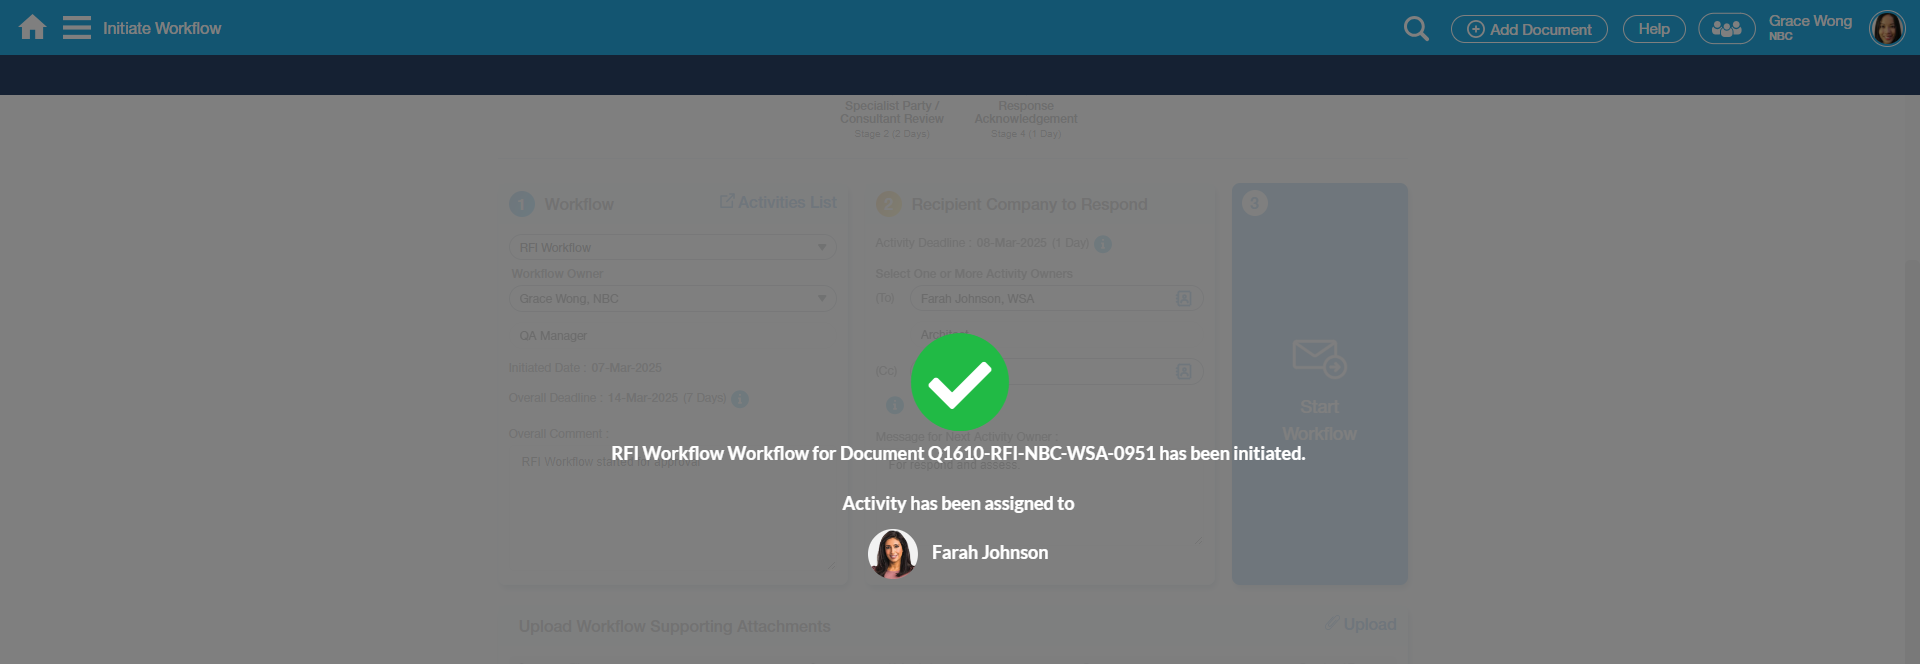
8. A prompt message will display. Click OK. |
9. Workflows can be viewed on the Workflow tab of the document. |
| 10. The Next Activity Owner will then receive a notification email. The Next Activity Owner can click the Document No hyperlink on the notification email or login to Scenario Enterprise and view and Action the Workflows either on /wiki/spaces/AHG/pages/1340538924, /wiki/spaces/AHG/pages/1340538926/wiki/spaces/AHG/pages/1340538926 or /wiki/spaces/S6Help/pages/1340538921 menu - which will be discussed in separate topics as provided on the links. |
Examples of Use
Sample In Progress Workflow

Sample Completed Workflow.

Sample Cancelled Workflow

Related Topics
/wiki/spaces/S6Help/pages/1340538919


