Add Document
Contents
Overview Document is a basic function and broadly common to all Registers.
Add Document button enables the User to process new documents (or other registered information). This requires the user to select the Register they wish to add the document to, and then complete the form entry, upload attachments, send conversations, and so on...
Screen Explanation
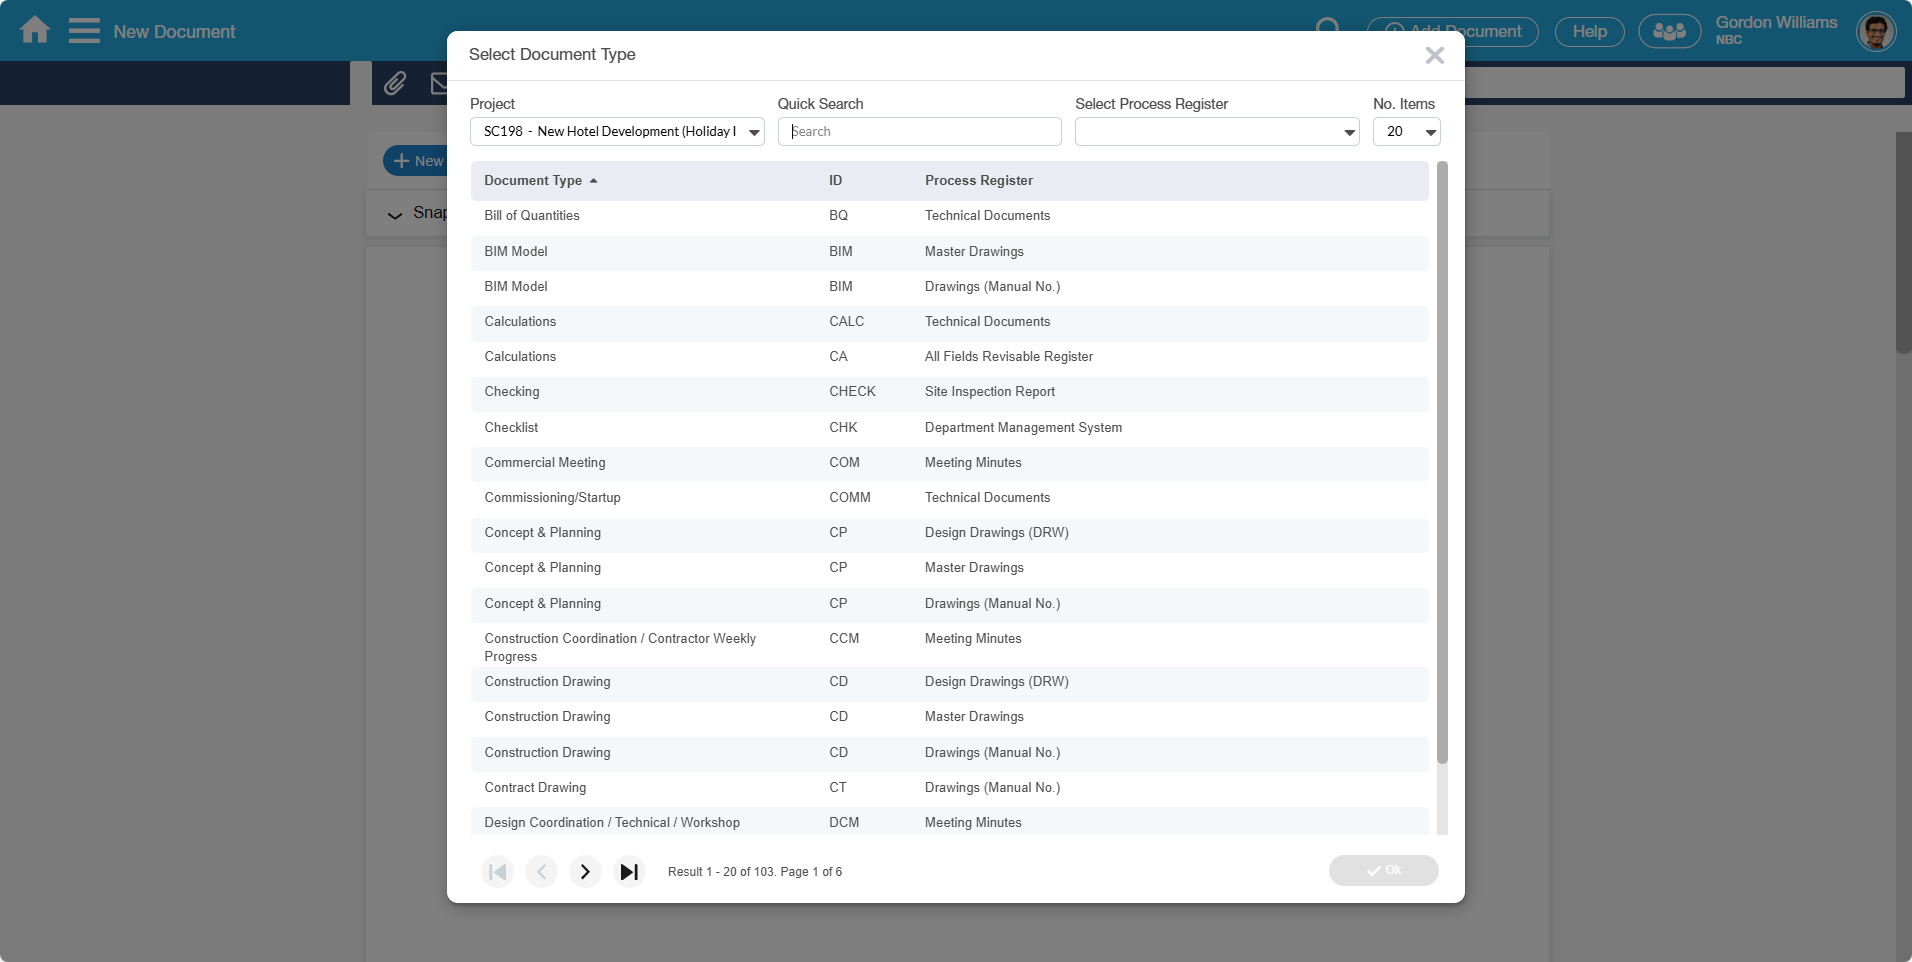
New Document - Select Register pop-up
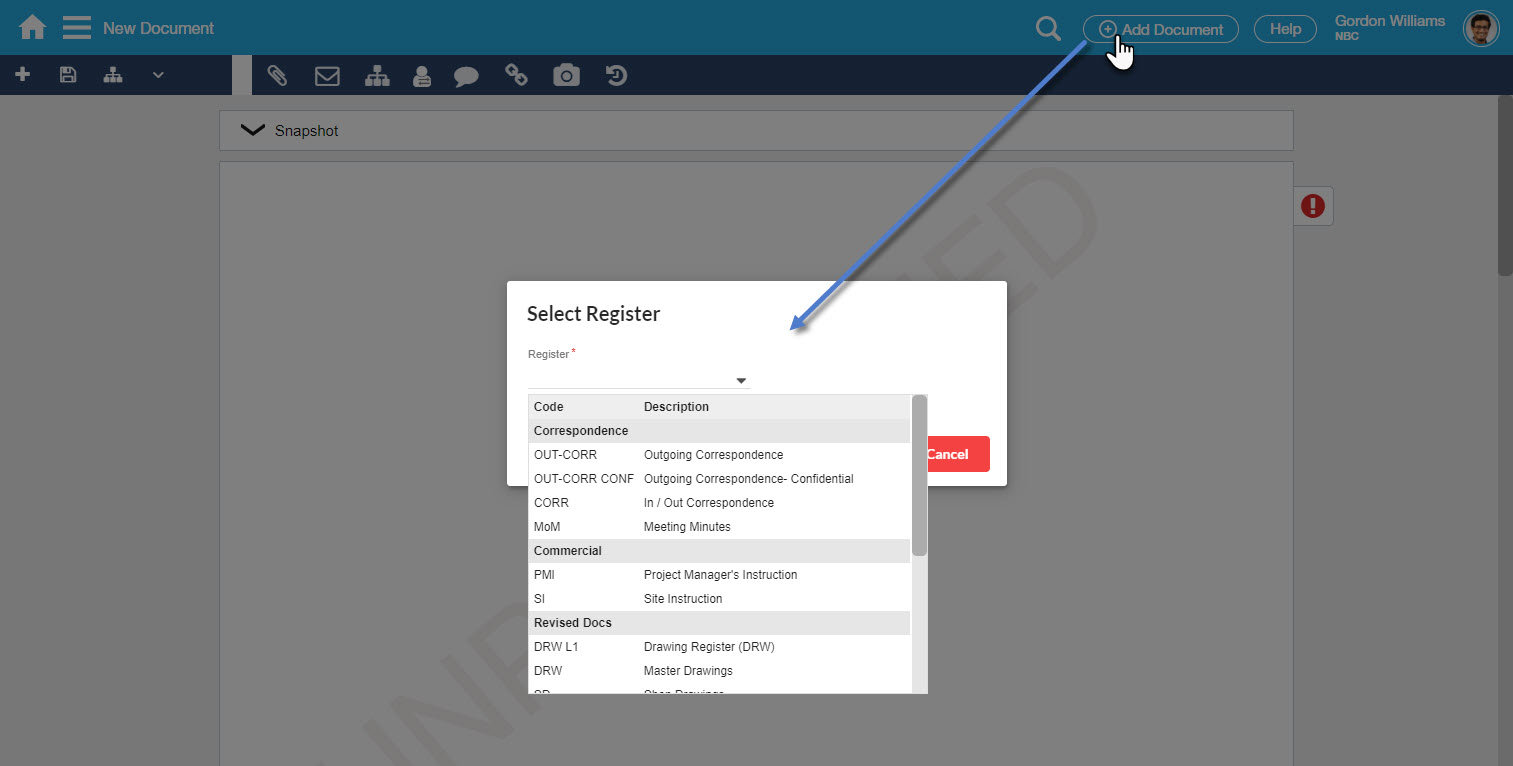
Upon selecting the Add Document button, you will be presented with the 'Select Register' pop-up. This pop-up displays the List of Registers that you have access to.
Your default 'Project' will be based on your 'Last Project' used. However, this can be changed to a different Project if it requires another Project. The Register can be selected by either selecting from the dropdown option or typing a code or description that possibly matches a Register in the list.
Field | Description |
|---|---|
Register | It displays the list of Registers a User has access to. You can select a Register either by selecting from the dropdown list or typing a code or description in the field that potentially matches a Register from the list. |
Document Tabs - Count Information
As information is added to the Document, Tabs are also updated with that additional information. This functionality automatically sets for the Attachments, Conversation, Workflows, Routings, Comments, Cross References, and Media tabs when those pages are added.
However, for some Registers configured with 'Use as Transmittal Register = True', a Transmittals tab will also be displayed in the Document form entry. Revisable Registers will have a Transmittals tab in its Document form entry (this allows access to the Transmittal or Submission used to deliver the Drawings).
The Details tab is updated to reflect the Document Number and other pertinent information regarding the document, and the other Tabs are updated with the count of records added to that specific Tab.

Transmittal Registration - Transmittals Tab

Document Form Screen
A Register's documents can be viewed in the detailed Form Entry view, based on how the Register has been configured. It provides the ability to add more information to a document; this includes uploading attachments, sending conversations, routing the Document, cross-referencing, adding comments, and initiating a Workflow against the document. The document form entry comprises - Action bar, Tabs, and fields.
Note that you are not allowed from using Document Form tabs until the Document is Saved. Whenever you attempt to use any of these Document Form tabs, a warning message will be presented, e.g. 'The Document must be saved and created first in order to utilize the Attachment section.'
Details Tab
The Details tab reflects the fields configured in the Register Designer for the Register that has been selected. Every field and drop-down value are entirely based on the Project's (or Company's) chosen configuration for the Register.
Fields can be non-mandatory or mandatory for entry to enable the User to save the Document. Fields marked with a red asterisk ( * ) are mandatory.
Document Status field uses color code as configured in the Register Designer.
Notes for Drop-down fields control (applicable to all screen with fields that has drop-downs):
1. When typing in a search text in a drop-down field and no result is selected, then the control loses focus then the field will be blank.
2. When typing in a search text in a drop-down field and no results are found, a message will be shown, 'No Records Found' just like the lookup control.
| Label/Icon | Description |
|---|---|
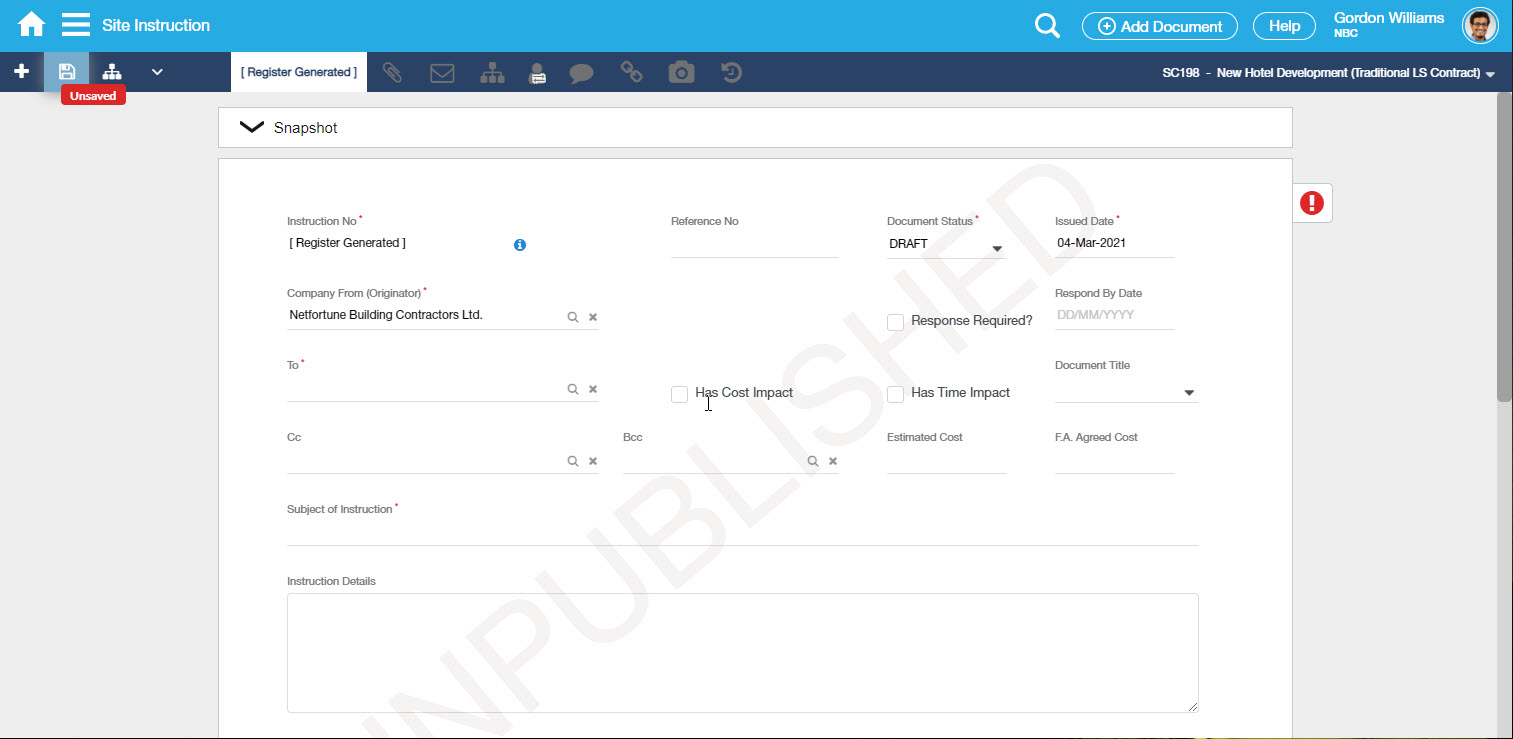
| This red 'Unsaved' label will appear once a new Document is not yet saved; or whenever the Document is modified. This label ensures the User never forget to save the change. | |
| This red 'Exclamation' icon is displayed once the new Document is not yet 'Published' or not available to the 'Public' yet. This label disappears only when the Document is already set to Published (ie. the selected Status = Published) and a green check-mark will appear. |
Document Form Entry - Snapshot
Feature - Document Snapshot AC.mp4
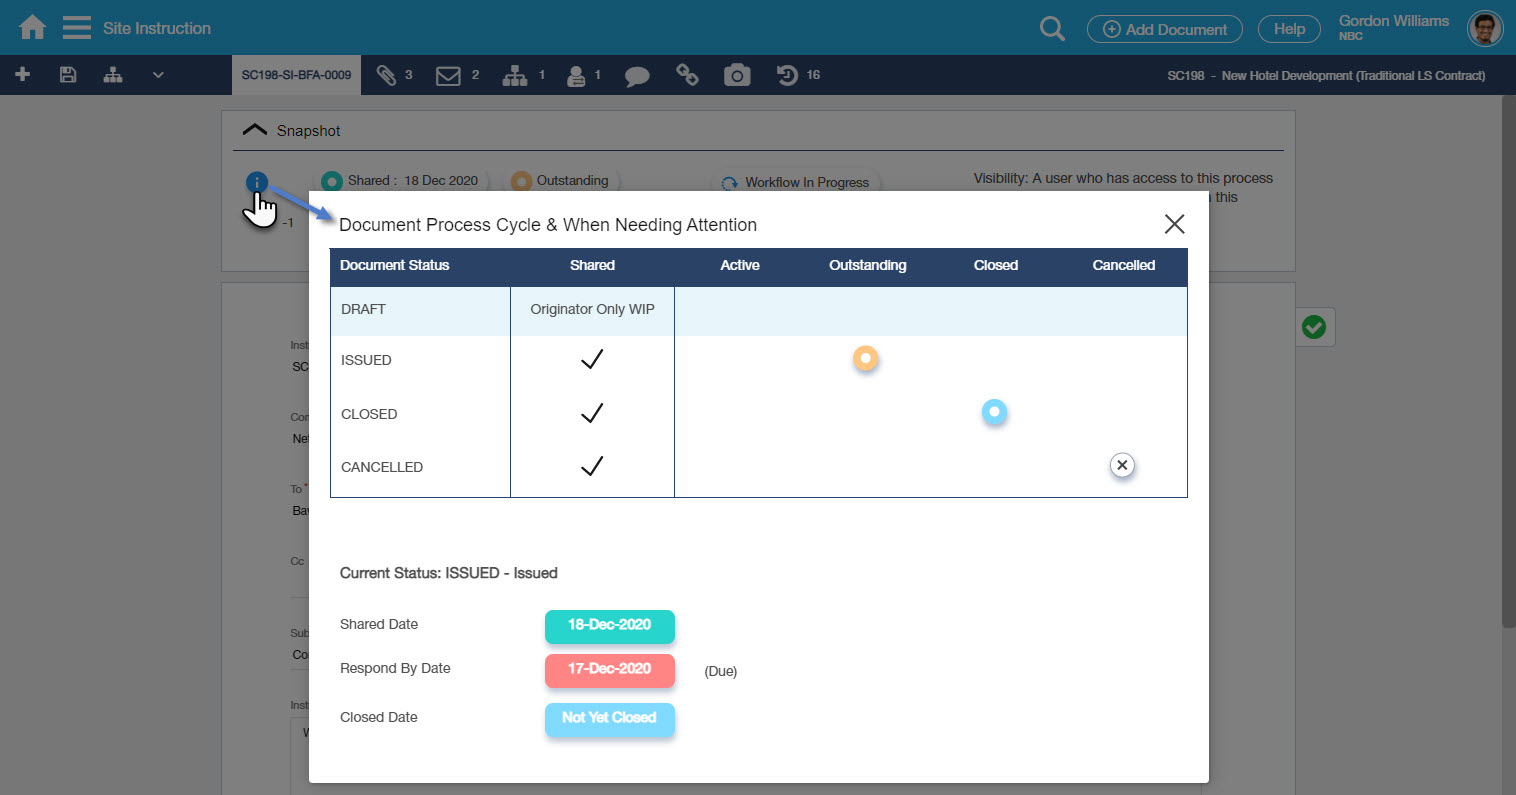
Document Snapshot provides an immediate snapshot summary upon opening the Document in regards to its overall status, activity, and visibility.
By default, Snapshot is open and the Status matrix is visible when opening a Document; however, you can opt to minimize it by clicking the arrow up.

| Labels | Description |
|---|---|
| Info icon | Shows the Document Process Cycle & When Needing Attention |
| Shared | The date when the Document got Published |
| Due Date | The date set in Respond By Date |
| Document Status Attribute Constant | Shows if the Document is Active, Outstanding, Closed, or Cancelled |
| No of Days | No of days the Document is set to Active/Outstanding/Closed/Cancelled from the Published Date |
| Workflow Status | Shows if the Workflow is In-Progress, Completed, or No Workflow |
| Routing Status | Shows if the Routing is In-Progress, Completed, or No Routing |
| Visibility | A user who has access to this process registers and the company that is listed on this document. |
| View users with access | Shows all Users with access to the Documents |

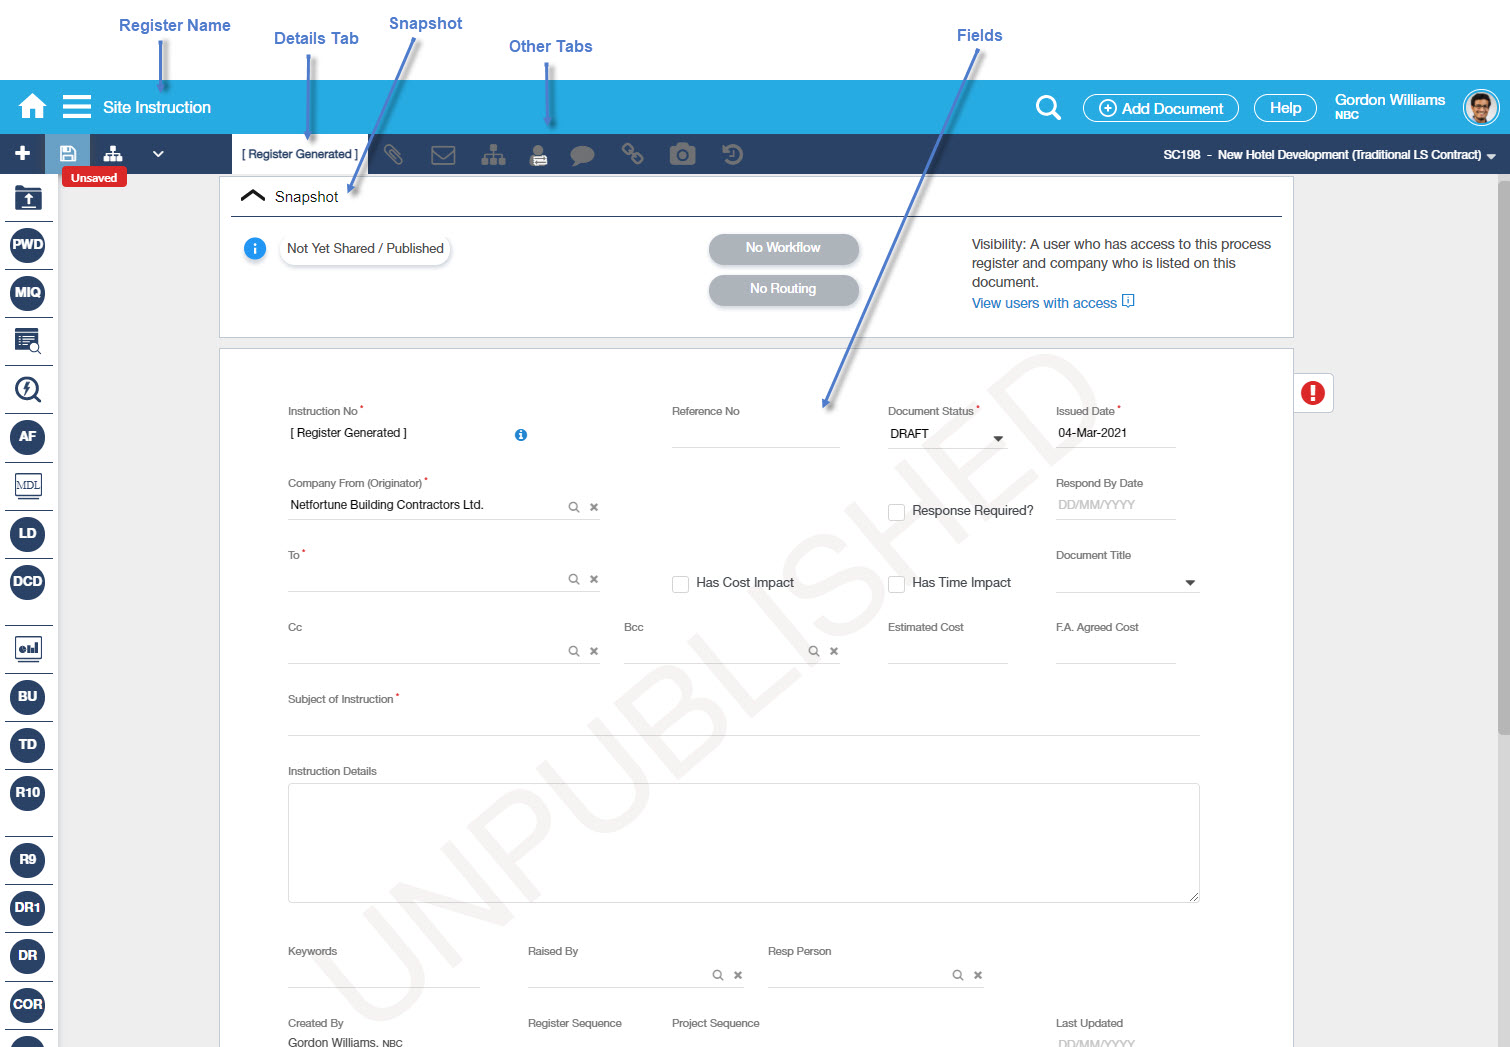
New unsaved Document
The Document tabs (Attachments, Conversations, Content, Workflows, Routing, Comments, Cross References, Media & History) are disabled on a Document until it has been saved.
Labels | Description |
|---|---|
Register Name | This is located at the top left-hand side of the screen and beside the Vertical Menu icon. |
| Project Filter | Displays Projects you have access to. Your default 'Project' will be based on your 'Last Project' used. However, this can be changed to a different Project if it requires another Project. |
Details Tab | It displays the Details tab notes [Register Generated] when the document has not yet been saved; but once already saved, the Document number will then be displayed. HINT - Click the Info icon to view the Document Number Structure. |
| Other Tabs | Other tabs include Attachments, Conversations, Initiate Workflow, Routing, Comments, Cross References, Media, and History. |
| Fields | Fields displayed on the Details tab are configured in Instant Install or customised by the Projection Implementation Team. |
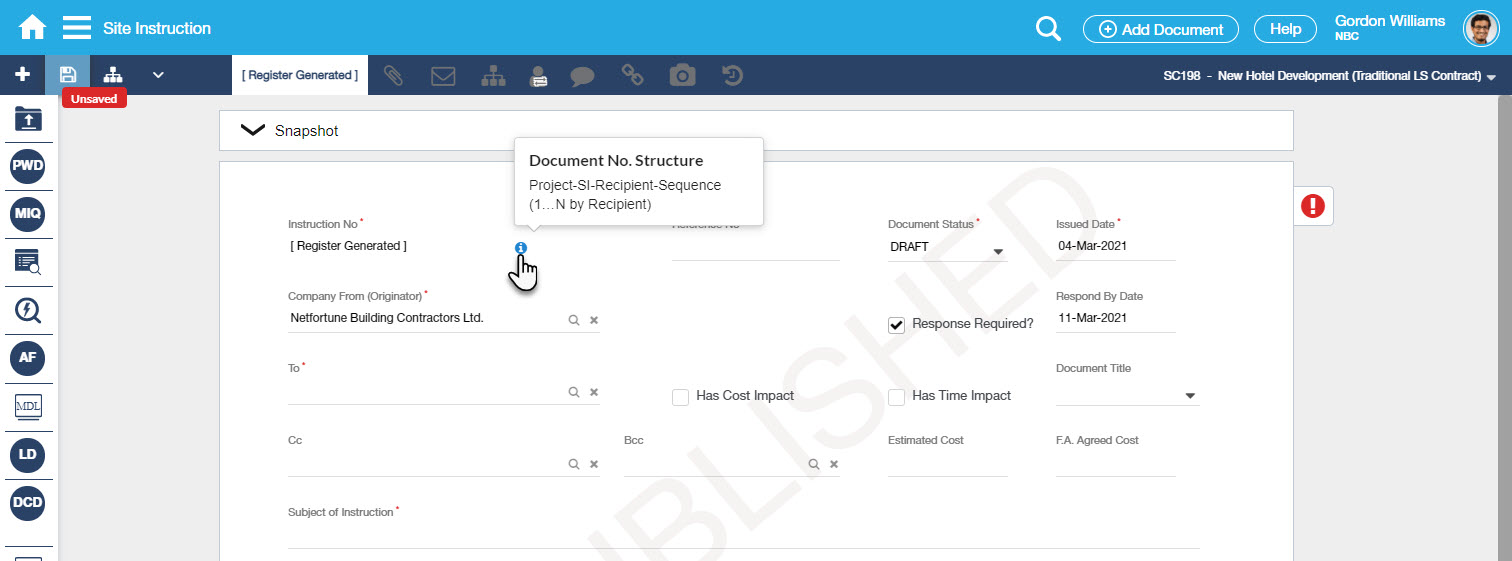
Sample auto-generated Document No info message showing the Document Number format.
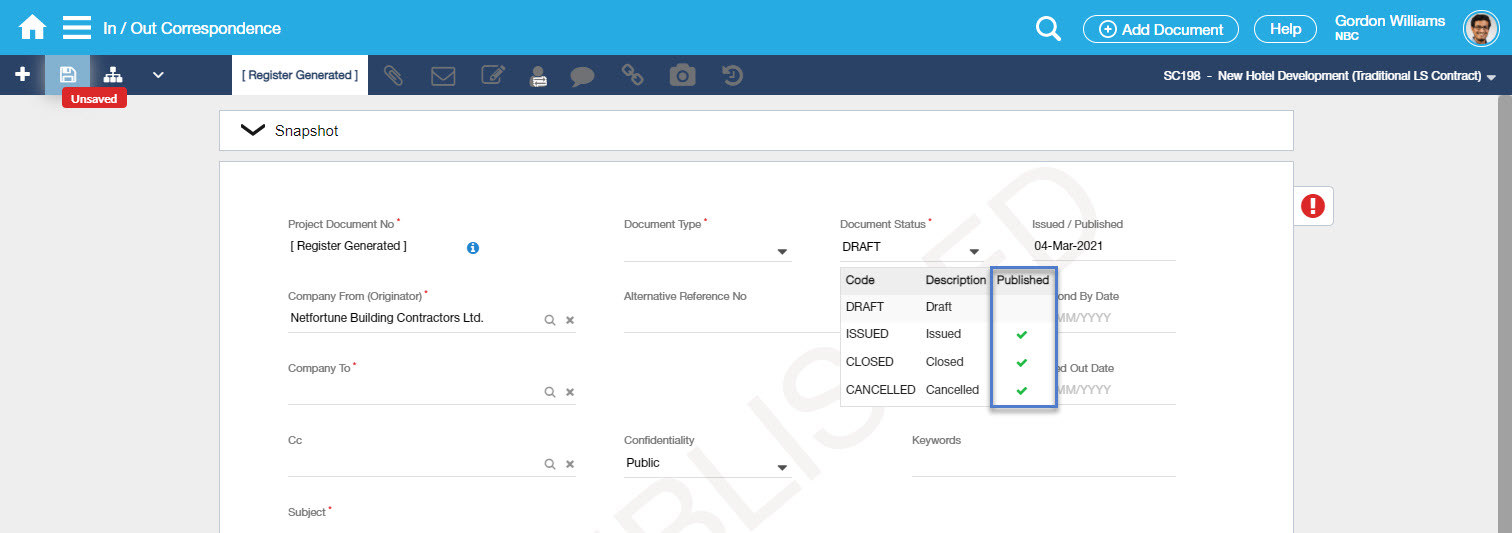
The status drop-down has a Published column, it displays a green tick icon against the row if Status is configured as Published.
Action Bar
The Action bar consists of 'Actions' that change depending on the Tab within the Document. This is clearly indicated to the User what you can do on that particular Tab.
- When you are on the Details Tab, you will be presented with the following 'Actions'

- When you are on the Comments Tab, you will be presented with the following 'Actions'

Action | Description |
|---|---|
New/Add | Use to add or create a new Document for the register. |
Save | Use to Save the document changes. |
| Initiate Workflow | Use to Initiate a new Workflow. |
| More | Selections for the form/report generation - Microsoft Word File, Preview - Output Form as PDF, Generate and Save as PDF. The copy function is also found in this Action. |
Other Tabs
Please refer to the following links:
/wiki/spaces/S6Help/pages/1359545456
Transmitted Tab (for Transmittal Register)
How Do I?
There are two ways a user can add a new Document to a Register:
How Do I Create/Add New Document via Add Document button?
1. Add by clicking Add Document button |
|---|
|
1. Select the Add Document button to open the 'Select Register' pop-up window. |
| 2. You will be required to select from the Select Register pop-up window the Register to use for the Document. |
| 3. You can select the Register by either using the drop-down selection or typing into the Register field to show a potential Register that matches the entered value and then selecting from the list. |
How Do I Add a New Document by Selecting Add Document button on a specific Register in the Left Menu?
1. Add New Document by selecting Add Document button on a specific Register in the Left Menu |
|---|
|
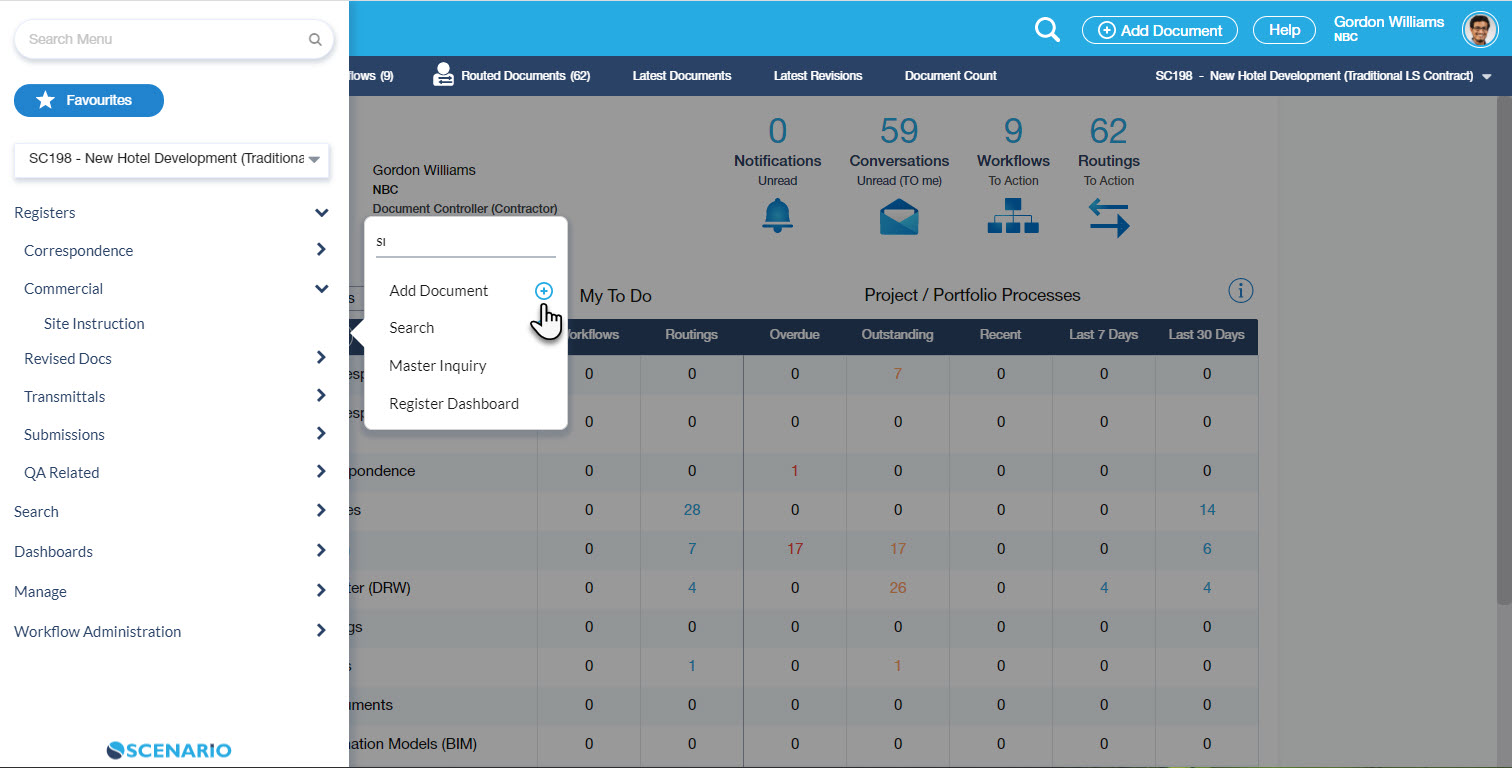
| 1. Selecting the 'Add Document' button on a specific Register in the Left Menu e.g. SI will lead you directly into the new Document form screen defaulted with your last Project used. |
| 2. Fill out the fields and save the entry. |
How Do I Add a New Document by selecting + New Document button for specific Register in Search, Find & Action
1. Add New Document by click + New Document button on a specific Register in Search, Find & Action. |
|---|
|
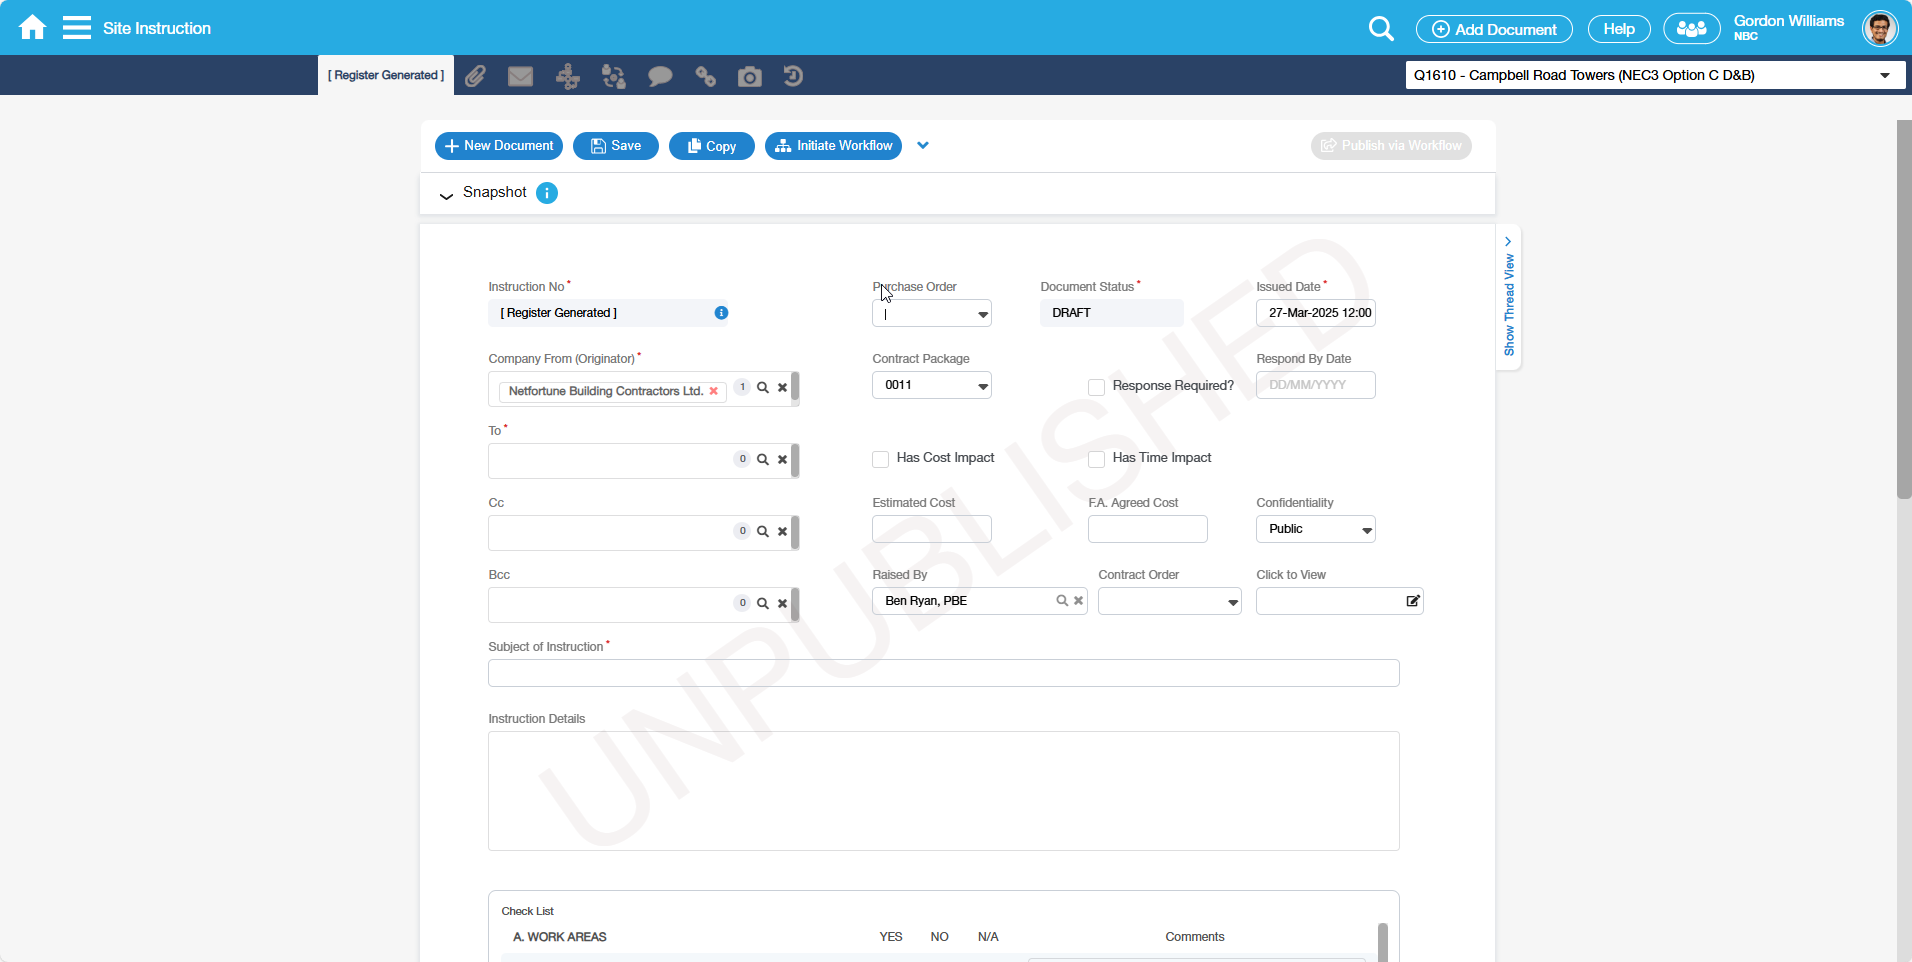
| 1. Selecting the ' + New Document' button on a specific Register in the Search, Find & Action e.g. SI will lead you directly into the new Document form screen defaulted with your last Project used. |
| 2. Fill out the fields and save the entry. |
Examples of Use
<insert examples of use here>


