Conversations Tab
Contents
Overview
Conversation allows to communicate by used of emails saved within Scenario Enterprise, which is part of a Document. It cannot be sent to companies but only apply to user represent the company.
This simple concept is a form of collaboration where discussions (or Conversations dialogue) can be made around the topic of the document and have that discussion saved for historical purposes.
Each Conversation by default is restricted to My Company (Sender’s Company). Ensure to select Restricted To options if Conversations are deemed to be Private or more widely shared with the Project Team or viewed by all using Public:
- My Company – default when the Document is not yet Published
- Project Team
- Public - default when the Document is already published
- Private
Conversation Emails will be sent to recipients and hyperlinks are provided to access the document. As the recipient, you should be able to view the Conversations in the Conversations Tab of the MPD - My Project Dashboards screens.
Note: Notification is marked with a red bell ( ).
New Conversation
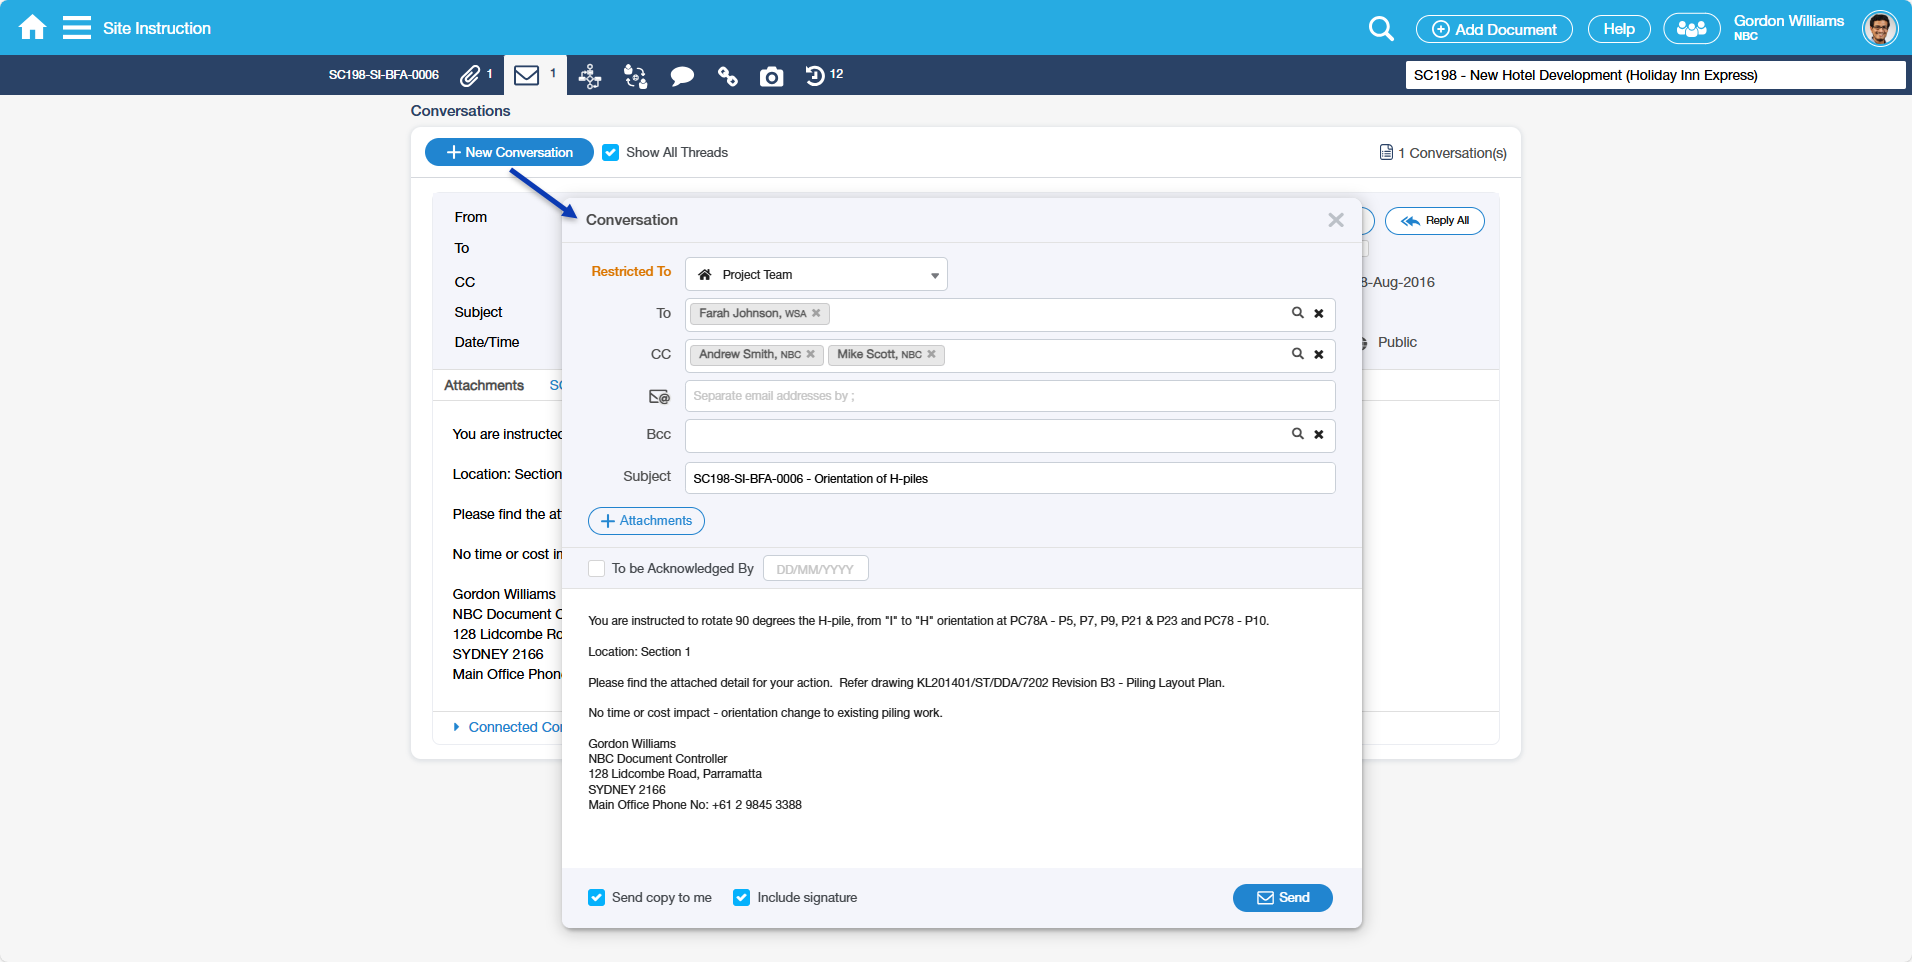
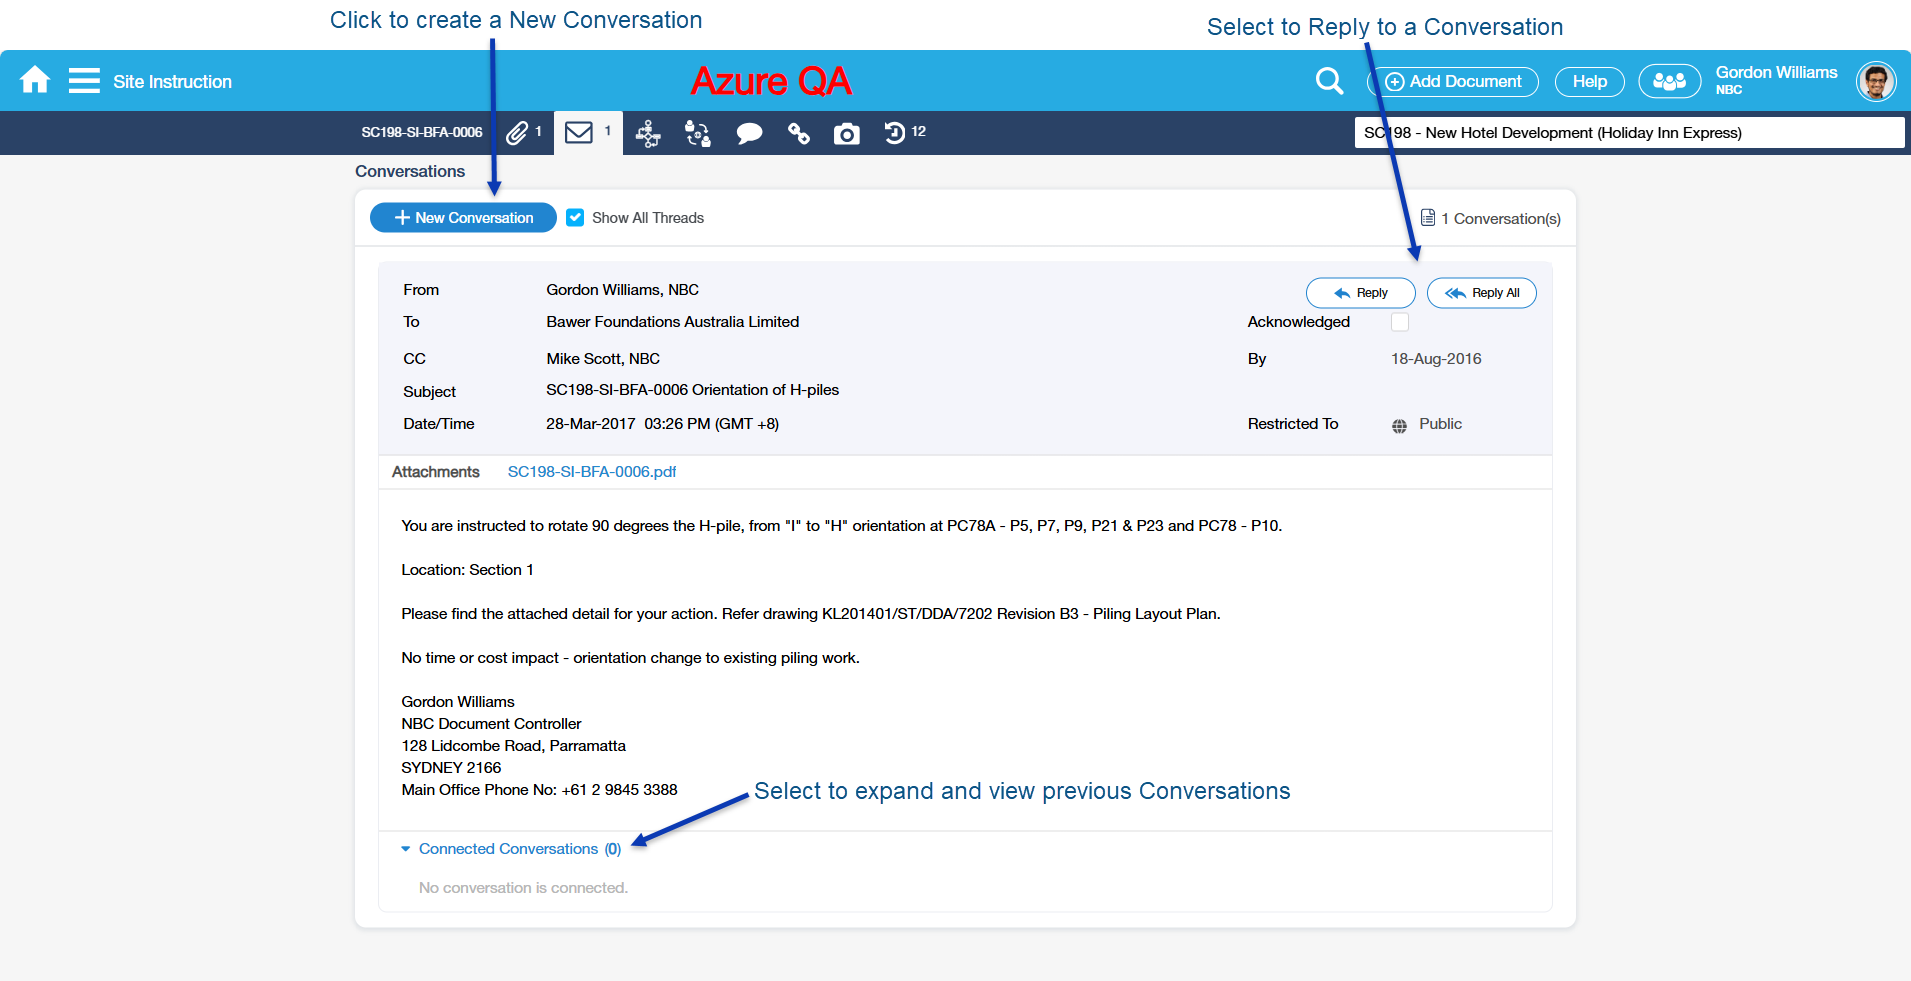
Add / Create a new Conversation by clicking the '+ New Conversations' button.
The New Conversation dialogue screen will auto-populate the 'Restricted To' to My Company when the Document is still not 'Published', however when already 'Published' the default will be set to Public.
Note - Email Content will default from the Remarks or Details field.
KEY - Privacy Settings
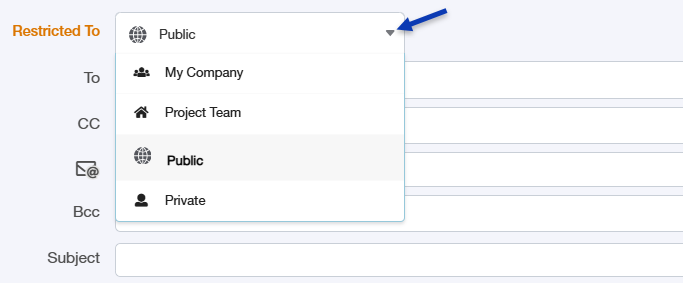
The privacy setting is key when creating a new Conversation or replying to an existing Conversation.
By default - it is my Company if a Document is Not Published; however, if a Document is already Published, the default value is set to Public.
When Restricted To is set to My Company, the only Users you can select will be from your Company. You have the following options once you select the Restricted To setting; you can only choose Users belonging to that set.
Note 1 - You can also choose Users outside the Project, BUT...
Note 2 - Users may receive the Conversation email but may not have permission to open the Document. This method allows you to inform others of the Conversation content without enabling access to the Register or specific Document.
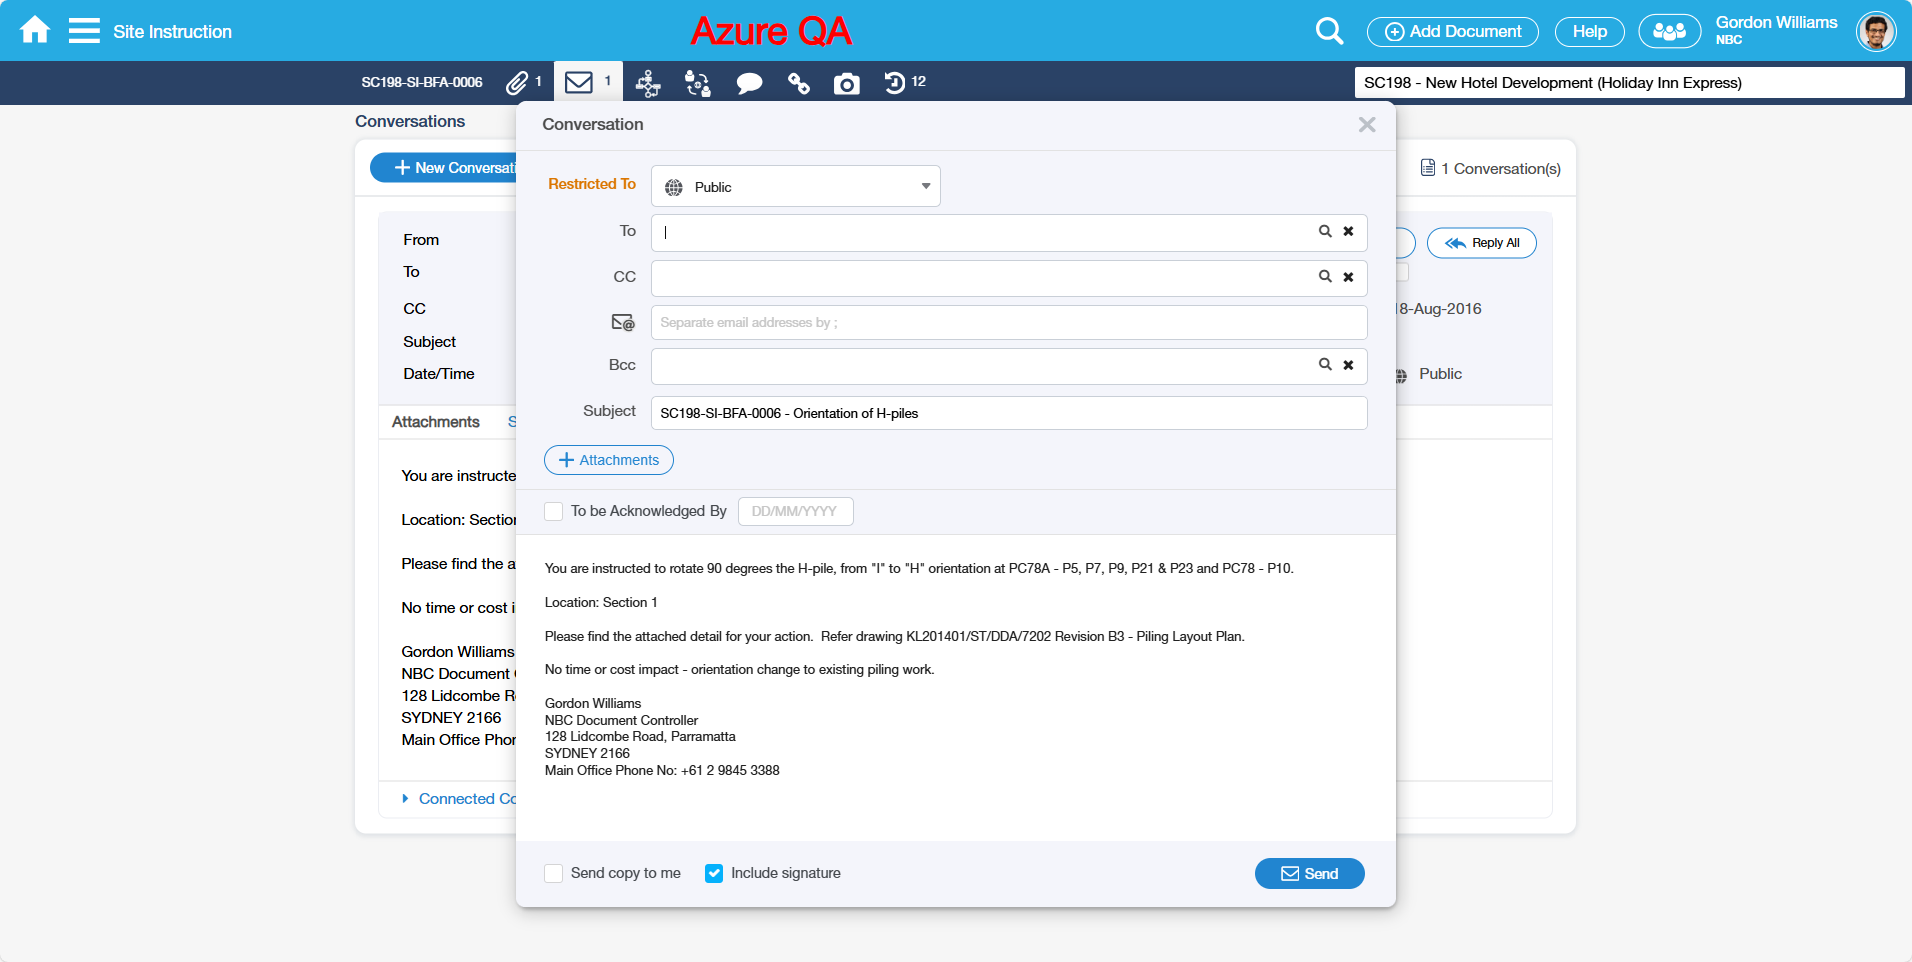
Screen Explanation
To, Cc, Bcc, and Additional Email Addresses fields
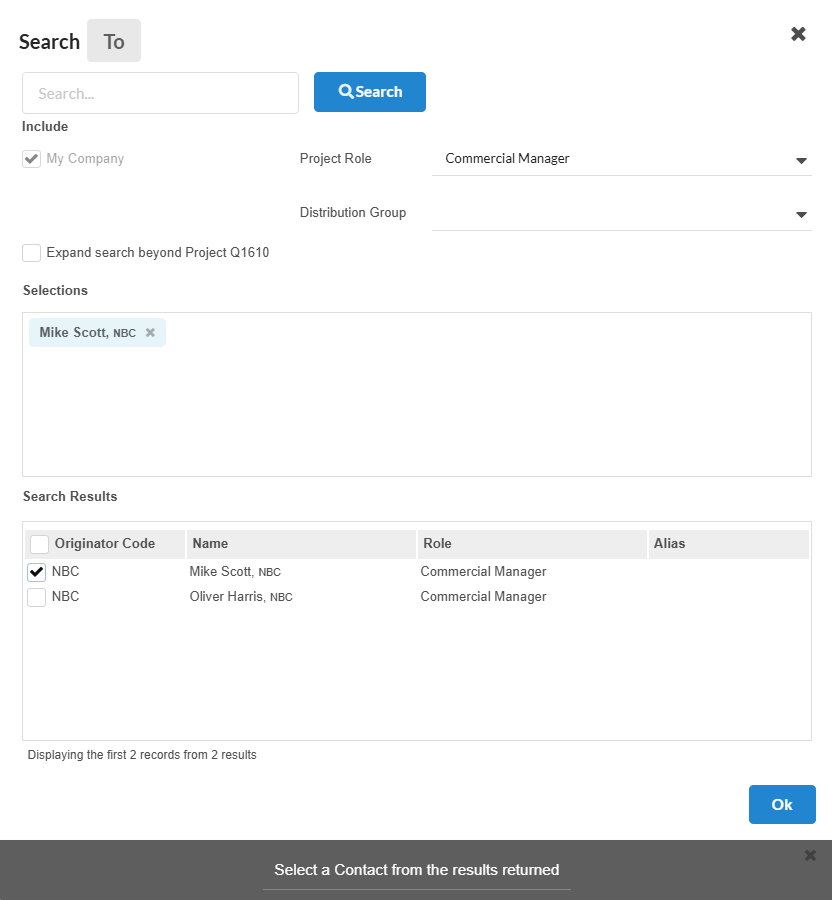
Sample showing Restricted To as Public list of Contacts - Project Team and Other Users checkboxes available
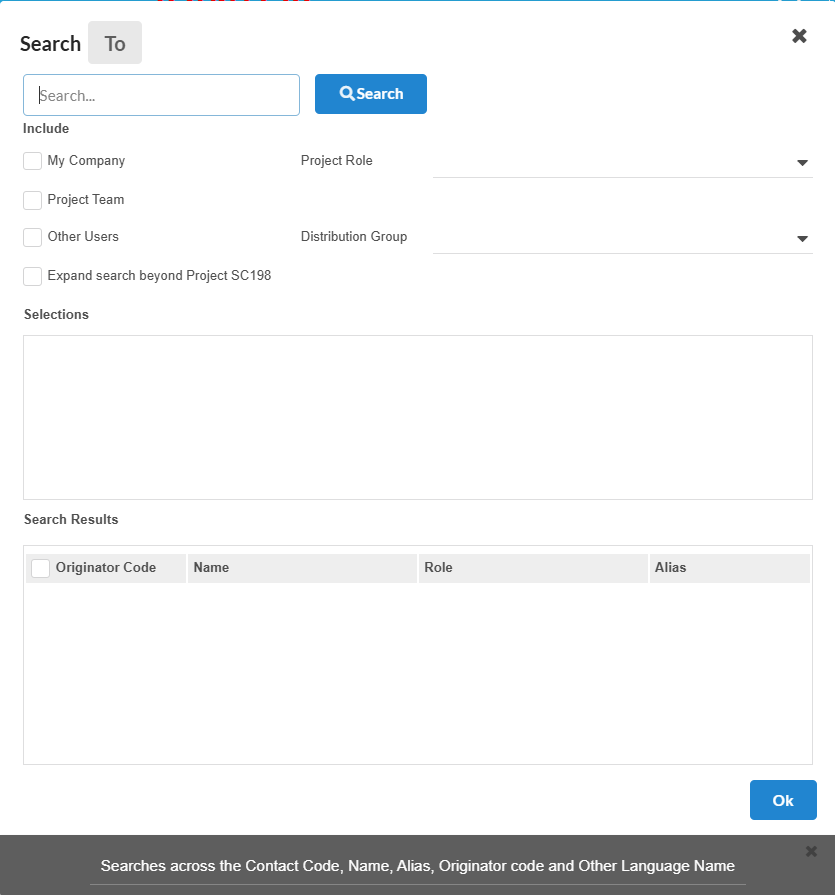
For Bcc, expand the field to enter the User or select by using the lookup.
For additional Email Addresses, also expand the field and manually enter the Email Address.

Field | Description |
|---|---|
To, Cc, Bcc | To, Cc and Bcc fields are multiple Users selection fields. You can select one or more Users by manually entering the field or by using the lookup. The Bcc field is hidden by default and can be displayed by clicking the Bcc button below the Cc field. |
Additional Email Addresses | This field is hidden by default and can be displayed by clicking the ‘Email’ icon right next to the Bcc field. |
Other Fields
- Subject
- Notification
- By (Date)
- Send copy to me
- Include Signature
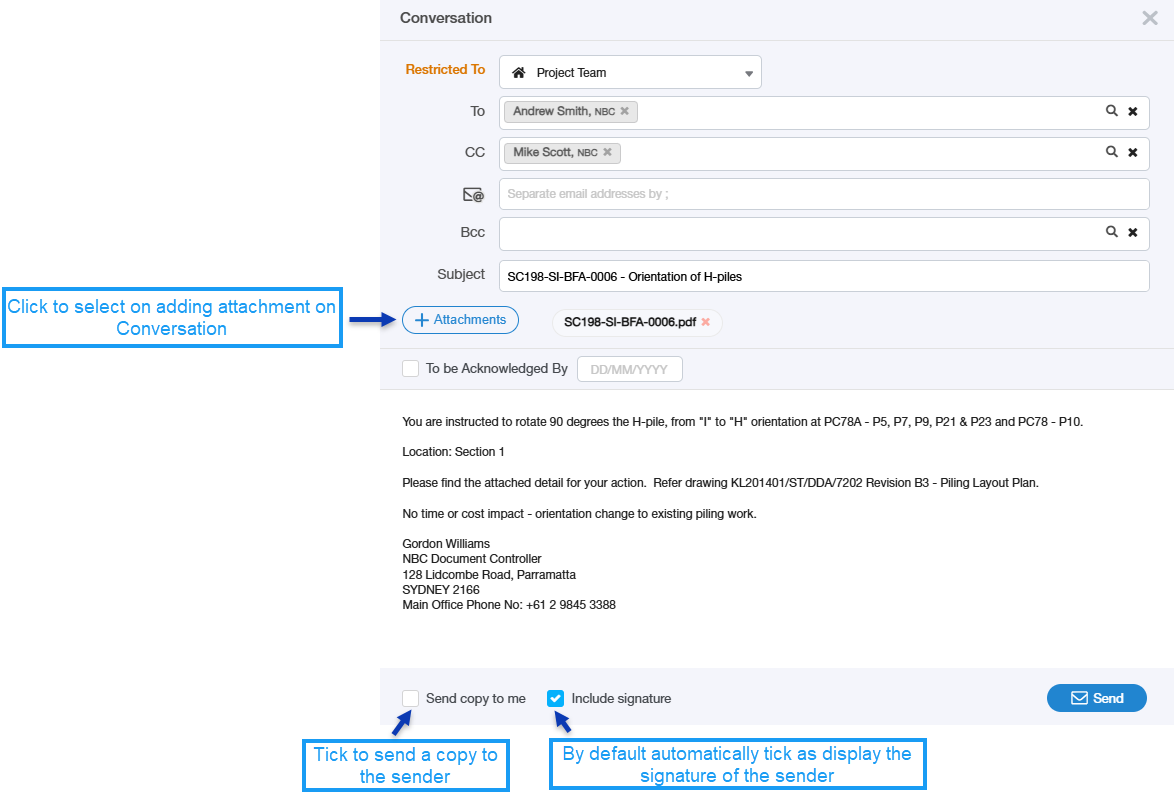
Field | Description |
|---|---|
| Restricted To | *** KEY field *** Restricted To option (Refer earlier Notes):
|
| Subject | Free text field to enter the description of the Conversation - defaults to Document subject. |
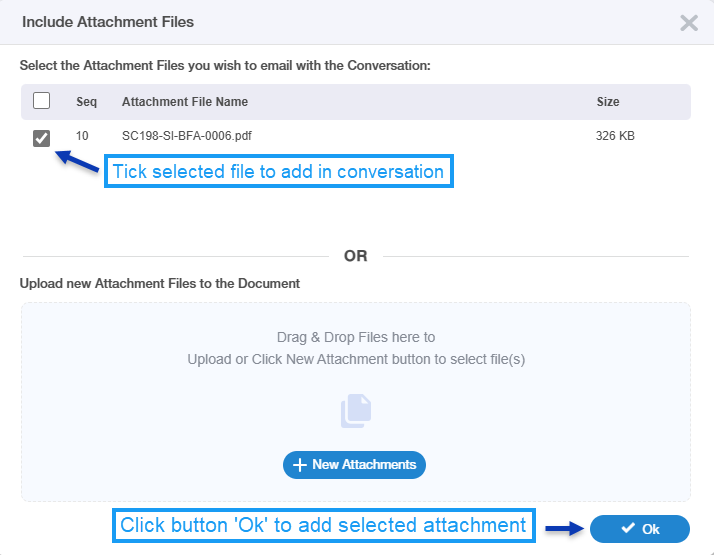
| Attachment | Use to include existing Attachment files or to upload a new file(s) on the Conversation. Any new files uploaded will be automatically saved on the Attachment Tab. |
| Notification checkbox | This checkbox will serve as a flag to determine if the Conversation is deemed a Notification for contract purposes and required to be acknowledged by the recipient(s). Notifications are displayed on TS - Today's Status 'Notifications' section. A red bell icon will appear on the Conversation. |
| By (Date) | This is the date the recipient(s) is required to acknowledge the receipt of the Notification. This is a mandatory field for Notifications. |
| Send copy to me checkbox | When this checkbox is ticked the sender of the Conversation also receives a copy of the Conversation via your normal email delivery (e.g. received on your phone, Outlook). |
| Include Signature checkbox | When this checkbox is ticked, a pre-configured signature block for the sender will automatically appear on the message body. This signature block can be set up using the right-hand menu, My Settings, Create Signature, and Conversations Signature. |
How Do I?
How Do I Add a New Conversation against a Document?
1. Select the '+ Conversations' option on the Action Bar |
|---|
Open the document you wish to add a Conversation. Select the Conversation tab and select the '+New Conversations' option. |
2. Enter the necessary details and required fields |
|
1. Select the Recipients you wish to email the Conversation controlled by 'Restricted To'. |
| 2. Edit the Conversation Subject. Email Subject will auto-populate from the Document Subject field. Note - option exists to include uploaded Attachment files, but it is a practice to be discouraged. Only use if you need to deliver the file with the Conversation email. |
3. To and Cc Contact fields will auto-populate from the Form Entry details where Users were in To, Cc and Users match the Restricted To setting for the Conversation. Note - Normal case is that Companies are only used in To & Cc and will not auto-populate - unless an individual User has been used in the Form Cc field. |
| 4. Email Content is auto-populated from the Remarks / Details field. Edit texts as needed. |
| 5. If the recipients are required to acknowledge the Conversation on or before a specified date, tick the Notifications checkbox and enter the By (date) field. |
| 6. Tick 'Send copy to me' if the sender wants a copy of the Conversation delivered to your email. Note - this is a useful feature for external party Users allowing Conversation email to be delivered to your company email system. |
| 7. Tick Include signature if the sender wishes to automatically display your signature block on the message body. |
How Do I Reply to a Conversation?
A - Replying in ENTERPRISE
1. Select the Reply or Reply All button |
|---|
|
1. On the document you wish to reply to a Conversation, select the Conversation tab and click the Reply (or the Reply All) button. Just like adding a new Conversation, the Conversation dialog will also open. You can drag and move this Conversation dialog for you to see the previous Conversation(s) underneath. When the User select Reply button, the To field will be defaulted with the Senders name (the one that appears on the From field); while, when Reply All is selected, the To field will be populated with the Sender's name and the Users on the To field; Users on the CC field stay the same. Note: Restricted To is set equal to the original Conversation setting. |
| 2. To continue the reply process. do the same steps as when adding a new Conversations - How Do I Add a New Conversation in Conversations Tab? |
| Note: This process (Reply & Reply All) can also be done via /wiki/spaces/AHG/pages/1340538924 and /wiki/spaces/AHG/pages/1340538926. |
B - Replying via Outlook
To reply via Outlook, ensure that the Conversation Email is retained on the To field for the email to synch back into ENTERPRISE.
Attachments added when replying via Outlook are captured and displayed also as Attachments against the corresponding Document.
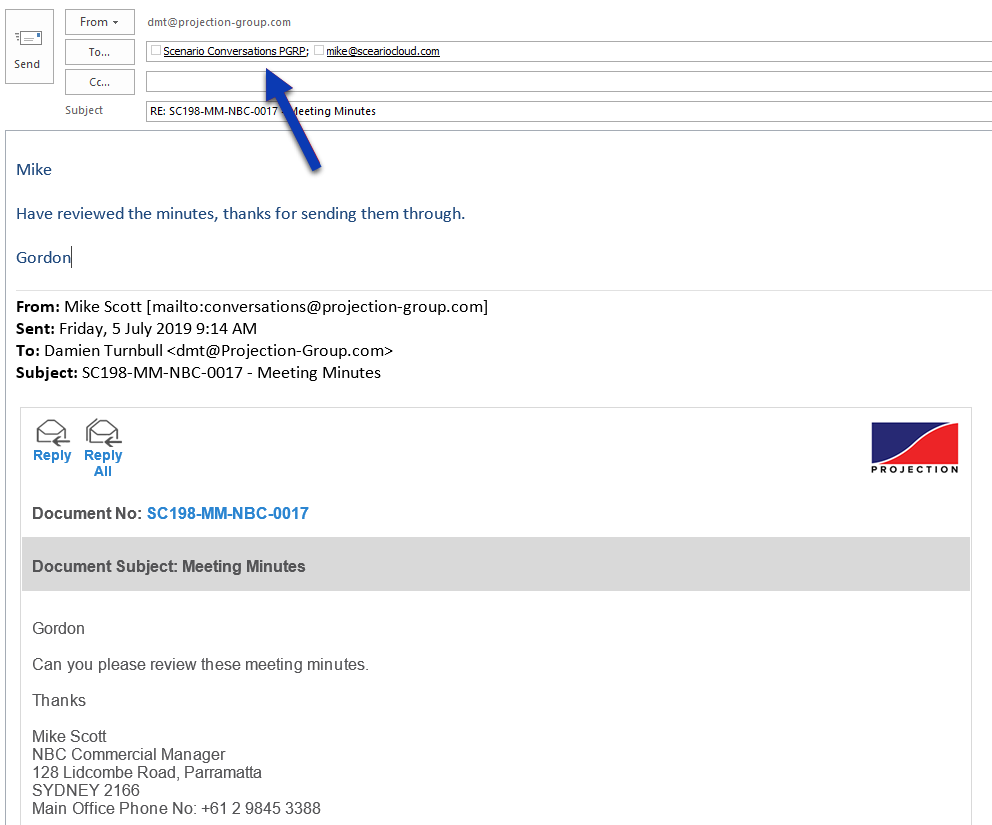
Note that this feature is only supported by Outlook on PC; therefore, when replying via Ipad or Android tablets, the Email messages and the attachments will not be synched into ENTERPRISE.
Additionally, only the response of the Authorised Users of the ENTERPRISE will reflect back into the system.
How Do I Attach Existing or New File(s) on the Conversation?
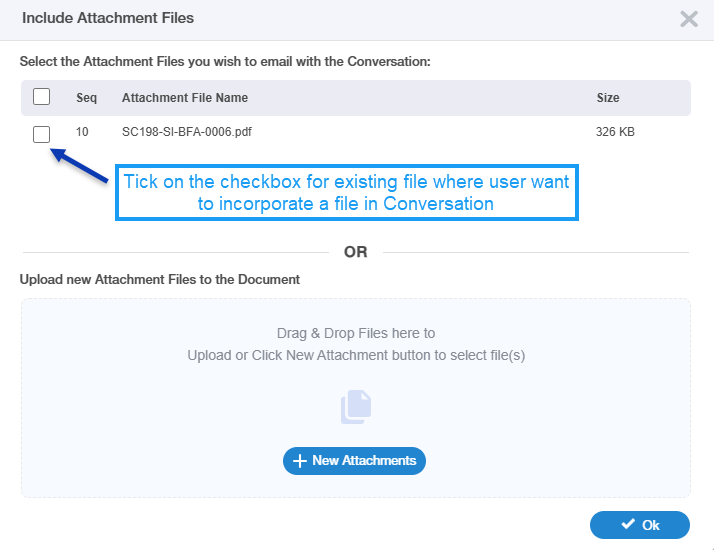
1. Click the Attachment icon (paperclip icon) on the New Conversations Dialog |
|---|
|
|
2. Add a file(s) to the Conversations |
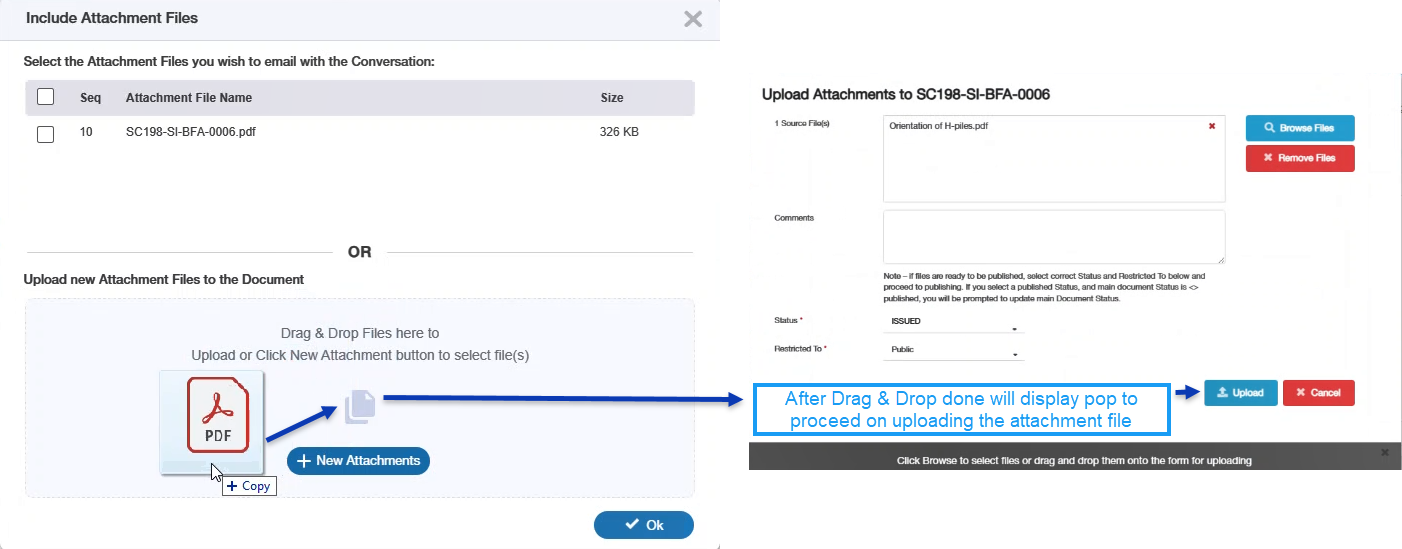
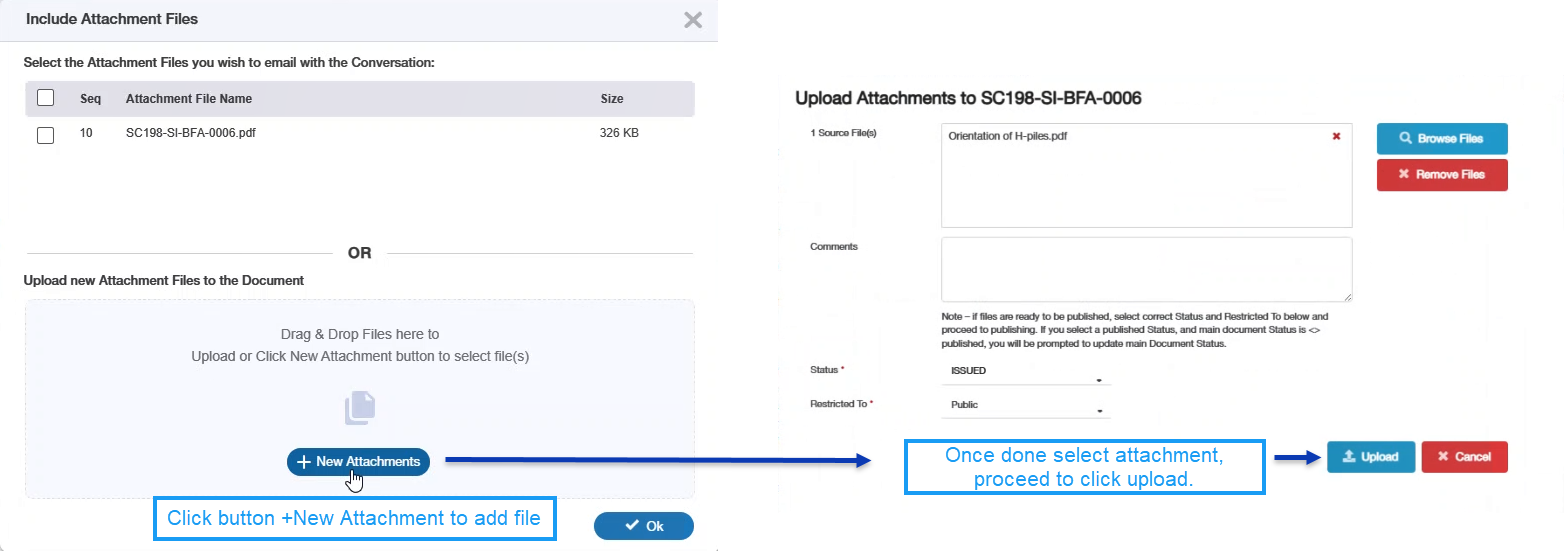
There are 3 ways files can be added to the Conversation:
|
2. Use the Drag and Drop functions. When the User uploads using drag & drop, the file must be on the space with the message where you intend to drop the attachment. |
3. Use the Upload button to attach new files |
3. Close the Attach Files pop-up screen |
|
Click the Ok button to close the pop-up and add the selected/uploaded file(s) on the Attachment field. |
Examples of Use
<insert examples of use here>


